

Chapter 1: What you need, and your first ten minutes #
What Runesmith is #
Runesmith is a non-traditional model. It turns the AI model you choose into a builder of real software. Give it a free model (Google AI Studio or NVIDIA), a paid one (Anthropic or OpenAI) or one you run yourself (Ollama or LM Studio), and Runesmith does the rest: it plans the work as a list of milestones, drafts each step, checks it on a throwaway copy of your folder, and keeps improving what it builds. It builds and improves software autonomously: once you have said what you want and what "done" means, it can carry on, step by step, without you, inside the folders you allow.
You stay in charge of how much it does alone. Out of the box it asks first: nothing of your project is written into your folder until you approve it (or until you switch on automatic apply), and everything it writes can be undone. The one thing it writes by itself is its own log, RUNESMITH.md (see "What to expect"). The rest of this manual shows, one switch and one recipe at a time, how to hand it more.
Runesmith adapts to your project, and only to your project. What it is told along the way (the reasons you give when you replace or withdraw checks, the checks you turn down, the decisions you make) is kept with the project and shapes what it does next there. It does not learn from other people's use of Runesmith.
Runesmith is open source, under the Apache License 2.0 (copyright AI ThinkLab).
What you need #
- A computer. Windows, macOS or Linux.
- Python 3.11 or newer. Nothing else is needed to open the Studio. If Python isn't installed, the launcher tells you; on Windows and macOS it also opens the download page for you (on Linux, open the link yourself:
https://www.python.org/downloads/). On Windows, tick "Add python.exe to PATH" during the install.
- A model, if you want Runesmith to plan or write anything. You don't need one to start: without a model, Runesmith still maps your folder and shows you around, it just can't plan or draft until you add one. When you're ready, there are four ways, from least to most setup:
- None. Look around, nothing more, for now.
- A model already on your computer. If Ollama, LM Studio or llama.cpp is running, Runesmith finds it by itself (tested with stand-ins so far; tell us how it goes). Free, and nothing leaves your computer.
- An API key. Google AI Studio (Gemini) and NVIDIA (many models with a free endpoint, among them Nemotron and Kimi) both have free tiers, and so do OpenRouter (many of its models are free), Groq and Mistral. Others are paid (OpenAI, Anthropic, DeepSeek, Together AI) — pick one of those only if you already have a key. Any OpenAI-compatible endpoint (a server you run, or a company gateway) works too. Free limits change, so Chapter 4 says what to check. Before you build with one free Google key, know this: a free Gemini key allows about 20 requests a day for each model (your own AI Studio shows the exact figure), and one milestone can use that up. Runesmith sets up several free Gemini models on the one key and uses them in turn; for building comfortably, add a second free provider as well (Groq is the one we suggest); the chat window (way 4) needs no key at all.
- A chat window you already use. No key, nothing to install. Runesmith shows you what to say; you copy it into ChatGPT, Claude, Gemini or whatever you already have open, and paste the reply back. This is the fastest way to start with nothing, and the one this chapter walks through.
- pytest, only sometimes. It's needed if you want Runesmith to find and fix failing tests in a Python project you already have (install it with
python -m pip install pytest). It is also needed for the command-line demo. Building something new from an empty folder — planning it, drafting the first files, checking them — does not need it: the Studio checks a draft's own tests with Python's built-in unittest, not pytest.
What to expect #
- Results depend on the model. Larger models plan and write better. Small models do best on small, checked steps. There is no minimum model size to promise you.
- Free tiers have limits. When a model is busy or at its limit, a round waits or moves on to the next model you listed for that role. A free key allows only so many requests an hour and a day, and Runesmith does not spend them on retrying: when a service says it is at its limit, Runesmith says until when and leaves it alone until then. A second free key from another provider (Chapter 4) lets work go on meanwhile. One free Google key is the clearest case. Google counted about 20 requests a day for each model in a real first run (and a busy answer counted too), so one milestone can use a model's day up. So when you save a Gemini key, Runesmith also sets up the next free Gemini models on that same key (you do not type it again) and moves to the next one the moment a model is used up. It counts what each has used ("about 3 of 20 used today", on the model's row and on the Overview) and leaves a used-up model alone until Google's day ends, at midnight on the US Pacific coast. For building comfortably, add a second free provider (Groq is the one we suggest). With no key at all, a chat window works too.
- A file called
RUNESMITH.md appears in your folder. Runesmith writes it by itself, when you first plan, and adds one plain line for each thing it does: a milestone done, a build applied, checks you approved, which model wrote code. It never holds a prompt, an answer, a file's contents or a key, and models never read it. It is Runesmith's own log, not part of your project: leave it, or switch it off under Settings ("Keep a RUNESMITH.md in this folder"), and it is never created or changed again.
- Your code and goals go to the model you choose. With a model on a provider's servers, your goals and your project's code are sent to that provider: read its terms. With a model on your own computer, nothing leaves it.
- Checking runs your project's own code, on a throwaway copy of the folder. The copy is not a security boundary, so use Runesmith on code you trust.
Starting Runesmith #
-
Find the launcher for your system: Runesmith.cmd on Windows, Runesmith.command on macOS, or runesmith.sh on Linux. All three are in the Runesmith folder you unzipped or cloned.
-
Start it:
- Windows: double-click
Runesmith.cmd. To work in a folder you already made, drag that folder onto it.
- macOS: open Terminal in the Runesmith folder and run
sh Runesmith.command.
- Linux: open a terminal in the Runesmith folder and run
sh runesmith.sh.
- macOS or Linux, working in a folder you already made: add its path:
sh runesmith.sh path/to/folder.
- Any system:
python -m runesmith up path/to/folder from the Runesmith folder (python3 on macOS and Linux). If you installed Runesmith once with pip install ., run runesmith inside any folder instead.
To double-click the launcher on macOS or Linux, first make it executable: chmod +x Runesmith.command runesmith.sh. With no folder given, the launcher reopens the folder you used last time.
-
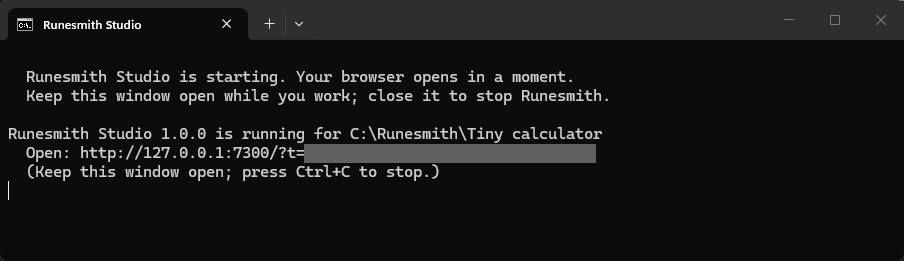
A small window opens and prints:
Runesmith Studio is starting. Your browser opens in a moment.
Keep this window open while you work; close it to stop Runesmith.
Under those two lines the window also says which folder Runesmith opened and prints the private address it gives your browser; your browser opens it for you, so you do not have to copy it.
(On macOS and Linux, the second line reads "press Ctrl+C to stop" instead — same idea: this window is Runesmith running.)
-
Your browser opens on its own, a moment later, at a private address such as http://127.0.0.1:7300/?t= followed by a long string of letters and numbers. That string is a one-time key. Don't share it or type it into anything else; it's what proves to Runesmith that this browser is you.
-
If you gave no folder and this is the first time you've opened Runesmith, it creates a folder called "My first project" inside a "Runesmith" folder in your home folder, and opens that. It's empty, which is exactly what the rest of this chapter uses.
"Runesmith Studio is locked" #
https://www.python.org/downloads/). On Windows, tick "Add python.exe to PATH" during the install.- None. Look around, nothing more, for now.
- A model already on your computer. If Ollama, LM Studio or llama.cpp is running, Runesmith finds it by itself (tested with stand-ins so far; tell us how it goes). Free, and nothing leaves your computer.
- An API key. Google AI Studio (Gemini) and NVIDIA (many models with a free endpoint, among them Nemotron and Kimi) both have free tiers, and so do OpenRouter (many of its models are free), Groq and Mistral. Others are paid (OpenAI, Anthropic, DeepSeek, Together AI) — pick one of those only if you already have a key. Any OpenAI-compatible endpoint (a server you run, or a company gateway) works too. Free limits change, so Chapter 4 says what to check. Before you build with one free Google key, know this: a free Gemini key allows about 20 requests a day for each model (your own AI Studio shows the exact figure), and one milestone can use that up. Runesmith sets up several free Gemini models on the one key and uses them in turn; for building comfortably, add a second free provider as well (Groq is the one we suggest); the chat window (way 4) needs no key at all.
- A chat window you already use. No key, nothing to install. Runesmith shows you what to say; you copy it into ChatGPT, Claude, Gemini or whatever you already have open, and paste the reply back. This is the fastest way to start with nothing, and the one this chapter walks through.
python -m pip install pytest). It is also needed for the command-line demo. Building something new from an empty folder — planning it, drafting the first files, checking them — does not need it: the Studio checks a draft's own tests with Python's built-in unittest, not pytest.- Results depend on the model. Larger models plan and write better. Small models do best on small, checked steps. There is no minimum model size to promise you.
- Free tiers have limits. When a model is busy or at its limit, a round waits or moves on to the next model you listed for that role. A free key allows only so many requests an hour and a day, and Runesmith does not spend them on retrying: when a service says it is at its limit, Runesmith says until when and leaves it alone until then. A second free key from another provider (Chapter 4) lets work go on meanwhile. One free Google key is the clearest case. Google counted about 20 requests a day for each model in a real first run (and a busy answer counted too), so one milestone can use a model's day up. So when you save a Gemini key, Runesmith also sets up the next free Gemini models on that same key (you do not type it again) and moves to the next one the moment a model is used up. It counts what each has used ("about 3 of 20 used today", on the model's row and on the Overview) and leaves a used-up model alone until Google's day ends, at midnight on the US Pacific coast. For building comfortably, add a second free provider (Groq is the one we suggest). With no key at all, a chat window works too.
- A file called
RUNESMITH.mdappears in your folder. Runesmith writes it by itself, when you first plan, and adds one plain line for each thing it does: a milestone done, a build applied, checks you approved, which model wrote code. It never holds a prompt, an answer, a file's contents or a key, and models never read it. It is Runesmith's own log, not part of your project: leave it, or switch it off under Settings ("Keep a RUNESMITH.md in this folder"), and it is never created or changed again. - Your code and goals go to the model you choose. With a model on a provider's servers, your goals and your project's code are sent to that provider: read its terms. With a model on your own computer, nothing leaves it.
- Checking runs your project's own code, on a throwaway copy of the folder. The copy is not a security boundary, so use Runesmith on code you trust.
Starting Runesmith #
-
Find the launcher for your system: Runesmith.cmd on Windows, Runesmith.command on macOS, or runesmith.sh on Linux. All three are in the Runesmith folder you unzipped or cloned.
-
Start it:
- Windows: double-click
Runesmith.cmd. To work in a folder you already made, drag that folder onto it.
- macOS: open Terminal in the Runesmith folder and run
sh Runesmith.command.
- Linux: open a terminal in the Runesmith folder and run
sh runesmith.sh.
- macOS or Linux, working in a folder you already made: add its path:
sh runesmith.sh path/to/folder.
- Any system:
python -m runesmith up path/to/folder from the Runesmith folder (python3 on macOS and Linux). If you installed Runesmith once with pip install ., run runesmith inside any folder instead.
To double-click the launcher on macOS or Linux, first make it executable: chmod +x Runesmith.command runesmith.sh. With no folder given, the launcher reopens the folder you used last time.
-
A small window opens and prints:
Runesmith Studio is starting. Your browser opens in a moment.
Keep this window open while you work; close it to stop Runesmith.
Under those two lines the window also says which folder Runesmith opened and prints the private address it gives your browser; your browser opens it for you, so you do not have to copy it.
(On macOS and Linux, the second line reads "press Ctrl+C to stop" instead — same idea: this window is Runesmith running.)
-
Your browser opens on its own, a moment later, at a private address such as http://127.0.0.1:7300/?t= followed by a long string of letters and numbers. That string is a one-time key. Don't share it or type it into anything else; it's what proves to Runesmith that this browser is you.
-
If you gave no folder and this is the first time you've opened Runesmith, it creates a folder called "My first project" inside a "Runesmith" folder in your home folder, and opens that. It's empty, which is exactly what the rest of this chapter uses.
"Runesmith Studio is locked" #
Find the launcher for your system: Runesmith.cmd on Windows, Runesmith.command on macOS, or runesmith.sh on Linux. All three are in the Runesmith folder you unzipped or cloned.
Start it:
- Windows: double-click
Runesmith.cmd. To work in a folder you already made, drag that folder onto it. - macOS: open Terminal in the Runesmith folder and run
sh Runesmith.command. - Linux: open a terminal in the Runesmith folder and run
sh runesmith.sh. - macOS or Linux, working in a folder you already made: add its path:
sh runesmith.sh path/to/folder. - Any system:
python -m runesmith up path/to/folderfrom the Runesmith folder (python3on macOS and Linux). If you installed Runesmith once withpip install ., runrunesmithinside any folder instead.
To double-click the launcher on macOS or Linux, first make it executable: chmod +x Runesmith.command runesmith.sh. With no folder given, the launcher reopens the folder you used last time.
A small window opens and prints:
Runesmith Studio is starting. Your browser opens in a moment. Keep this window open while you work; close it to stop Runesmith.
Under those two lines the window also says which folder Runesmith opened and prints the private address it gives your browser; your browser opens it for you, so you do not have to copy it.
(On macOS and Linux, the second line reads "press Ctrl+C to stop" instead — same idea: this window is Runesmith running.)
Your browser opens on its own, a moment later, at a private address such as http://127.0.0.1:7300/?t= followed by a long string of letters and numbers. That string is a one-time key. Don't share it or type it into anything else; it's what proves to Runesmith that this browser is you.
If you gave no folder and this is the first time you've opened Runesmith, it creates a folder called "My first project" inside a "Runesmith" folder in your home folder, and opens that. It's empty, which is exactly what the rest of this chapter uses.
If you ever open Runesmith's address and see the Runesmith logo with the words "Runesmith Studio is locked", this is what it means and what to do.
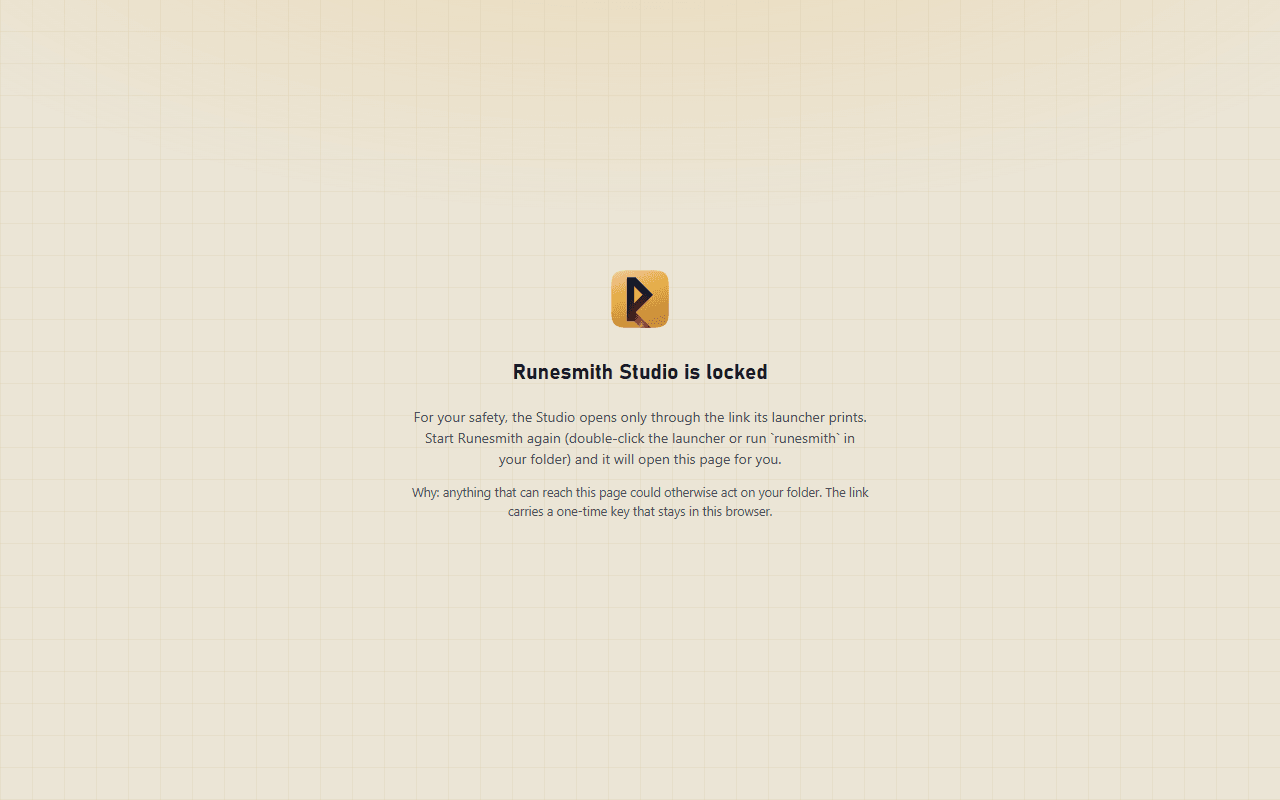
You'll see this if you reach the page without the link the launcher just gave you — for example, by typing the plain address yourself, opening it in a different browser or a private window, or reopening an old bookmark after Runesmith has been closed and started again (every start prints a fresh link). The page explains why:
For your safety, the Studio opens only through the link its launcher prints. Start Runesmith again (double-click the launcher or run
runesmithin your folder) and it will open this page for you. Why: anything that can reach this page could otherwise act on your folder. The link carries a one-time key that stays in this browser.
What to do: go back to the launcher's console window.
- If it's still open and running, it already printed the working link — use that one.
- If you closed it, start the launcher again. If Runesmith is still running underneath, it prints "Runesmith Studio is already open for …" with a working link and opens it for you; if not, it starts fresh with a new one.
The introduction #
The first time you open a folder, Runesmith plays a short animated introduction before showing you the Studio itself — about half a minute if you let it run, or a few seconds if you skip it.

-
Watch, or skip ahead: press Space (or the right arrow) to move to the next scene, or click Skip intro in the top corner to jump straight to the end.
-
The scenes show, in turn: a spark; the forge; a map of your folder (or, for an empty one, a plain note that it's a blank canvas); Runesmith's own kernel and organs; how it works under guard (throwaway copies, a held-out judge, you decide); how it earned the right to improve itself; and the different kinds of "mind" it can wear.
-
It ends on one screen: "What will you create?"
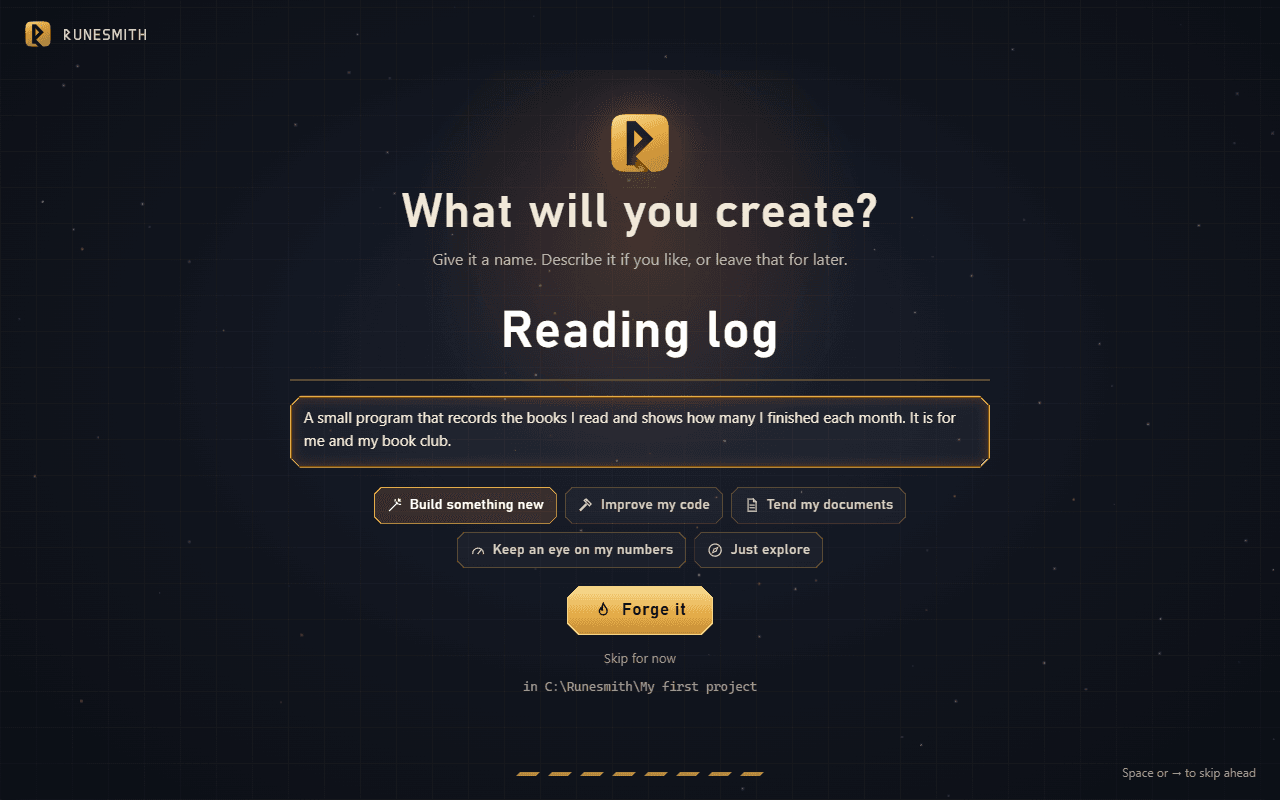
- Type a name for what you're building, in the box at the top.
- Underneath, say what it should do and who it's for, if you feel like it — you can leave this for later.
- Pick one of the five buttons below that: Build something new, Improve my code, Tend my documents, Keep an eye on my numbers, or Just explore. Runesmith already selects one for you from what it found in your folder — Build something new for an empty folder, Keep an eye on my numbers if it found report files, and so on — click a different one if that's not right.
- Click Forge it.
(If you'd rather decide all this later, click Skip for now instead. Runesmith still opens, named after the folder itself, and you can add a description from Goals & plan's Brief card whenever you like. To rename the workspace itself later, use Settings → Behaviour → Name, not Goals & plan.)
Two of the five are worth knowing about before you click: Just explore and Keep an eye on my numbers both switch Runesmith straight into its "just look" mode — mapping and reporting only, asking no model, changing nothing — until you tell it otherwise (Just explore reports this on the Overview as "You chose to just look."; Keep an eye on my numbers shows its own line about your numbers there instead). The other three leave it free to plan and propose changes once you've added a model.
Whatever you typed as a description becomes both your workspace's first goal and the start of its brief — Runesmith already has something to work from when you reach Goals & plan.
Your first choices, on the Overview #
After the introduction, you land on the Overview — the page that always shows what's happening and the one thing to do next.
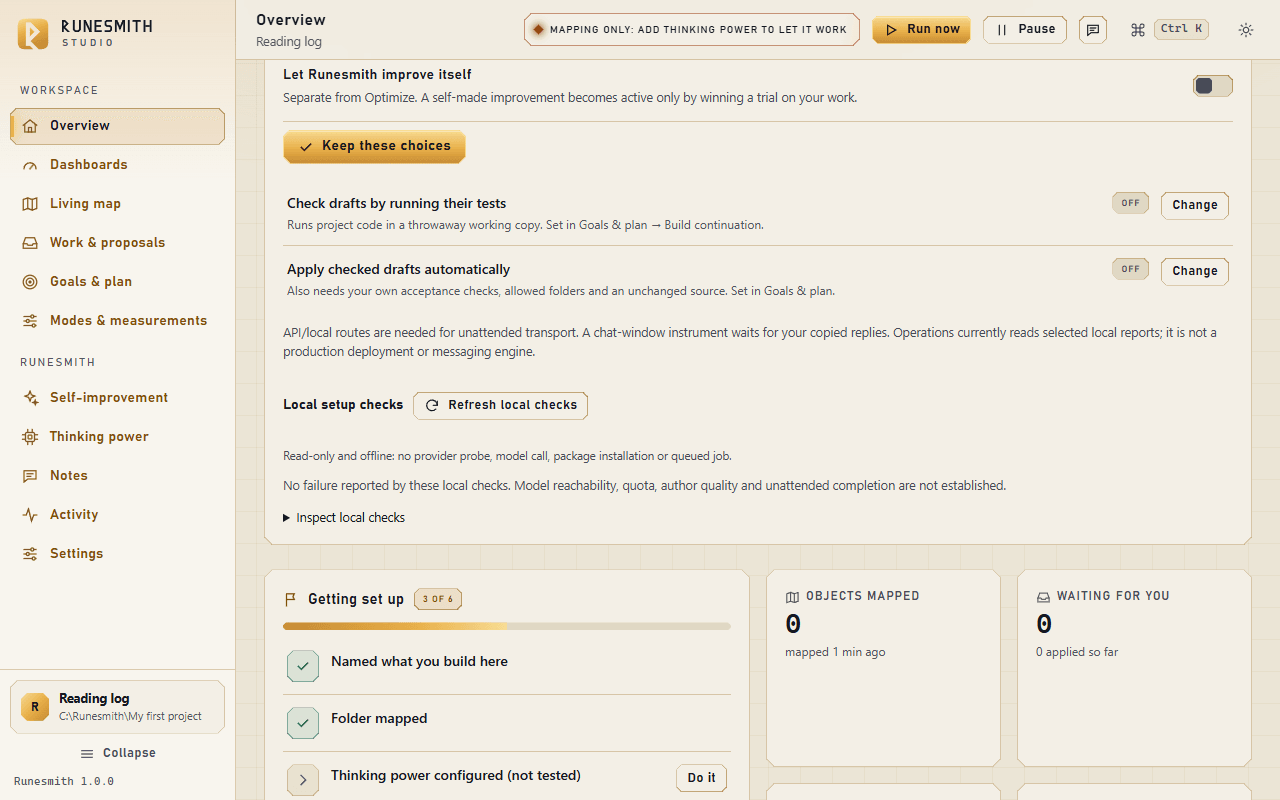
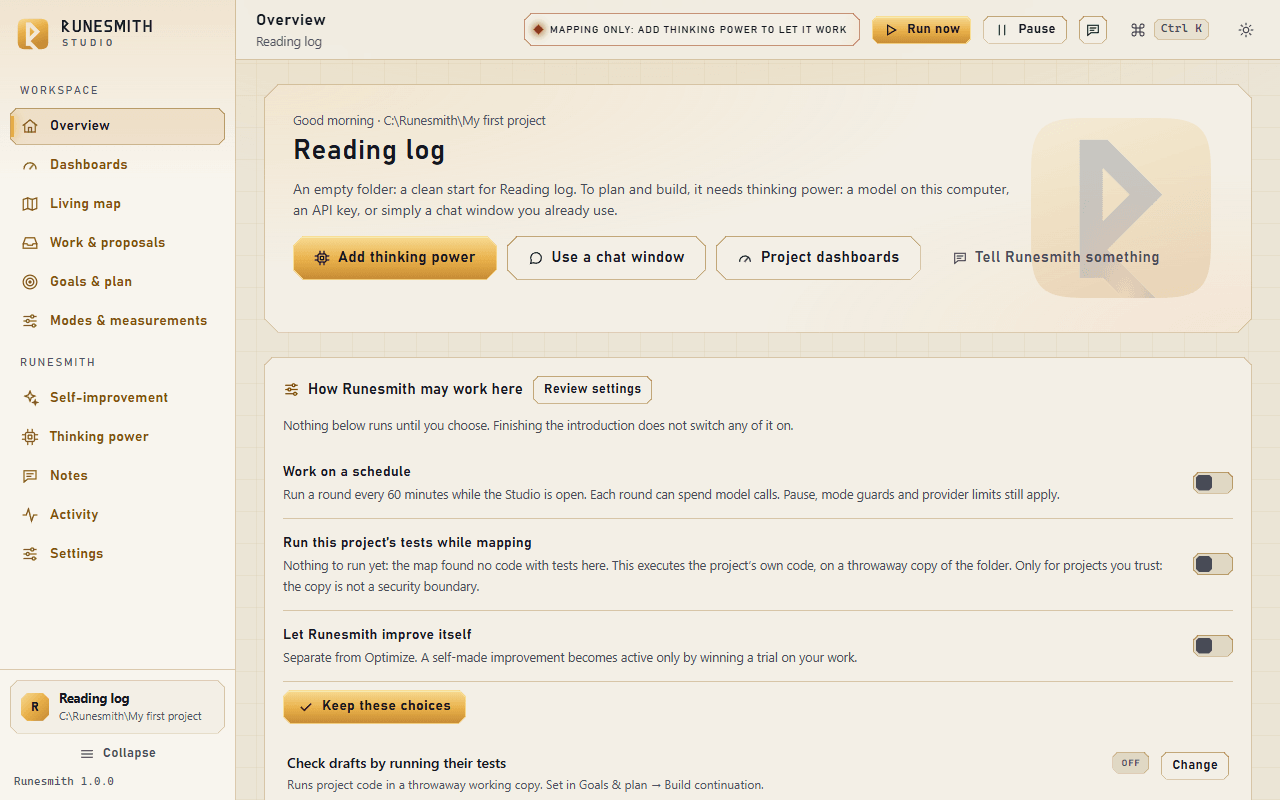
Near the top is a Getting set up checklist with six boxes. One is already ticked the moment you land here: "Named what you build here" tracks finishing the introduction itself, not whether you actually typed a name, so it is done whether you clicked "Forge it" or "Skip for now". "Goals or a brief written" is different: it only ticks if you typed a description on the "What will you create?" screen, since that description becomes your brief and first goal. The rest tick themselves as Runesmith finishes mapping your folder and as you make the choices below. The six are: "Named what you build here", "Folder mapped", "Thinking power configured (not tested)", "Chose how Runesmith may work here", "Goals or a brief written", and "Work history recorded (not a success verdict)".
Below that (or reachable from the checklist's "Do it" button) is a card called "How Runesmith may work here". This is where you decide what Runesmith is allowed to do on its own, before anything runs. It says plainly: "Nothing below runs until you choose. Finishing the introduction does not switch any of it on." Three switches, all off to start:
- "Work on a schedule." With this on, Runesmith works by itself every so often (every 60 minutes, unless you change it) while the Studio is open, spending model calls each time. Leave it off if you'd rather ask for each step yourself.
- "Run this project’s tests while mapping." This runs your project's own code, on a throwaway copy, to see whether its tests pass. If your folder is still empty, the card says so plainly: "Nothing to run yet: the map found no code with tests here." — there's nothing to turn on yet either way.
- "Let Runesmith improve itself." A separate matter from your own project: with this on, Runesmith may try to improve its own code, but any change it makes only starts working once it wins a trial on your own work.
You don't have to turn any of these on to get started. If you're happy leaving all three off for now, click "Keep these choices" — it records that you looked, without switching anything on. (If you do flip a switch, that choice saves itself immediately, and the "Keep these choices" button disappears — there's nothing more to click.) You can change any of this later from the same card, or from Settings.
One complete first success: an empty folder to written files #
This is the whole path, from nothing to a working first file, using the free option that needs no key at all: a chat window you already use.
-
On the Overview, click "Use a chat window" (next to "Add thinking power", in the hero card near the top). This sets up a chat-window "model" with one click — no name to choose, no key to paste — and takes you straight to Goals & plan.
(If you'd rather use a model on your computer or an API key instead, click "Add thinking power" and pick one of the other two ways. The rest of these steps work the same either way, except you won't need to copy and paste anything by hand. If the key is a free Google one, read the note the dialog shows before the key box: a free Gemini key allows about 20 requests a day for each model, Runesmith sets up several free Gemini models on it to use in turn, and a second free provider (Groq) is what lets you build comfortably.)
-
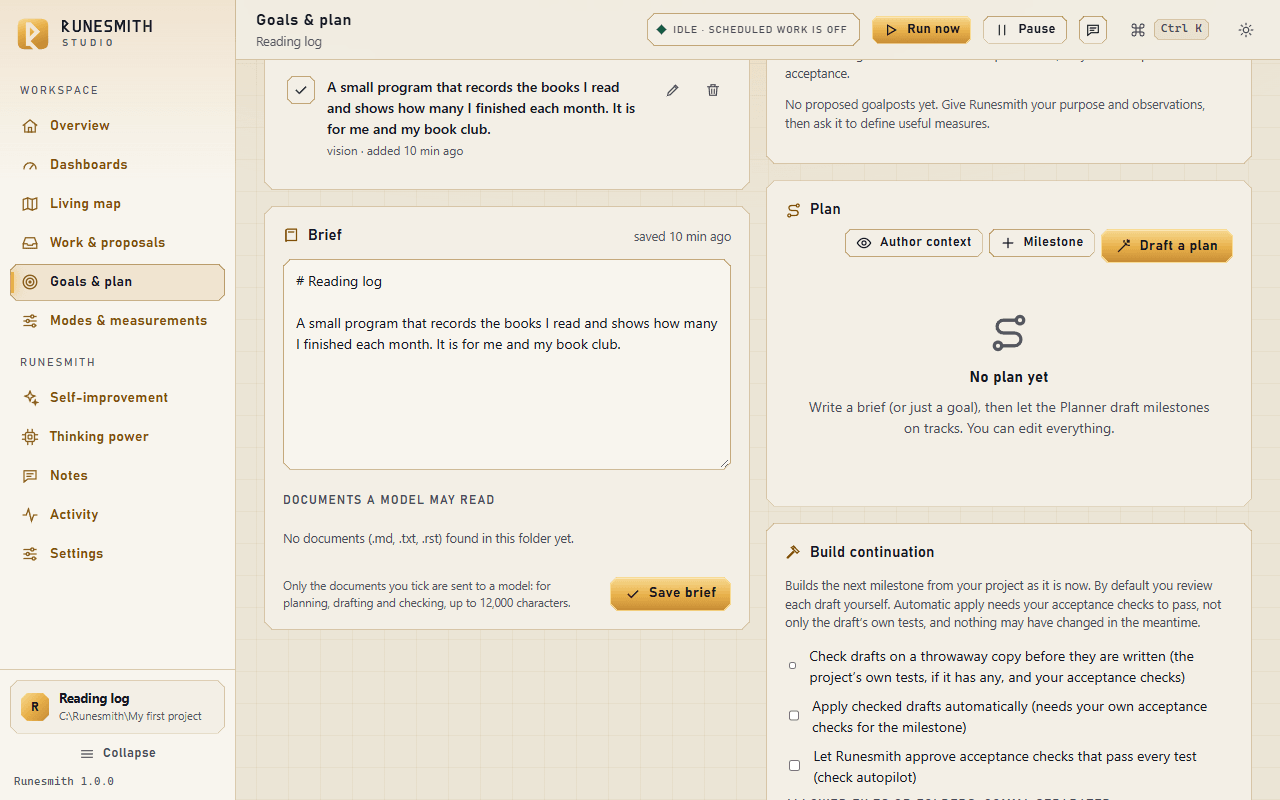
On Goals & plan, click "Draft a plan".
-
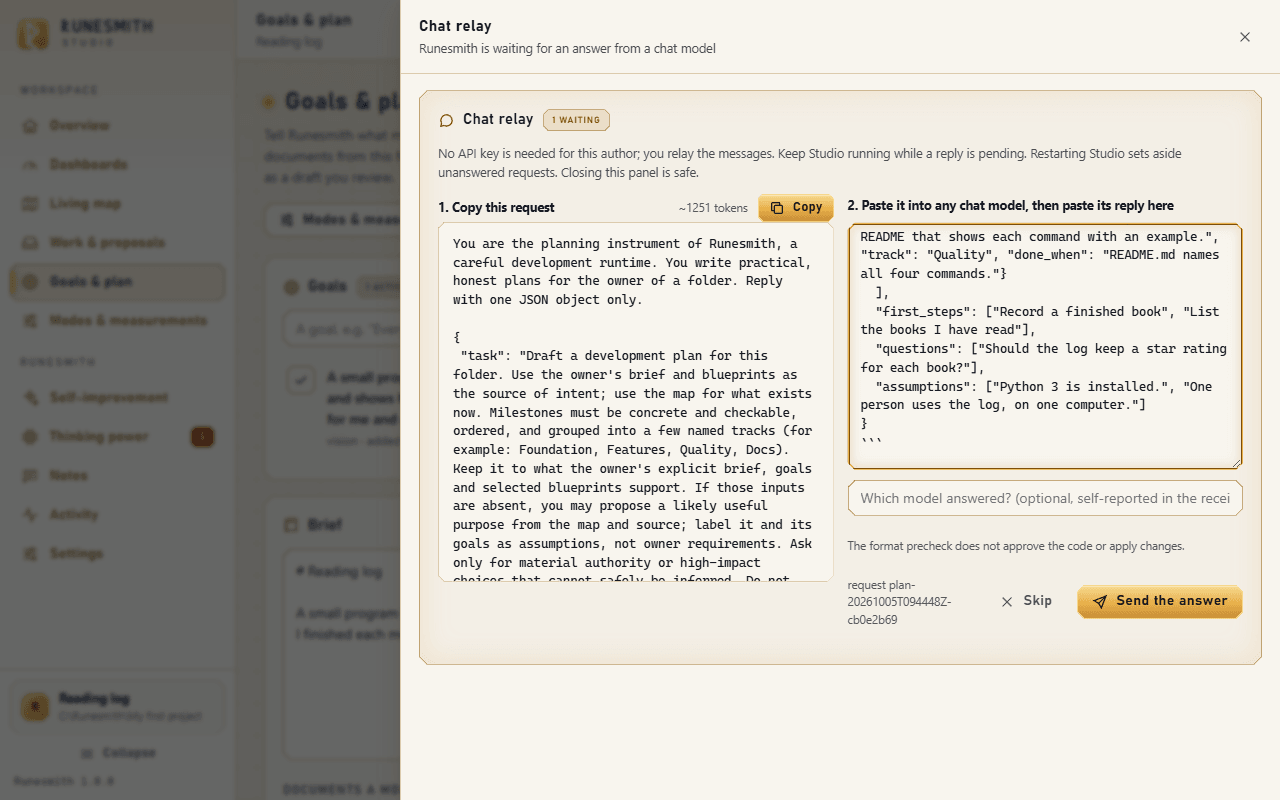
Runesmith now needs your help to relay one request. A message appears — "Runesmith needs you: a request is ready to relay to your chat model." — with a button, "Open the relay". Click it. (You can also open it any time from the status pill in the top bar, which now says "Needs you: 1 request to relay to a chat model".)
-
In the Chat relay panel that opens: under "1. Copy this request", click Copy.
-
Paste what you copied into the chat window you use (ChatGPT, Claude, Gemini, or whichever you have), and let it answer.
-
Back in Runesmith, paste the model's whole reply into the box under "2. Paste it into any chat model, then paste its reply here", then click "Send the answer".
-
Your plan appears on Goals & plan, broken into milestones. Find the first one and click "Draft first files" next to it.
-
This asks another question of your chat model. Repeat steps 3–6: open the relay, copy the request, paste it into your chat, paste the reply back, and click "Send the answer".
-
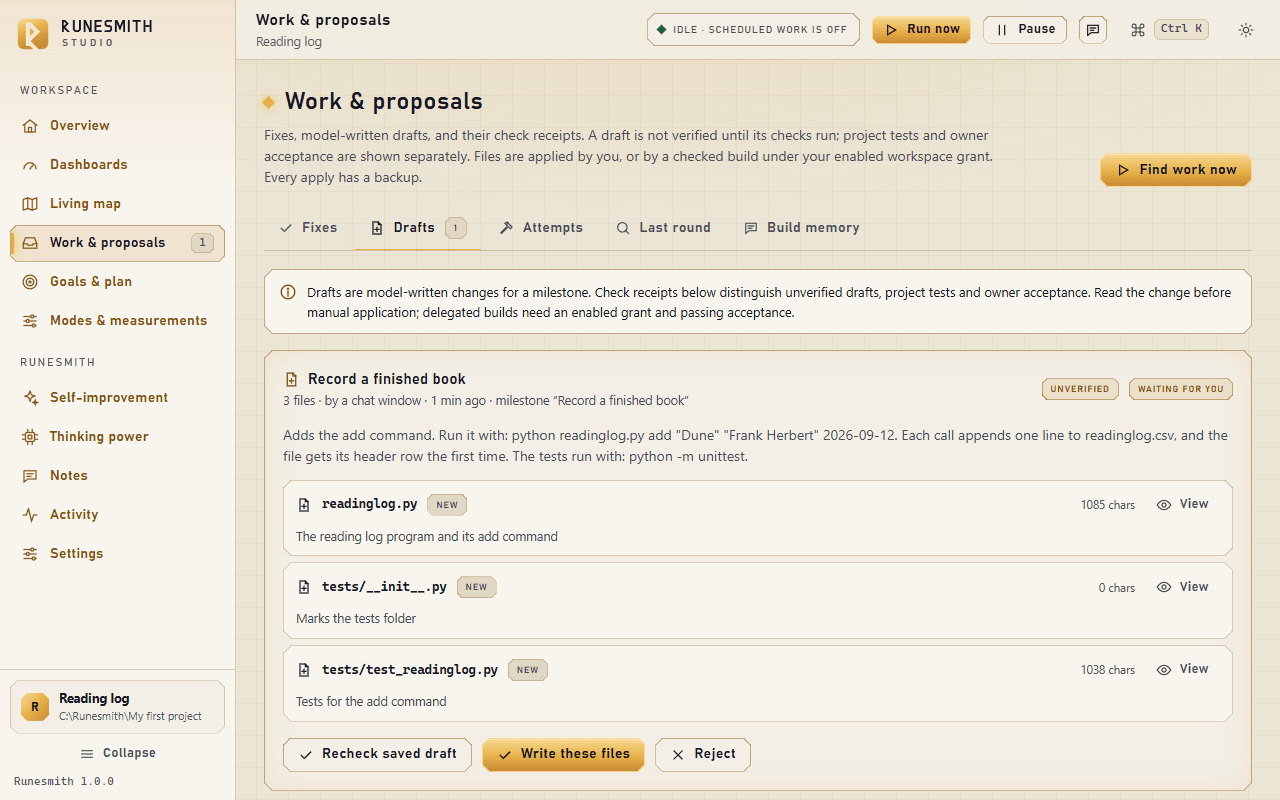
The first files appear under Work & proposals → Drafts, labelled unverified — Runesmith has written them, but hasn't checked them yet.
-
Click "Recheck saved draft". Since checking is off by default, a dialog appears — "Checking drafts is off in this folder" — explaining that checking runs your project's code on a throwaway copy. Click "Turn checking on and check this draft".
-
Runesmith runs the draft's own tests on a throwaway copy of your folder. Watch the Live panel on the Overview, or Activity, for the result. When it passes, the draft's badge changes from "unverified" to "its own tests passed".
-
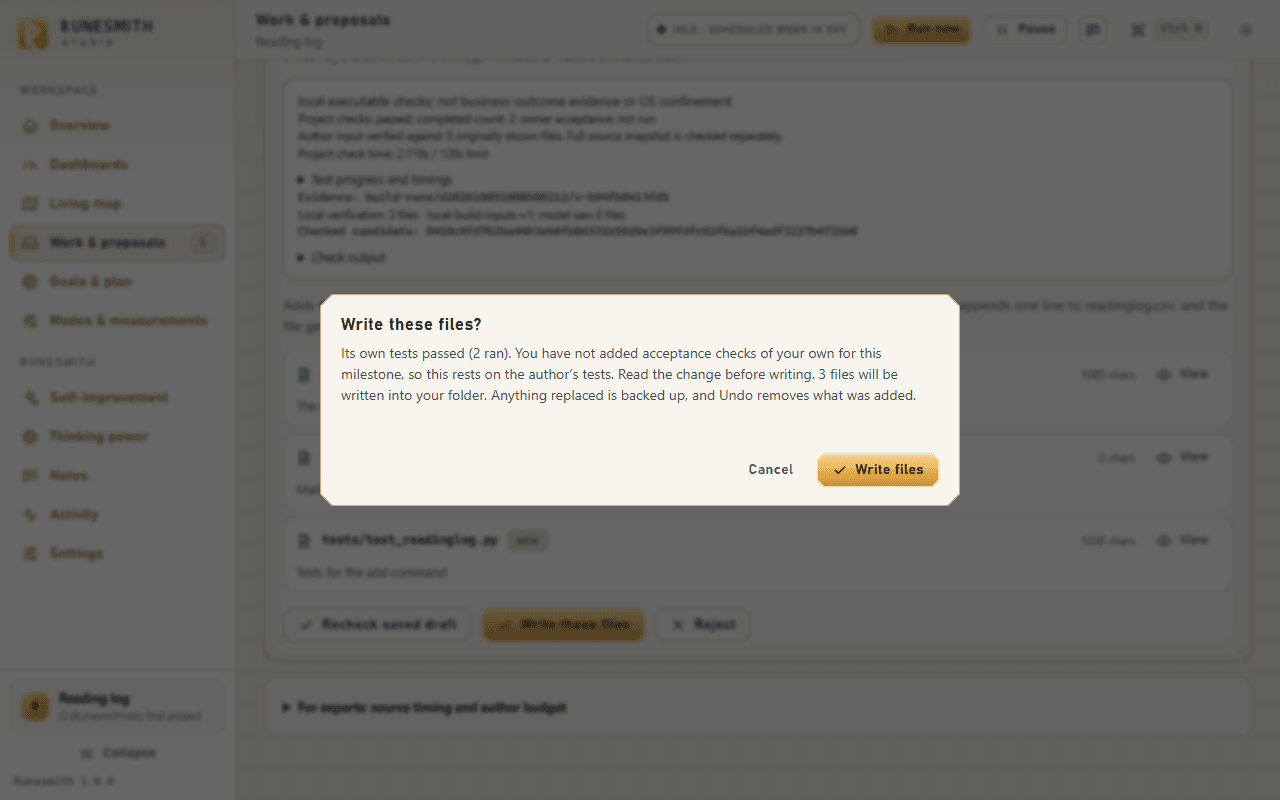
Click "Write these files". A dialog titled "Write these files?" opens — because you haven't added any acceptance checks of your own yet, it tells you plainly that this rests on the model's own tests, and asks you to read the change before writing. When you're satisfied, click "Write files".
-
The files are written into your real folder (anything they'd replace is backed up first, and can be undone). Runesmith may then ask, for example "Is "Record a delivery" done?" (naming your actual milestone) — choose "Mark done" if it is, or "Keep in progress" if you'd rather try it first.
That's a complete first pass: an empty folder, a plan in your own words, a first set of files drafted by a model you talked to by copy and paste, checked on a throwaway copy of your folder, and finally written into the real thing. Nothing was written until you approved it, and everything it changed can be undone.
From here, Work & proposals keeps showing you what's waiting, and Goals & plan keeps offering the next milestone the same way. Trying what you've built — running it yourself, on a practice copy of your folder — is its own short story, for another chapter.
Keys worth knowing #
- Ctrl+K opens the command palette: type what you want to do.
- 1 to 9 go to a page in the left menu (for example 4 for Goals & plan and 6 for Thinking power).
- R runs one round now.
- C switches on comment mode: click anything to leave a note about it (see "Give notes to the model" in Chapter 2).
- ? lists the shortcuts, and Esc closes whatever is open.
Chapter 2: Every switch, in one card each #
This chapter is a shelf of reference cards, one for each switch, setting or mode you can see in the Studio. Use it to look up a single control: what it does, where it lives, its default, when to turn it on or off, and what is safe about it. It does not walk you through a project start to finish — for that, see the earlier chapter.
Every card follows the same six lines:
- Find it — the page, tab or card, and the exact label as it appears in the Studio.
- What it does — in plain words.
- Default — what it is set to before you touch it.
- Turn it on when (or: choose this position when) — a reason to switch it on.
- Turn it off when (or: leave it off when) — a reason to leave it alone.
- Safe to know — a guarantee, or a consequence worth knowing before you touch it.
A few switches are shown more than once, worded slightly differently on different pages. Where that happens, this chapter names every wording you might see, so you can match what is on your screen even if it does not exactly match the heading here.
Settings #
Three of the cards below — Work on a schedule, Run this project's tests while mapping, and Let Runesmith improve itself — are the workspace's three "first-run choices". The Overview page's setup checklist tracks all three together as one item, "Chose how Runesmith may work here", and its own card says plainly: "Nothing below runs until you choose. Finishing the introduction does not switch any of it on." You can set all three from that Overview card, or from Settings, below; both write to the same place. A workspace first opened with an older version of Runesmith may already have all three on — its "legacy" behaviour — until you open Settings and make an explicit choice yourself.
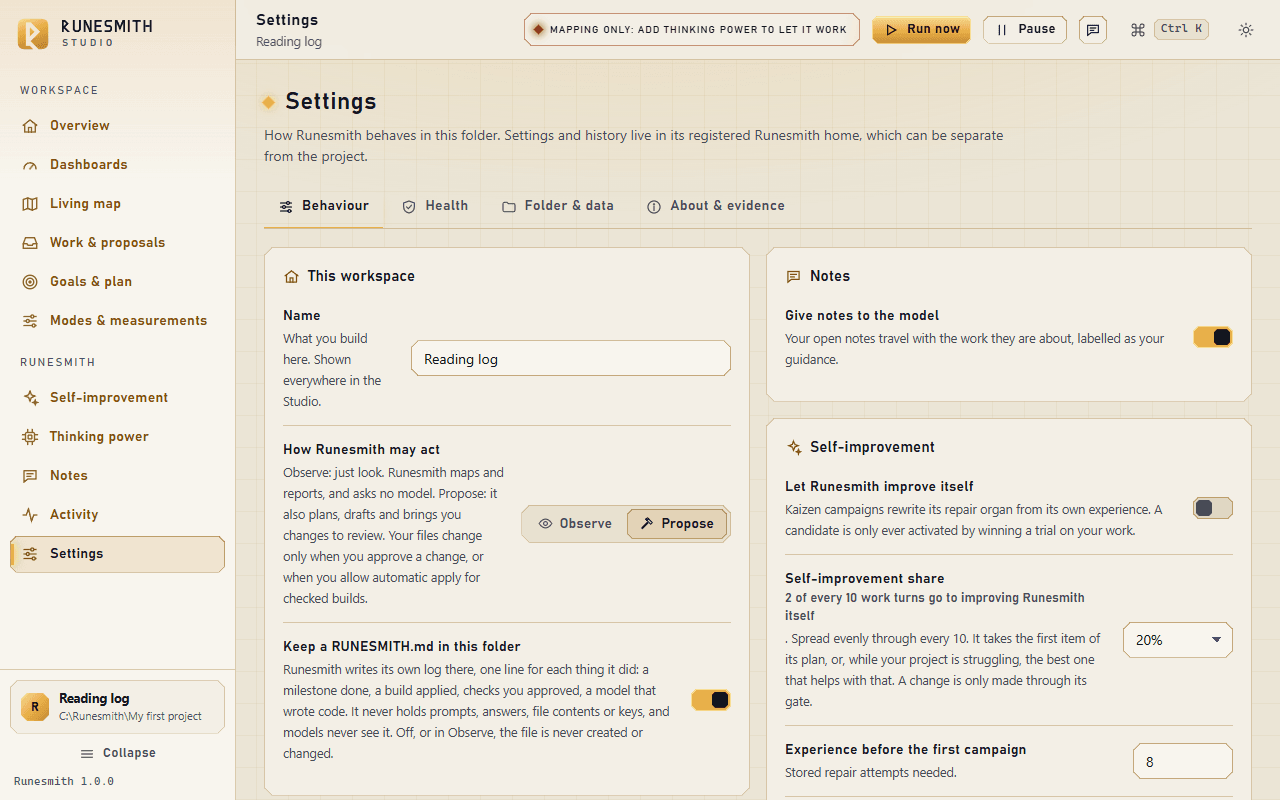
"How Runesmith may act" (Observe / Propose) #
- Find it: Settings → Behaviour tab → "This workspace" card → "How Runesmith may act", a two-position switch labelled Observe and Propose.
- What it does: Observe makes Runesmith map your folder and report only; it asks no model and changes nothing. Propose also lets it plan, draft and bring you changes to review. Even in Propose, your files change only when you approve a change yourself, or when you have separately turned on automatic apply for checked builds (see "Apply checked drafts automatically", below).
- Default: Propose.
- Choose Observe when: you want to see what Runesmith finds before any model is asked anything, or you have not added a model yet and do not want it to try.
- Choose Propose when: you are ready for Runesmith to plan, draft, and bring you fixes and drafts to look at.
- Safe to know: with Observe chosen, no model call and no project file write can happen, whatever else is switched on. Mapping is the one exception to "changes nothing about code execution": if "Run this project's tests while mapping" is also on, an ordinary mapping round still runs the project's own tests on a throwaway copy even while you are only observing, and the Living map page's own "Re-map & measure" button, and each object's "Measure its tests" button, run those tests on your click regardless of either switch. Observe stops Runesmith asking a model; it does not, by itself, stop every project-code execution. The Overview page offers a one-click "Let it help" button when you are observing, which explains what changes and asks you to confirm before switching you to Propose.
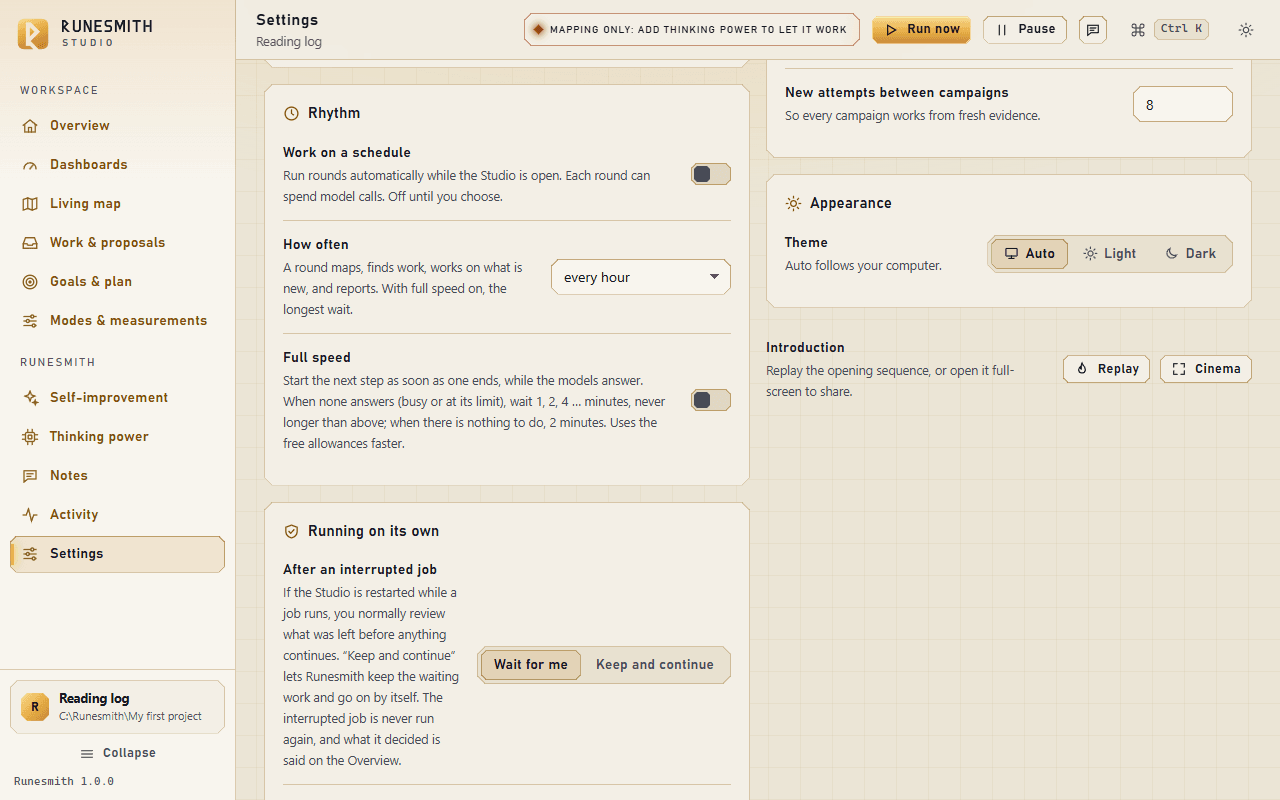
"Work on a schedule" and "How often" (auto_work, interval_minutes) #
- Find it: Settings → Behaviour tab → "Rhythm" card → "Work on a schedule" (a switch) and "How often" (a drop-down beneath it). The "Work on a schedule" switch itself — not a read-only copy, changing it here changes it in Settings too — is also shown on Overview → "How Runesmith may work here", where its own description names the current interval in minutes; "How often" as a separate drop-down lives only on the Settings page.
- What it does: "Work on a schedule" runs rounds automatically while the Studio is open; each round can spend model calls. "How often" sets the gap between rounds: every 5, 15 or 30 minutes, every hour, every 3 hours, twice a day, or once a day. With Full speed on (next card), it becomes the longest wait instead of the usual one.
- Default: off. When you turn it on, the interval defaults to "every hour".
- Turn it on when: you want Runesmith to keep working by itself while you leave the Studio window open.
- Turn it off when: you only want Runesmith to work when you click a button yourself, or you are watching how many model calls it spends.
- Safe to know: with this off, nothing starts without your click — a plain guarantee that holds regardless of any other switch. The three choices under "Running on its own" (below) act on scheduled steps, so they do nothing by themselves while this is off. The one exception is "After an interrupted job", which only lets work that was already waiting go on after a restart; it starts nothing new. If you have pressed Save modes on Modes & measurements, the schedule takes turns between the modes you saved instead of choosing its own next step. With Build switched on there, the steps under "Running on its own" and the check autopilot's checks-first step still come first; see the note under "Running on its own", below.
- Find it: Settings → Behaviour tab → "Rhythm" card → "Work on a schedule" (a switch) and "How often" (a drop-down beneath it). The "Work on a schedule" switch itself — not a read-only copy, changing it here changes it in Settings too — is also shown on Overview → "How Runesmith may work here", where its own description names the current interval in minutes; "How often" as a separate drop-down lives only on the Settings page.
- What it does: "Work on a schedule" runs rounds automatically while the Studio is open; each round can spend model calls. "How often" sets the gap between rounds: every 5, 15 or 30 minutes, every hour, every 3 hours, twice a day, or once a day. With Full speed on (next card), it becomes the longest wait instead of the usual one.
- Default: off. When you turn it on, the interval defaults to "every hour".
- Turn it on when: you want Runesmith to keep working by itself while you leave the Studio window open.
- Turn it off when: you only want Runesmith to work when you click a button yourself, or you are watching how many model calls it spends.
- Safe to know: with this off, nothing starts without your click — a plain guarantee that holds regardless of any other switch. The three choices under "Running on its own" (below) act on scheduled steps, so they do nothing by themselves while this is off. The one exception is "After an interrupted job", which only lets work that was already waiting go on after a restart; it starts nothing new. If you have pressed Save modes on Modes & measurements, the schedule takes turns between the modes you saved instead of choosing its own next step. With Build switched on there, the steps under "Running on its own" and the check autopilot's checks-first step still come first; see the note under "Running on its own", below.
"Full speed" (full_speed) #
- Find it: Settings → Behaviour tab → "Rhythm" card, the switch under "How often", labelled Full speed.
- What it does: with "Work on a schedule" on, Runesmith normally waits the whole "How often" gap after every step. With Full speed on, the next step starts as soon as one ends, as long as the models are answering. If no model answered (busy, or at its free limit), it waits 1 minute, then 2, then 4, and so on, never longer than "How often". When there is nothing to do, it waits 2 minutes.
- Default: off.
- Turn it on when: a project is running without you and the waiting between steps, not the work itself, is what slows it down. It was added because, in a long unattended run, a failed build waited out the whole 15-minute interval before the next step began.
- Turn it off when: you are making a free allowance last, or you want to watch each step happen.
- Safe to know: it changes only how soon the next scheduled step starts. Pause still holds everything, and every limit on tries, checks and automatic apply stays as it was. Because the models are asked more often, a free allowance runs out faster. It speeds up building steps, check requests, one-more-tries and breakdowns; an ordinary repair round still waits the full "How often". A shorter "How often" (5 minutes is the shortest) means a shorter longest wait.
"Running on its own" — three choices that let a project go on without you #
A project with a long plan can run to the end while you are away, if you choose. The card Running on its own (Settings → Behaviour tab, between "Rhythm" and "Mapping") holds three choices, each a short row of buttons. All three start on Wait for me: nothing changes until you pick something else, and each pick saves the moment you click it.
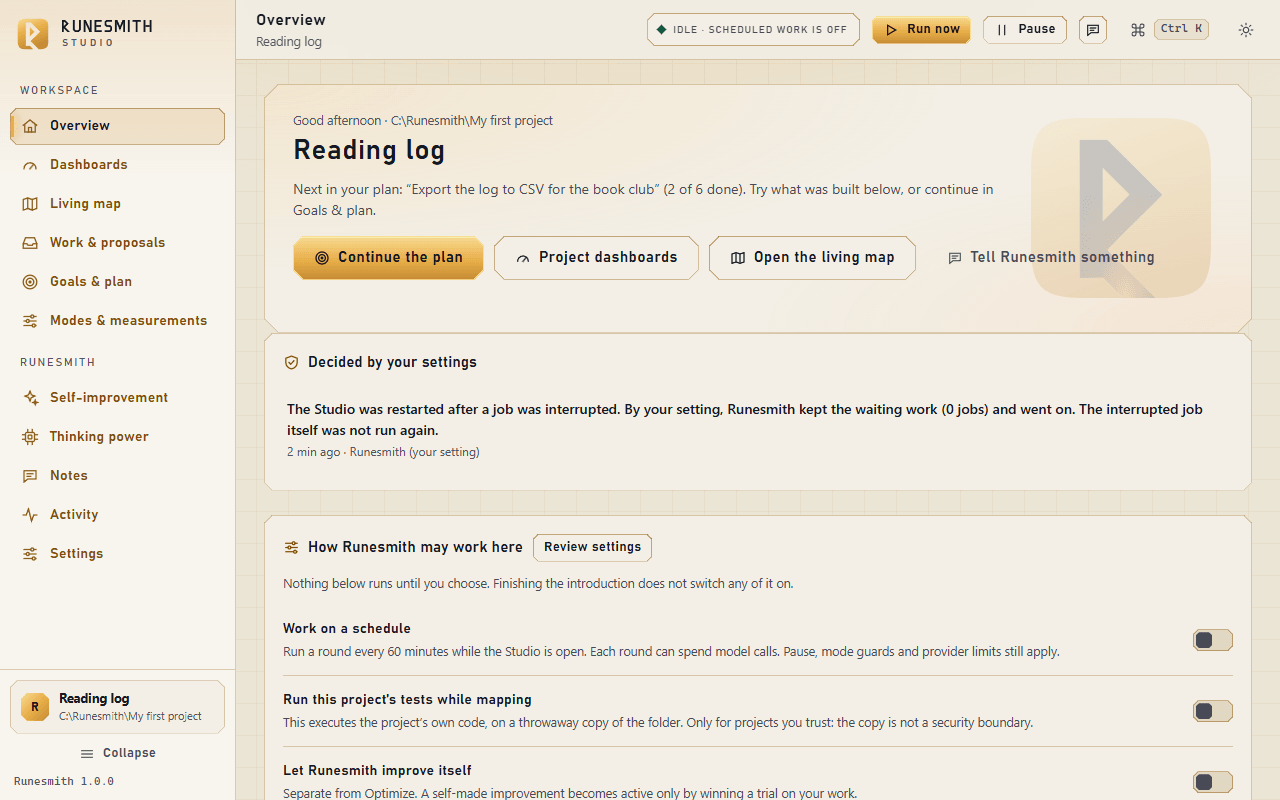
When Runesmith acts by one of these choices, it says so in plain words on the Overview, in a card called Decided by your settings (it shows the newest five decisions, each with the time and Runesmith (your setting) beside it), and it writes the same words to the ledger under Activity. So you can always tell what you decided and what it decided for you.
One thing to know before you rely on them is how the Modes & measurements page changes the schedule. Three cases:
- Before you first press Save modes there. The schedule picks its own next step. First, where they apply: the check autopilot's request for a ready milestone's checks, the one-time recheck of a draft whose checks did not finish, and the one more try or breakdown of a milestone whose tries are used up. Then a build.
- Saved, with Build switched on among the modes. The schedule takes turns between the modes you saved, and those same three steps still come first, in the same order and under the same conditions. The modes take their turn between them.
- Saved, with every Build mode off. The schedule does only what your saved modes say. One more try, One more try, then break it down and Recheck once then wait for your own click, as if they were on Wait for me, and the autopilot does not ask for checks ahead of a build.
After an interrupted job and Full speed are not affected in any case.
"After an interrupted job" (recovery_policy) #
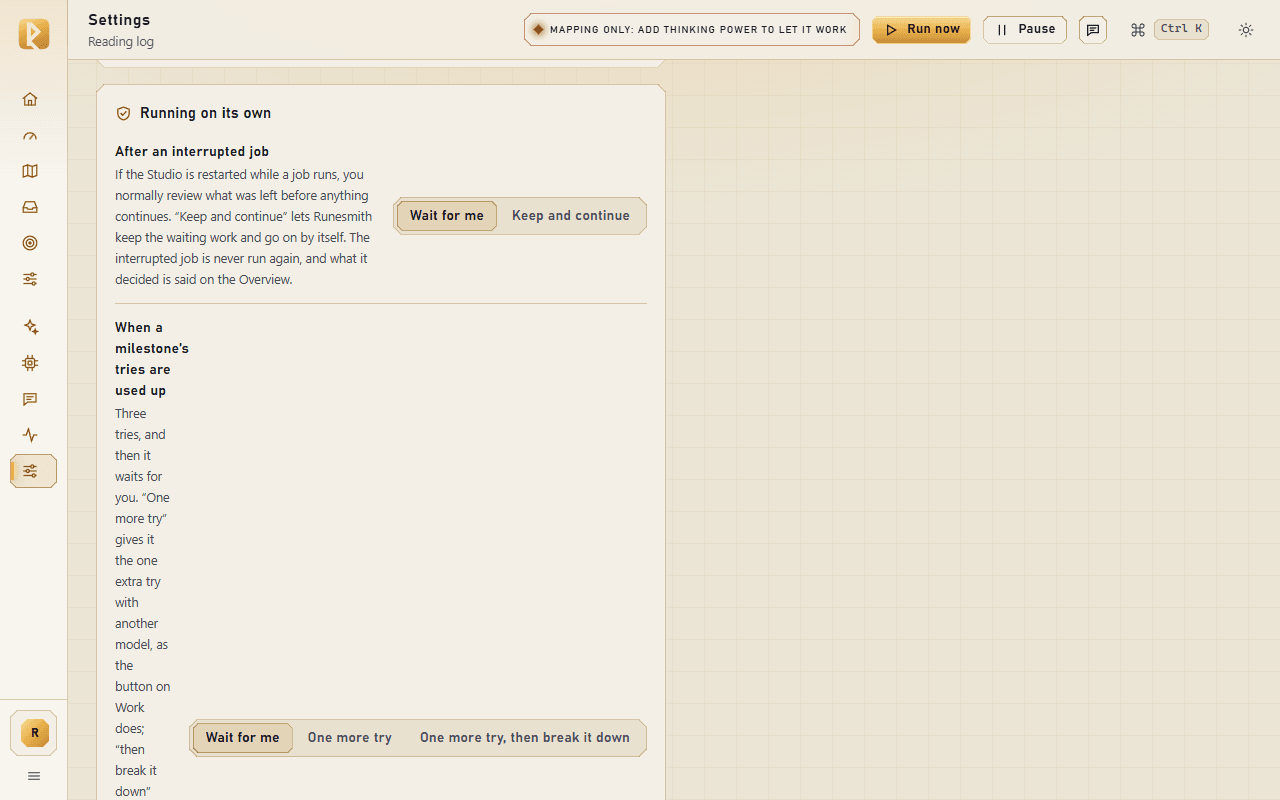
- Find it: Settings → Behaviour tab → "Running on its own" → After an interrupted job: two buttons, Wait for me and Keep and continue.
- What it does: if the Studio is closed or restarted while a job is running, you normally review what was left (Activity → "Restart recovery") before anything continues. With Keep and continue, Runesmith does the review's "keep" for you: it keeps the waiting work and goes on.
- Default: Wait for me.
- Choose Keep and continue when: nobody will be at the keyboard after a restart, for example overnight.
- Leave it on Wait for me when: you want to look at what was interrupted every time.
- Safe to know: the interrupted job itself is never run again, and nothing is sent twice. It never lifts a pause you set yourself ("left the pause you set"). It decides nothing it cannot read: if the saved records are damaged or changed, a write-recovery conflict is open, or a job is still running, the review still waits for you. After it acts, the Overview says: "The Studio was restarted after a job was interrupted. By your setting, Runesmith kept the waiting work (N jobs) and went on. The interrupted job itself was not run again."
"When a milestone's tries are used up" (stuck_policy) #
- Find it: Settings → Behaviour tab → "Running on its own" → When a milestone’s tries are used up: three buttons, Wait for me, One more try and One more try, then break it down.
- What it does: a milestone gets three ordinary tries; then it waits for you. You would normally press Use alternate author (Work & proposals → Drafts) for one more try with another model, and, if that fails too, Propose smaller steps. One more try gives that extra try for you, with the same limits and records as the button: once for each milestone, as your files stand. One more try, then break it down also asks for smaller steps when the extra try did not help, and adopts them as your own Adopt prerequisites would, once for each milestone.
- Default: Wait for me.
- Choose one of the other two when: a long plan should not stop at the first milestone no model can build.
- Leave it on Wait for me when: you want to see every stuck milestone yourself before anything more is tried.
- Safe to know: it takes one turn between builds, so other ready milestones keep building meanwhile, and it is paced like other scheduled model calls. It never breaks down a smaller step of an earlier breakdown, and never acts over a proposal or decision you made yourself. If the cause is a file no model is shown (see "Author context", below), it does not pay for the same refusal again: that milestone waits for you to prioritize the file. It goes to the first milestone the extra try can be given to, so one that is waiting on a draft, a check or an answer does not hold the others back. It needs "Check drafts on a throwaway copy…" on and Propose chosen under "How Runesmith may act"; the breakdown also needs "Allowed files or folders" filled in (Goals & plan → Build continuation) and room in the plan (a plan holds up to 400 milestones). The Overview says each decision, for example: "“…” had used up its tries. By your setting, Runesmith gave it one more try with another model: …".
"When a draft's checks did not finish" (recheck_policy) #
- Find it: Settings → Behaviour tab → "Running on its own" → When a draft’s checks did not finish: two buttons, Wait for me and Recheck once.
- What it does: a draft whose checks ran out of time (its badge reads "checks did not finish") normally waits until you press Resume timed-out check once on Work & proposals → Drafts. With Recheck once, the schedule runs that one-time extension itself, once for each draft: no model call, a longer time limit, and the same receipt and refusals as the button. How long your own acceptance checks may run: an ordinary build gives them 60 seconds plus 2 seconds for every check, never less than 120 and never more than 600 seconds, so a milestone with many checks gets more time. The extension gives them twice that, still at most 600 seconds, and the project's own tests up to 240 seconds.
- Default: Wait for me.
- Choose Recheck once when: the computer is sometimes busy with other work and a check that normally takes half a minute can run out of time. It was added because exactly that happened to a check in a long unattended run: it ran out of time on a busy computer, and nobody was there to press the button.
- Leave it on Wait for me when: you would rather look at every timed-out draft first.
- Safe to know: it asks no model, and a second timeout stays "did not finish". If the checks then pass, the draft is written only if automatic apply is on and its other rules are met, as always. The Overview says what it did: "“…”: a draft’s checks did not finish (they ran out of time). By your setting, Runesmith ran them once more with a longer limit and no model call: …". In Activity the job reads "Rechecking a draft whose checks did not finish".
- Find it: Settings → Behaviour tab → "Running on its own" → When a milestone’s tries are used up: three buttons, Wait for me, One more try and One more try, then break it down.
- What it does: a milestone gets three ordinary tries; then it waits for you. You would normally press Use alternate author (Work & proposals → Drafts) for one more try with another model, and, if that fails too, Propose smaller steps. One more try gives that extra try for you, with the same limits and records as the button: once for each milestone, as your files stand. One more try, then break it down also asks for smaller steps when the extra try did not help, and adopts them as your own Adopt prerequisites would, once for each milestone.
- Default: Wait for me.
- Choose one of the other two when: a long plan should not stop at the first milestone no model can build.
- Leave it on Wait for me when: you want to see every stuck milestone yourself before anything more is tried.
- Safe to know: it takes one turn between builds, so other ready milestones keep building meanwhile, and it is paced like other scheduled model calls. It never breaks down a smaller step of an earlier breakdown, and never acts over a proposal or decision you made yourself. If the cause is a file no model is shown (see "Author context", below), it does not pay for the same refusal again: that milestone waits for you to prioritize the file. It goes to the first milestone the extra try can be given to, so one that is waiting on a draft, a check or an answer does not hold the others back. It needs "Check drafts on a throwaway copy…" on and Propose chosen under "How Runesmith may act"; the breakdown also needs "Allowed files or folders" filled in (Goals & plan → Build continuation) and room in the plan (a plan holds up to 400 milestones). The Overview says each decision, for example: "“…” had used up its tries. By your setting, Runesmith gave it one more try with another model: …".
"When a draft's checks did not finish" (recheck_policy) #
- Find it: Settings → Behaviour tab → "Running on its own" → When a draft’s checks did not finish: two buttons, Wait for me and Recheck once.
- What it does: a draft whose checks ran out of time (its badge reads "checks did not finish") normally waits until you press Resume timed-out check once on Work & proposals → Drafts. With Recheck once, the schedule runs that one-time extension itself, once for each draft: no model call, a longer time limit, and the same receipt and refusals as the button. How long your own acceptance checks may run: an ordinary build gives them 60 seconds plus 2 seconds for every check, never less than 120 and never more than 600 seconds, so a milestone with many checks gets more time. The extension gives them twice that, still at most 600 seconds, and the project's own tests up to 240 seconds.
- Default: Wait for me.
- Choose Recheck once when: the computer is sometimes busy with other work and a check that normally takes half a minute can run out of time. It was added because exactly that happened to a check in a long unattended run: it ran out of time on a busy computer, and nobody was there to press the button.
- Leave it on Wait for me when: you would rather look at every timed-out draft first.
- Safe to know: it asks no model, and a second timeout stays "did not finish". If the checks then pass, the draft is written only if automatic apply is on and its other rules are met, as always. The Overview says what it did: "“…”: a draft’s checks did not finish (they ran out of time). By your setting, Runesmith ran them once more with a longer limit and no model call: …". In Activity the job reads "Rechecking a draft whose checks did not finish".
"Run this project's tests while mapping" (probe_tests) #
- Find it: Settings → Behaviour tab → "Mapping" card, labelled there "Measure code by running its tests". The same switch is shown, worded "Run this project's tests while mapping", on Overview → "How Runesmith may work here".
- What it does: while mapping, it executes the project's own tests on a throwaway copy of your folder, so nothing is written back into your files. It only has something to run for a project with its own tests (for example, a Python project); a folder of documents has nothing for it to run.
- Default: off.
- Turn it on when: you trust the project's code enough to let its tests run, even on a disposable copy, and you want test results reflected on the map.
- Turn it off when: the code is not yours to run, you do not have its test tools installed, or you would rather mapping stay a read-only, static look at the files.
- Safe to know: with this off, a scheduled or automatic mapping round never runs the project's tests. The Living map page still offers its own explicit "Re-map & measure" button, and, on an unmeasured object, a "Measure its tests" button — both run that object's tests on a throwaway copy the moment you click them, on purpose, whatever this switch is set to; the switch only decides what an ordinary mapping round does by itself. The throwaway copy is not a security boundary — the Studio's own wording is "only for projects you trust". Two companion controls sit on the same "Mapping" card: "Most objects to map" caps how many objects a very large folder maps (default 50, settable 1–500), and "Never touch" lets you tick any sub-folder so Runesmith never reads, probes or works on it — a touched-off folder still shows on the map, just never opened.
"Let Runesmith improve itself" (kaizen) #
- Find it: Settings → Behaviour tab → "Self-improvement" card. Also shown with the same label on Overview → "How Runesmith may work here".
- What it does: turns on Kaizen self-improvement campaigns, which rewrite Runesmith's own repair organ from its stored experience of past repairs.
- Default: off.
- Turn it on when: you want Runesmith to try to improve its own ability to repair code over time.
- Turn it off when: you do not want Runesmith changing itself at all, even experimentally.
- Safe to know: with this off, nothing about Runesmith itself changes and no trial runs — even with it on, a self-made candidate only ever becomes the active generation by winning a live trial against your own work, or by your own separate, explicitly-recorded "Make active" choice on the Self-improvement page; nothing self-promotes silently. Two numbers on the same card only matter once this is on: "Experience before the first campaign" (stored repair attempts needed before the first campaign runs, default 8) and "New attempts between campaigns" (fresh attempts needed between campaigns, default 8), so every campaign works from evidence it has not already used.
"Give notes to the model" (read_notes) #
- Find it: Settings → Behaviour tab → "Notes" card.
- What it does: you leave a note by pressing C (or the note button in the top bar, whose tooltip reads "Comment on anything (C)") and then clicking anything: an object, a milestone, a fix, a model, Runesmith itself. With this on, Runesmith sends your open comments and notes along with the work they are about, clearly labelled as your guidance, to whichever role reads that kind of note — the Worker for a note on an object, the Improver for a note on Runesmith itself, the Planner for a note on the plan, brief or a goal.
- Default: on.
- Turn it on when: you want your comments to actually shape what gets built or repaired.
- Turn it off when: you want your notes kept for yourself only, as private reminders.
- Safe to know: with this off, no note text enters any model packet at all — your notes stay saved and visible to you in the Studio either way; turning this off does not delete them.
"Theme" (theme) #
- Find it: Settings → Behaviour tab → "Appearance" card → "Theme", a three-position switch: Auto, Light, Dark.
- What it does: sets the Studio's own colour scheme.
- Default: Auto (follows your computer's own setting).
- Choose Light or Dark when: you want the Studio's colours to ignore your computer's own light/dark setting.
- Choose Auto when: you are happy for it to follow your computer.
- Safe to know: cosmetic only — it has no effect on anything Runesmith reads, writes or decides.
Goals & plan — The plan, and what models are shown #
- Find it: Settings → Behaviour tab → "Self-improvement" card. Also shown with the same label on Overview → "How Runesmith may work here".
- What it does: turns on Kaizen self-improvement campaigns, which rewrite Runesmith's own repair organ from its stored experience of past repairs.
- Default: off.
- Turn it on when: you want Runesmith to try to improve its own ability to repair code over time.
- Turn it off when: you do not want Runesmith changing itself at all, even experimentally.
- Safe to know: with this off, nothing about Runesmith itself changes and no trial runs — even with it on, a self-made candidate only ever becomes the active generation by winning a live trial against your own work, or by your own separate, explicitly-recorded "Make active" choice on the Self-improvement page; nothing self-promotes silently. Two numbers on the same card only matter once this is on: "Experience before the first campaign" (stored repair attempts needed before the first campaign runs, default 8) and "New attempts between campaigns" (fresh attempts needed between campaigns, default 8), so every campaign works from evidence it has not already used.
"Give notes to the model" (read_notes) #
- Find it: Settings → Behaviour tab → "Notes" card.
- What it does: you leave a note by pressing C (or the note button in the top bar, whose tooltip reads "Comment on anything (C)") and then clicking anything: an object, a milestone, a fix, a model, Runesmith itself. With this on, Runesmith sends your open comments and notes along with the work they are about, clearly labelled as your guidance, to whichever role reads that kind of note — the Worker for a note on an object, the Improver for a note on Runesmith itself, the Planner for a note on the plan, brief or a goal.
- Default: on.
- Turn it on when: you want your comments to actually shape what gets built or repaired.
- Turn it off when: you want your notes kept for yourself only, as private reminders.
- Safe to know: with this off, no note text enters any model packet at all — your notes stay saved and visible to you in the Studio either way; turning this off does not delete them.
"Theme" (theme) #
- Find it: Settings → Behaviour tab → "Appearance" card → "Theme", a three-position switch: Auto, Light, Dark.
- What it does: sets the Studio's own colour scheme.
- Default: Auto (follows your computer's own setting).
- Choose Light or Dark when: you want the Studio's colours to ignore your computer's own light/dark setting.
- Choose Auto when: you are happy for it to follow your computer.
- Safe to know: cosmetic only — it has no effect on anything Runesmith reads, writes or decides.
Goals & plan — The plan, and what models are shown #
- Find it: Settings → Behaviour tab → "Appearance" card → "Theme", a three-position switch: Auto, Light, Dark.
- What it does: sets the Studio's own colour scheme.
- Default: Auto (follows your computer's own setting).
- Choose Light or Dark when: you want the Studio's colours to ignore your computer's own light/dark setting.
- Choose Auto when: you are happy for it to follow your computer.
- Safe to know: cosmetic only — it has no effect on anything Runesmith reads, writes or decides.
Goals & plan — The plan, and what models are shown #
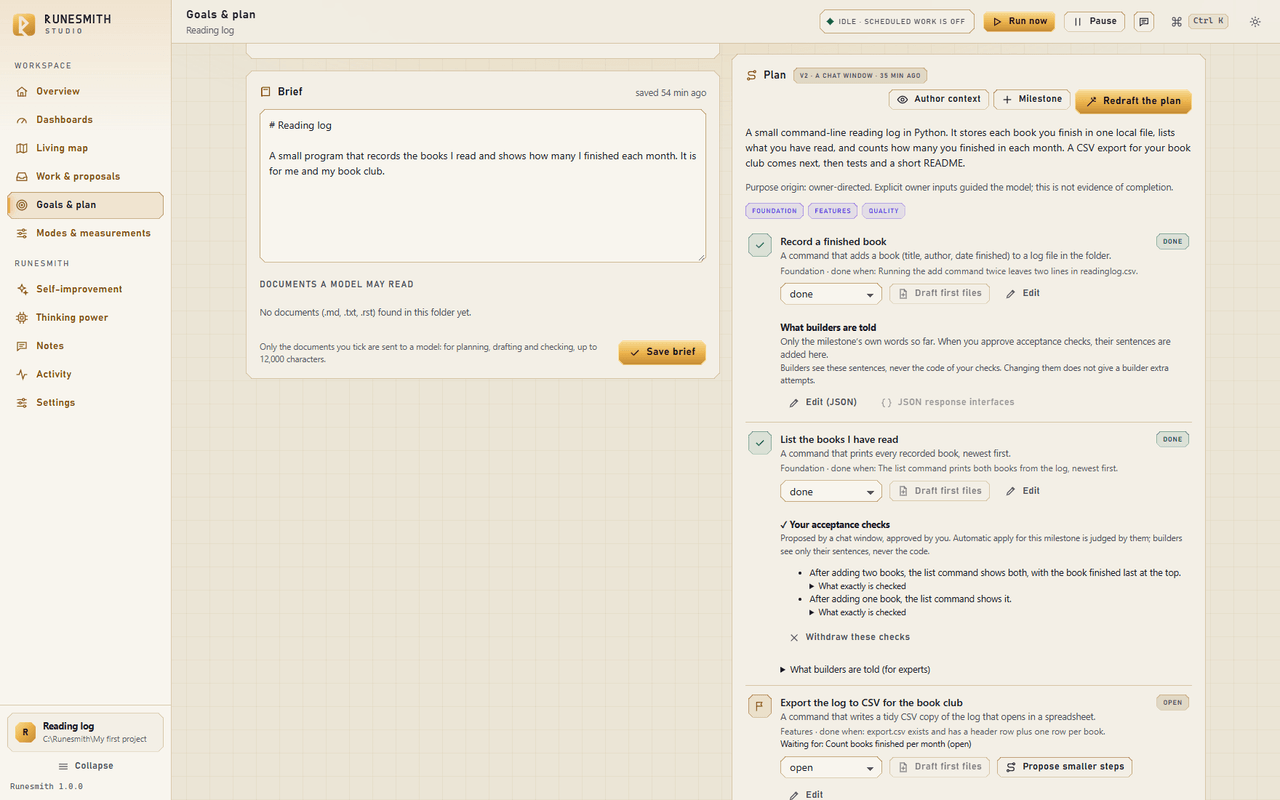
The Plan card on Goals & plan lists your milestones. Three things on it decide how they are written and built: the Milestone form, its Needs first choice, and the Author context drawer.
"Milestone" (Title, What it should do, Done when) #
- Find it: Goals & plan → Plan card → the Milestone button (to add one), or Edit on any milestone card.
- What it does: opens a form with three fields: Title, What it should do and Done when. Checkers and builders read all three, so the more exactly you say what "done" looks like (a number, a file name, a word that must appear), the closer the checks and the build will be to what you mean.
- Default: a milestone you add needs only a title; the other two fields are optional.
- Use it when: the plan leaves out something you need, or a milestone's words are too loose to check.
- Leave it when: the Planner's words already say what you mean.
- Safe to know: each field has a limit: 200 characters for the title, 1,500 for "What it should do", 400 for "Done when". A counter under each field shows it ("12 of 400 characters"). Text over the limit is refused with a plain message, nothing is saved, and the form opens again with what you typed. Nothing is ever cut without telling you.
"Needs first" (depends_on) #
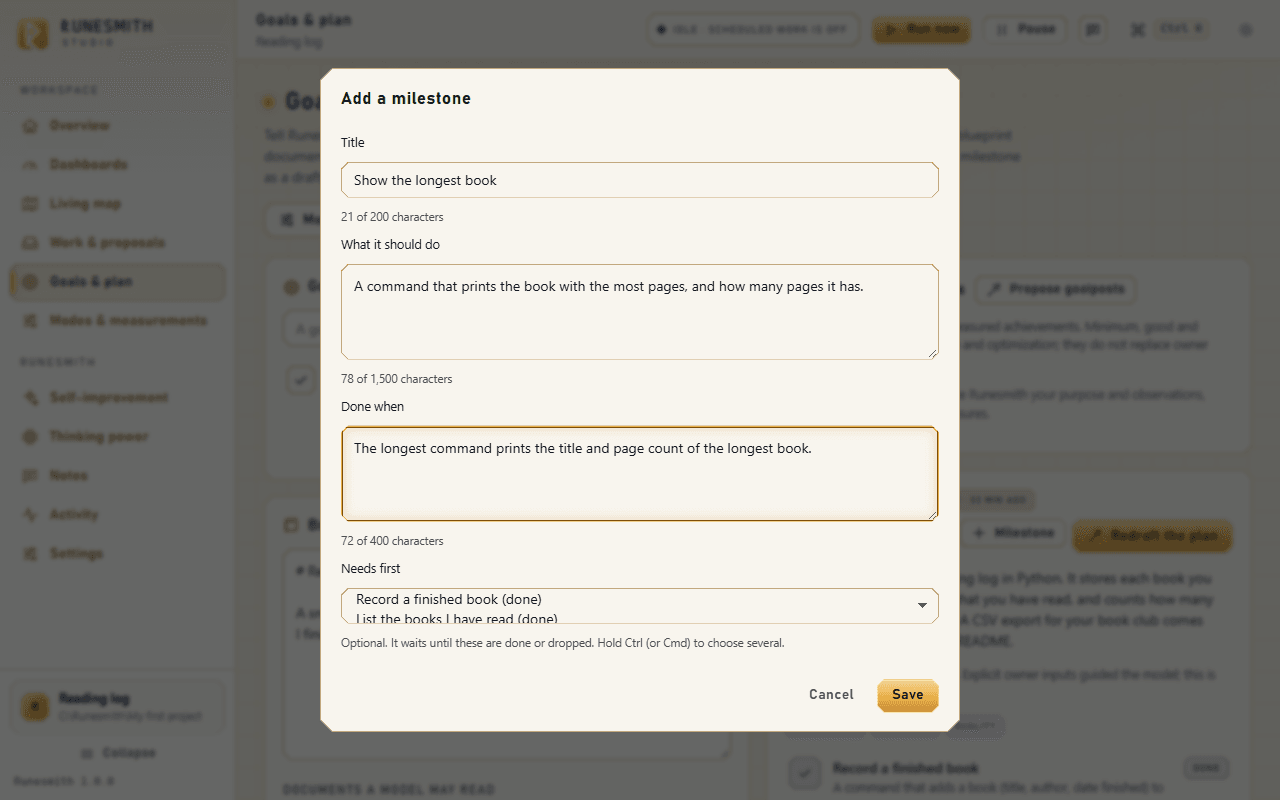
- Find it: in the Milestone form, the list under "Done when", labelled Needs first. It appears only when the plan has at least one other milestone.
- What it does: names the milestones that must be finished before this one. Each is listed with its status, for example "Add a stage (open)"; hold Ctrl (Cmd on a Mac) to choose several. Until every one of them is done or dropped (a dropped one counts as settled), the milestone's card reads "Waiting for: …", its Draft first files button is greyed, and the schedule skips it. When nothing is left to wait for, the card reads "Prerequisites satisfied — ready to draft".
- Default: nothing; a milestone waits for no one.
- Use it when: you load or write several milestones together and one cannot start before another, for example a page before the picture it shows. The plan then keeps its order even if you add all of it at once.
- Leave it empty when: the order does not matter: Runesmith takes the first ready milestone.
- Safe to know: it changes the order only. What is built, the milestone's checks and its drafts stay exactly as they were. A milestone can name at most 12 others. It cannot need itself, a milestone that does not exist, or a loop (A needs B and B needs A); such a save is refused with a message ("That would make “…” wait for itself through its prerequisites; nothing was saved.") and the form opens again with what you typed. The list is sent only when you change it, so editing the words alone never touches what a milestone waits for. The smaller steps Runesmith proposes when a milestone is stuck ("Adopt prerequisites") use the same mechanism.
"Author context" (prioritized files, and files shown in parts) #
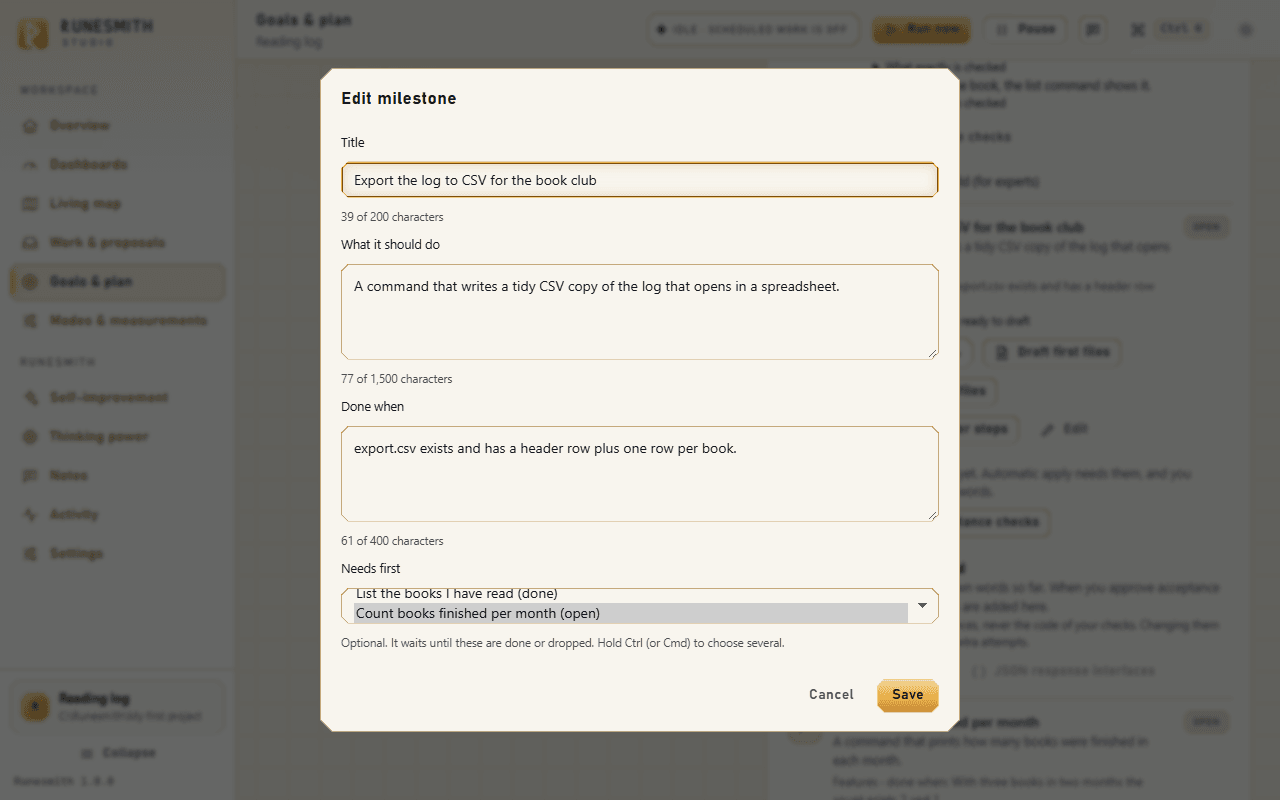
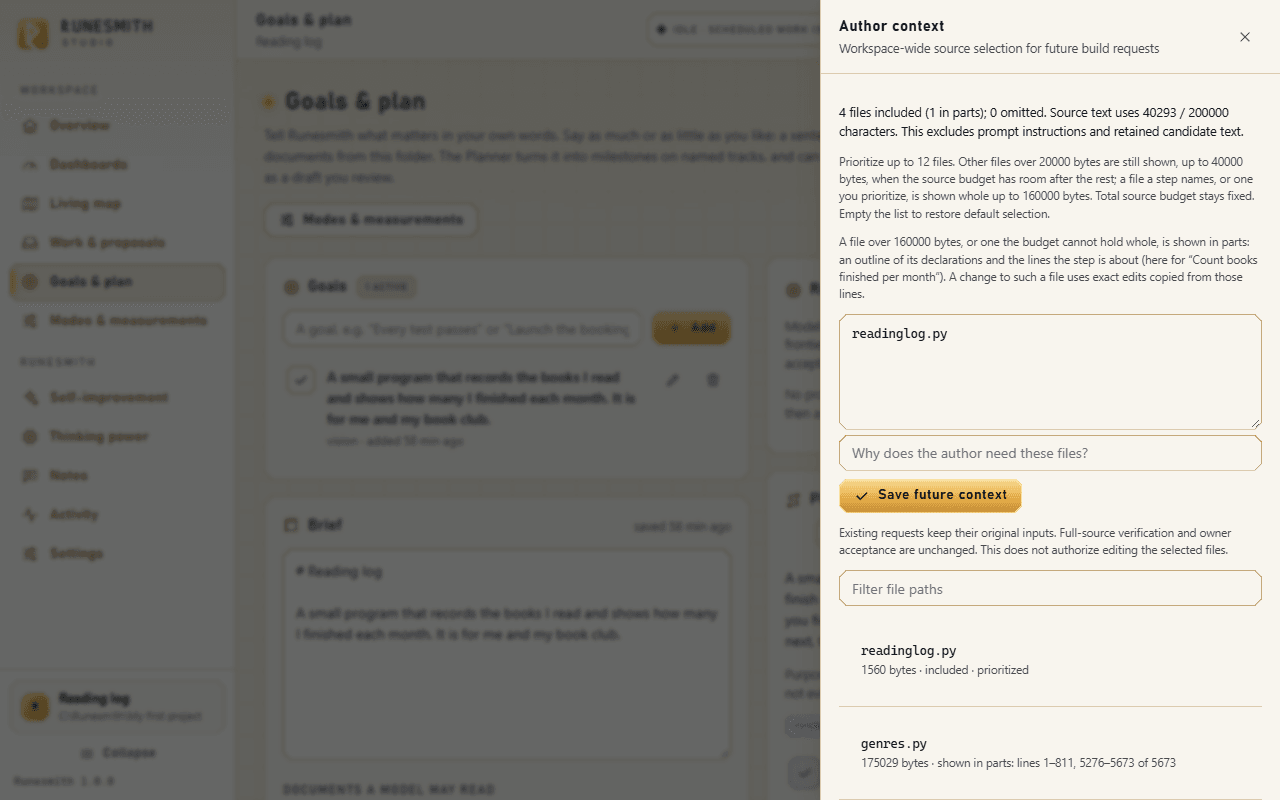
- Find it: Goals & plan → Plan card → the Author context button. A drawer opens, titled "Author context", with the line "Workspace-wide source selection for future build requests".
- What it does: shows which of your project's files the models are shown when they build, and lets you prioritize up to 12 of them so they are shown first. Every build request has a fixed room for source text: 48,000 characters. A file is shown whole when it is up to 20,000 bytes, or up to 40,000 bytes when you prioritized it or when there is room left after the rest. A bigger file, or one the room cannot hold whole, is shown in parts: an outline of its declarations with their line numbers, then the file's exact lines around what the step is about, each part labelled "lines A–B of N". The drawer lists every file as "included", "omitted: …" or "shown in parts: lines 120–180, 300–340 of 1150", and marks yours "prioritized". Without your help, the files are taken in this order: the ones you prioritized, then those the milestone names (or that its last refused answer asked for), then the rest; small files always stay whole.
- Default: nothing prioritized; Runesmith chooses by itself.
- Use it when: a file that matters to many steps (your main program, say) is not being shown, or a build was refused with "… was not shown to the model … Prioritize … under Goals & plan, Author context". The drawer's own lines tell you what to do about a prioritized file that cannot be shown.
- Leave it empty when: the default choice already shows what each step needs.
- Safe to know: it chooses only what models see. It asks no model, writes nothing to your project and grants no permission ("Future source selection saved. No model call, project write or permission change."). Requests already made keep their original inputs, and prioritizing a file does not allow a model to change it. A model may change a file that was shown in parts only with exact edits whose old text lies inside a shown part; replacing the whole file stays refused. A file over 40,000 bytes none of whose lines is short enough to quote (minified code, data), or over 400,000 bytes, cannot be shown at all, and the drawer says so: split it first. Every save needs a short reason, and saving an empty list brings back the default choice. A save is refused, with the reason, if a listed file cannot be shown, or if your project's files changed while the drawer was open ("Source changed; inspect the current context before saving."): close the drawer, open it again and save again.
Goals & plan — Build continuation #
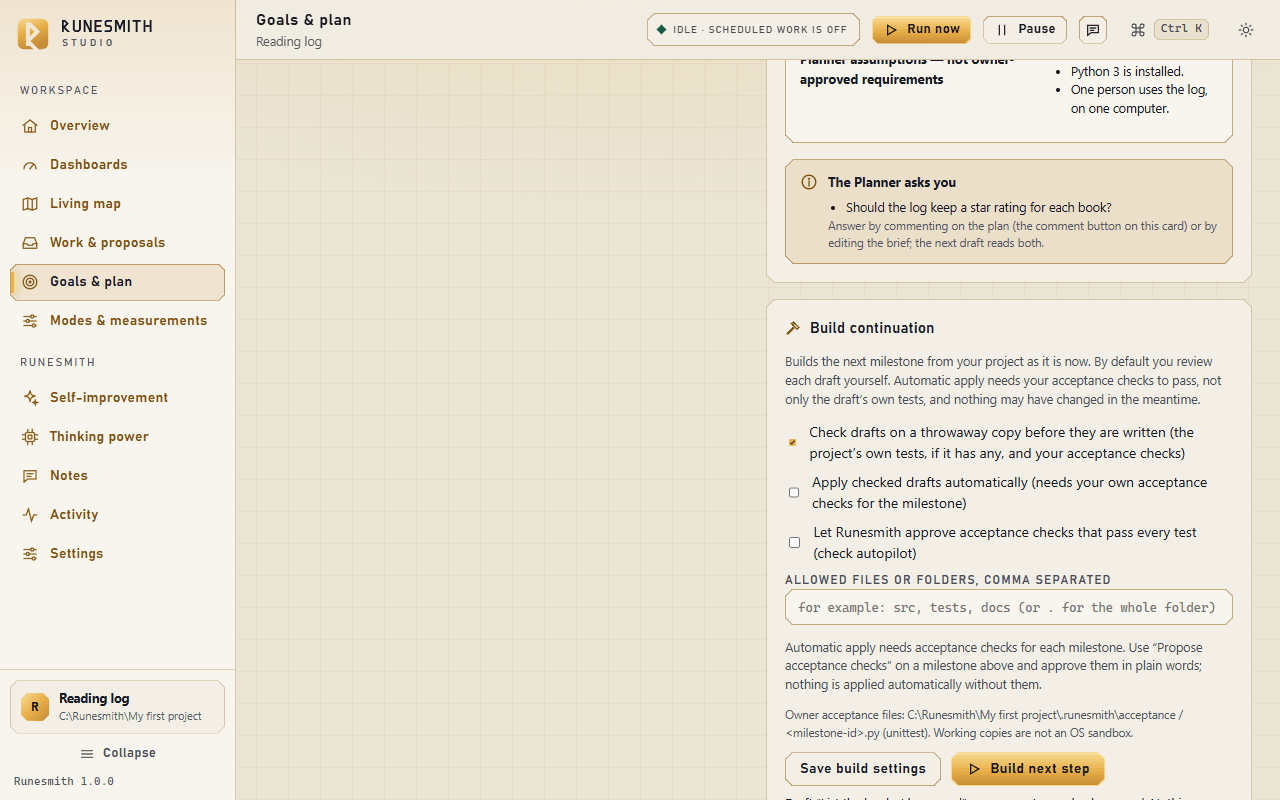
These four controls sit together on one card, "Build continuation", near the bottom of the Goals & plan page. They govern only the Build activity — drafting a milestone's files and, if you allow it, writing them — never a Troubleshoot repair, which always needs your own click to apply (see "Troubleshoot", under Modes & measurements, below). The first two are also summarized, read-only, on Overview: as "Check drafts by running their tests" and "Apply checked drafts automatically", each with a "Change" button that brings you back here.
"Check drafts on a throwaway copy before they are written" (build_steps) #
- Find it: Goals & plan → "Build continuation" card, first checkbox, labelled in full: "Check drafts on a throwaway copy before they are written (the project's own tests, if it has any, and your acceptance checks)".
- What it does: before a drafted milestone file is written into your folder, Runesmith checks it on a disposable copy of your project — running the project's own tests if it has any, plus your approved acceptance checks for that milestone if you have any.
- Default: off.
- Turn it on when: you want every draft checked automatically before you, or automatic apply, act on it.
- Turn it off when: you would rather review every draft yourself with no automated checking step first.
- Safe to know: with this off, no project code executes for a check or a trial run — and the Build mode under Modes & measurements refuses to run at all until this is on, whether started from there or from this page's "Build next step" button.
"Apply checked drafts automatically" (build_apply) #
- Find it: Goals & plan → "Build continuation" card, second checkbox, labelled in full: "Apply checked drafts automatically (needs your own acceptance checks for the milestone)".
- What it does: lets Runesmith write a checked draft straight into your folder without you clicking Write — but only for a milestone with approved acceptance checks (approved by you, or by the check autopilot if you switched that on, next card), only when the source has not changed since the check ran, and only inside the folders you have named under "Allowed files or folders" (below).
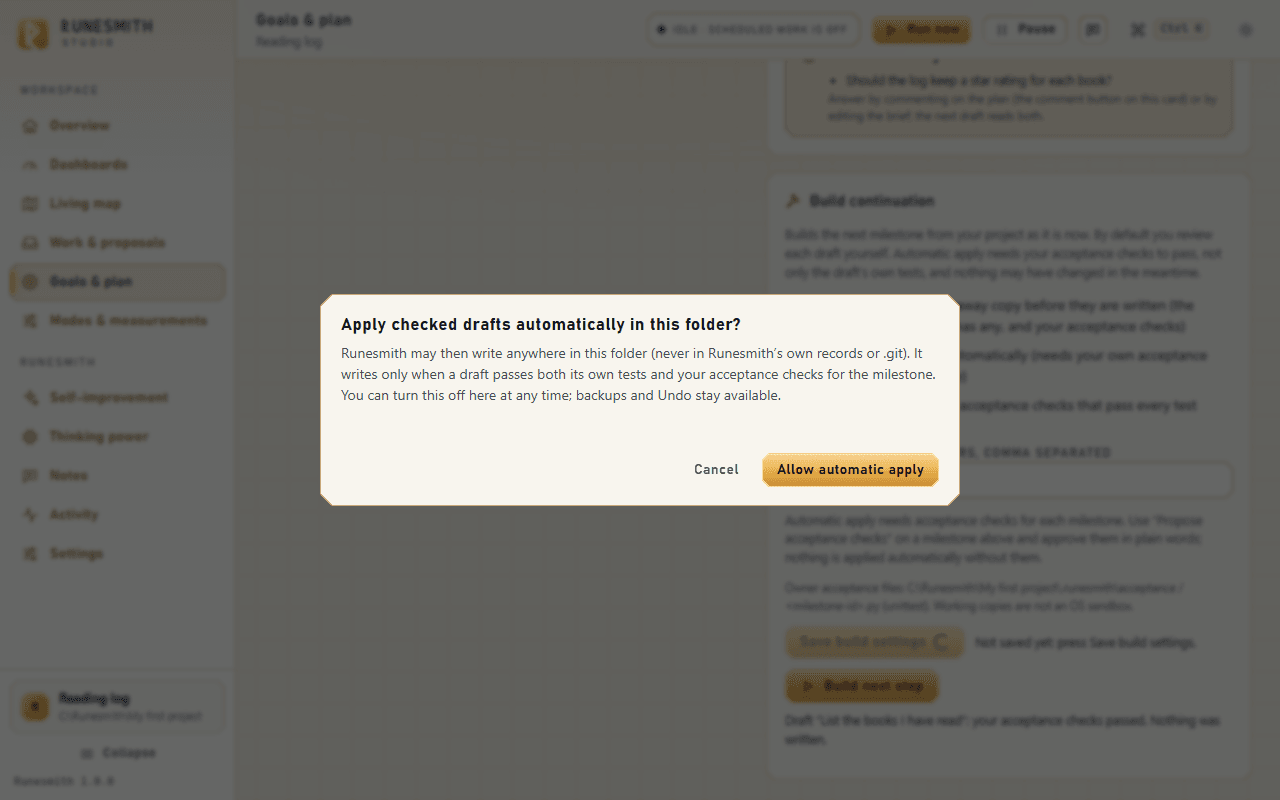
- Default: off. Turning it on for the first time opens a confirmation dialog that names exactly where it may write, before it takes effect.
- Turn it on when: you have approved acceptance checks for the milestones you want built unattended, and you have named the folders it may touch.
- Turn it off when: you want to look at, and click Write on, every draft yourself, however well it checked.
- Safe to know: with this off, or with no approved acceptance checks for a given milestone, Runesmith writes no project file on its own for that milestone. Whenever it does write, a backup is kept and Undo is always one click away, under Work & proposals.
- Find it: Goals & plan → "Build continuation" card, second checkbox, labelled in full: "Apply checked drafts automatically (needs your own acceptance checks for the milestone)".
- What it does: lets Runesmith write a checked draft straight into your folder without you clicking Write — but only for a milestone with approved acceptance checks (approved by you, or by the check autopilot if you switched that on, next card), only when the source has not changed since the check ran, and only inside the folders you have named under "Allowed files or folders" (below).
- Default: off. Turning it on for the first time opens a confirmation dialog that names exactly where it may write, before it takes effect.
- Turn it on when: you have approved acceptance checks for the milestones you want built unattended, and you have named the folders it may touch.
- Turn it off when: you want to look at, and click Write on, every draft yourself, however well it checked.
- Safe to know: with this off, or with no approved acceptance checks for a given milestone, Runesmith writes no project file on its own for that milestone. Whenever it does write, a backup is kept and Undo is always one click away, under Work & proposals.
"Let Runesmith approve acceptance checks that pass every test (check autopilot)" (checks_autopilot) #
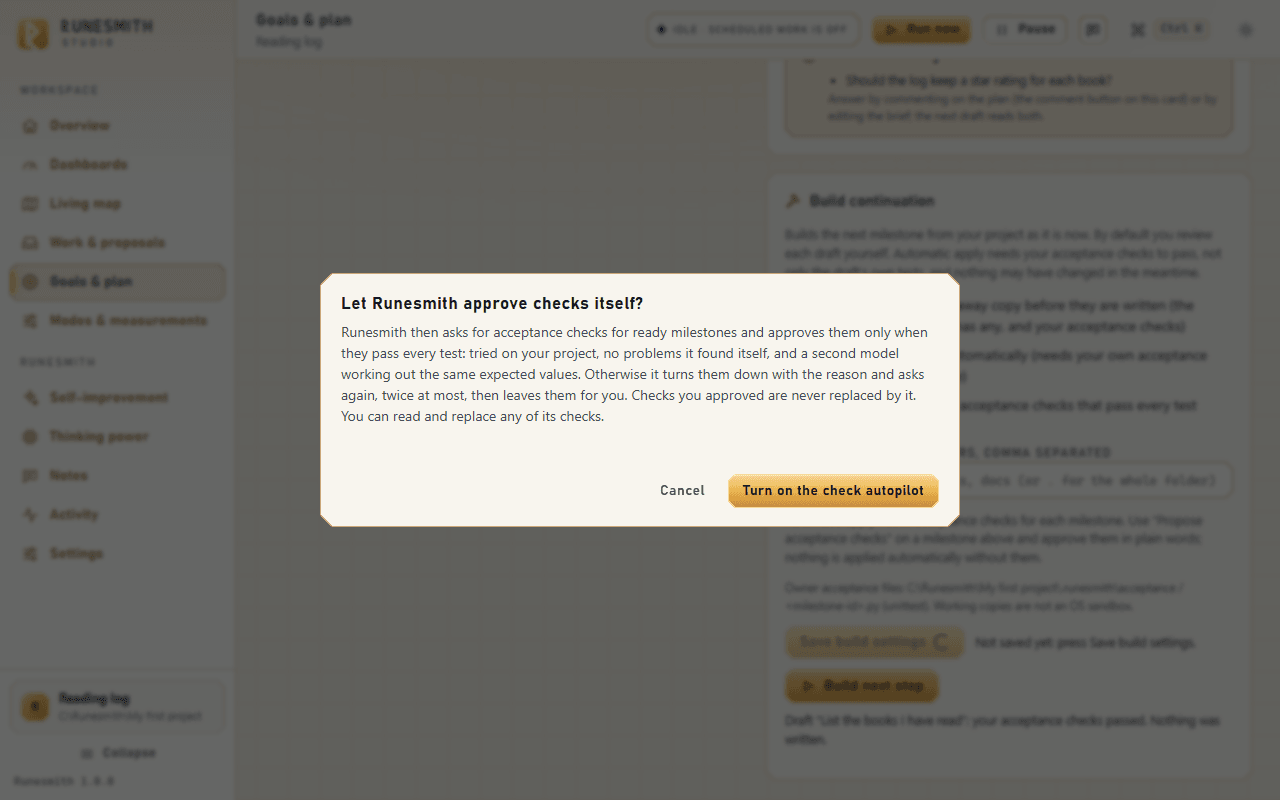
- Find it: Goals & plan → "Build continuation" card, third checkbox, labelled "Let Runesmith approve acceptance checks that pass every test (check autopilot)". It is saved with the rest of the card by Save build settings; the first time you turn it on, a dialog titled "Let Runesmith approve checks itself?" asks you to confirm with "Turn on the check autopilot".
- What it does: Runesmith approves a milestone's proposed acceptance checks itself, so a project running without you does not wait for approvals. It approves them only when they pass every test: (a) their trial on a throwaway copy of your project ran, and they fail as a milestone not yet built should; (b) Runesmith's own reading finds nothing wrong: no file nothing creates, no exact text the sentence does not say, no failed revision, and no exact text from the milestone's "Done when" (an attribute with its value, a call written with numbers, a phrase in quotes) that no check requires; (c) a second, different model, shown the milestone and each example's input but never the expected values, works out the same values and sees no contradiction with the other milestones' checks. Checks that fail a test are turned down with the reason, which the next Checker is told, and asked for again, at most twice; after that, or when it cannot judge, they wait for you. If Runesmith's own request for a milestone's checks fails twice in a row (no usable answer, or no model answered), it stops asking for that milestone by itself and builds other work. The milestone's card says so, and it asks again when the project's files or the milestone change, after two hours, or when you press Propose acceptance checks yourself. With it on, a ready milestone without checks gets them proposed before it is built, and, with "Work on a schedule" and checking on, checks it approved are built at once.
- Default: off.
- Turn it on when: nobody will be there to read and approve checks, you have two different models to give the Checker's lane (see "Checker", below), and your milestones can be checked by running a command or reading a file.
- Turn it off when: you want to read every set of checks before anything uses it, or a milestone is about how something looks: checks read files and printed text, and cannot see a picture.
- Safe to know: it never replaces checks you approved yourself. Its approvals read "approved by Runesmith's check autopilot", never "approved by you", and the checks file is headed "not owner-reviewed". You can read, replace or withdraw any of them at any time (see "Withdraw these checks", below). It is a convenience, not a guarantee. In the first long project it ran on, a second model's agreement did not catch every wrong check: in one audit, the person running that project read seven approvals and found four wrong in the same way (an exact value checked in a field the program does not read) and one loose. Two tests were added after those mistakes: the checks are compared with the milestone's "Done when", and the second model is shown the inputs the program is known to read and asked to name any field written in the wrong place. Not every kind of mistake is caught yet. Read what it approves when you can. It leaves checks for you when the second model is missing ("there is no second model to cross-check with (add another under Thinking power)"), when checking drafts is off, when the checks call a function or read a document, and when they are not written as examples. With it on, even a set of checks you ask for yourself with Propose acceptance checks is reviewed by the autopilot: to read a proposal first, turn it off.
"Allowed files or folders" (build_paths) #
- Find it: Goals & plan → "Build continuation" card, the text field labelled "Allowed files or folders, comma separated", placeholder text "for example: src, tests, docs (or . for the whole folder)".
- What it does: names the only files or folders Runesmith may write into when automatic apply is on. Typing a single "." means the whole project folder.
- Default: empty. With nothing named here, nothing can be written automatically, whatever the other switches say.
- Set it when: you turn on automatic apply — list the folders you are comfortable with (for example
src, tests), or type . for the whole project.
- Leave it empty when: you are not using automatic apply, or you want it refused until you deliberately name somewhere.
- Safe to know: even
. never reaches Runesmith's own records or your version-control folder (for example .git) — those stay out of reach no matter what you type here. If you turn on automatic apply without naming anywhere, the Studio refuses and asks you to name a folder first.
Goals & plan — Acceptance checks #
src, tests), or type . for the whole project.. never reaches Runesmith's own records or your version-control folder (for example .git) — those stay out of reach no matter what you type here. If you turn on automatic apply without naming anywhere, the Studio refuses and asks you to name a folder first.Every milestone card under Goals & plan carries its own acceptance-checks block. These decide what "done" means for that one milestone, and they are what "Apply checked drafts automatically" (above) is judged against. This is a small workflow rather than a single on/off switch, so it gets one card per stage.
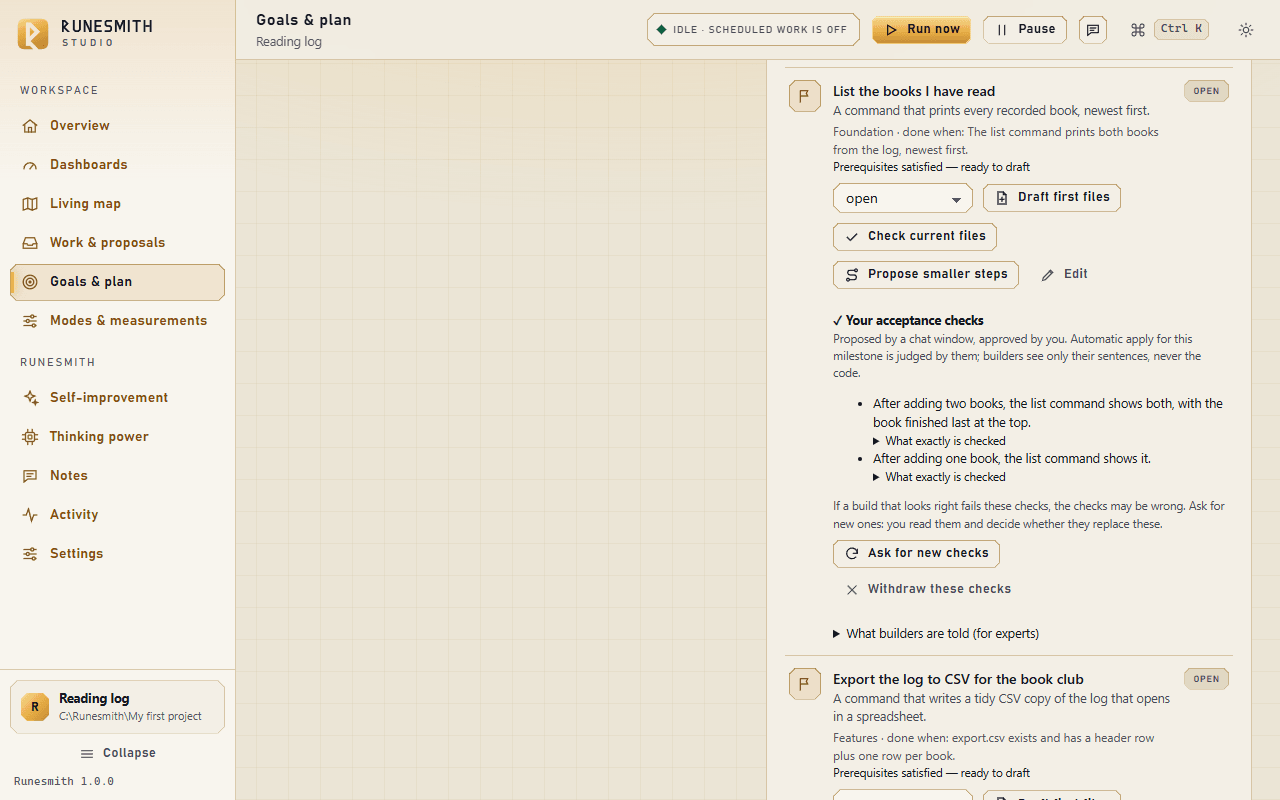
"Propose acceptance checks" #
- Find it: on a milestone card, under Goals & plan, when it has no checks yet.
- What it does: asks the Checker role (see "Thinking power — roles", below) to write acceptance checks for this milestone. The model describes a few examples (the files to start with, the commands a person would type, what the result should show), each with a plain sentence saying what it means; Runesmith writes the check code itself from them, so a small model does not have to. Where checking is on, Runesmith also tries the proposal on a throwaway copy of your project as it stands today, and warns you if the checks already pass or cannot run. With the check autopilot on (see "Build continuation", above), the autopilot reviews the proposal instead of waiting for you.
- Default: no checks exist for a new milestone until you ask for them.
- Use it when: you want automatic apply to be possible for this milestone, or you simply want a second opinion on what "done" should mean.
- Leave it when: you are happy reviewing every draft for this milestone by hand and never plan to turn on automatic apply for it.
- Safe to know: this only proposes. Nothing is approved, and nothing changes what automatic apply judges, until you act on the proposal below.
"Use these checks" (approve) #
- Find it: on the milestone card, once a proposal is showing, button labelled "Use these checks".
- What it does: approves the proposed checks as this milestone's acceptance checks. A confirmation dialog explains that they decide when the milestone is done, that work is applied automatically only if it passes them and you have separately allowed automatic apply, and that whoever builds the milestone is told their plain sentences, and what exactly each one checks, but never the check code.
- Default: nothing is approved until you click it.
- Use it when: you have read the checks — and any assumptions or exact-text requirements listed under them — and they describe "done" the way you mean it.
- Hold off when: the checks already pass on your project as it stands today; the Studio warns you about this case specifically, since it can mean the checks do not actually test what the milestone is meant to add.
- Safe to know: approving checks never writes or changes a project file by itself — it only sets the standard a later build is checked against.
- Find it: on the milestone card, once a proposal is showing, button labelled "Use these checks".
- What it does: approves the proposed checks as this milestone's acceptance checks. A confirmation dialog explains that they decide when the milestone is done, that work is applied automatically only if it passes them and you have separately allowed automatic apply, and that whoever builds the milestone is told their plain sentences, and what exactly each one checks, but never the check code.
- Default: nothing is approved until you click it.
- Use it when: you have read the checks — and any assumptions or exact-text requirements listed under them — and they describe "done" the way you mean it.
- Hold off when: the checks already pass on your project as it stands today; the Studio warns you about this case specifically, since it can mean the checks do not actually test what the milestone is meant to add.
- Safe to know: approving checks never writes or changes a project file by itself — it only sets the standard a later build is checked against.
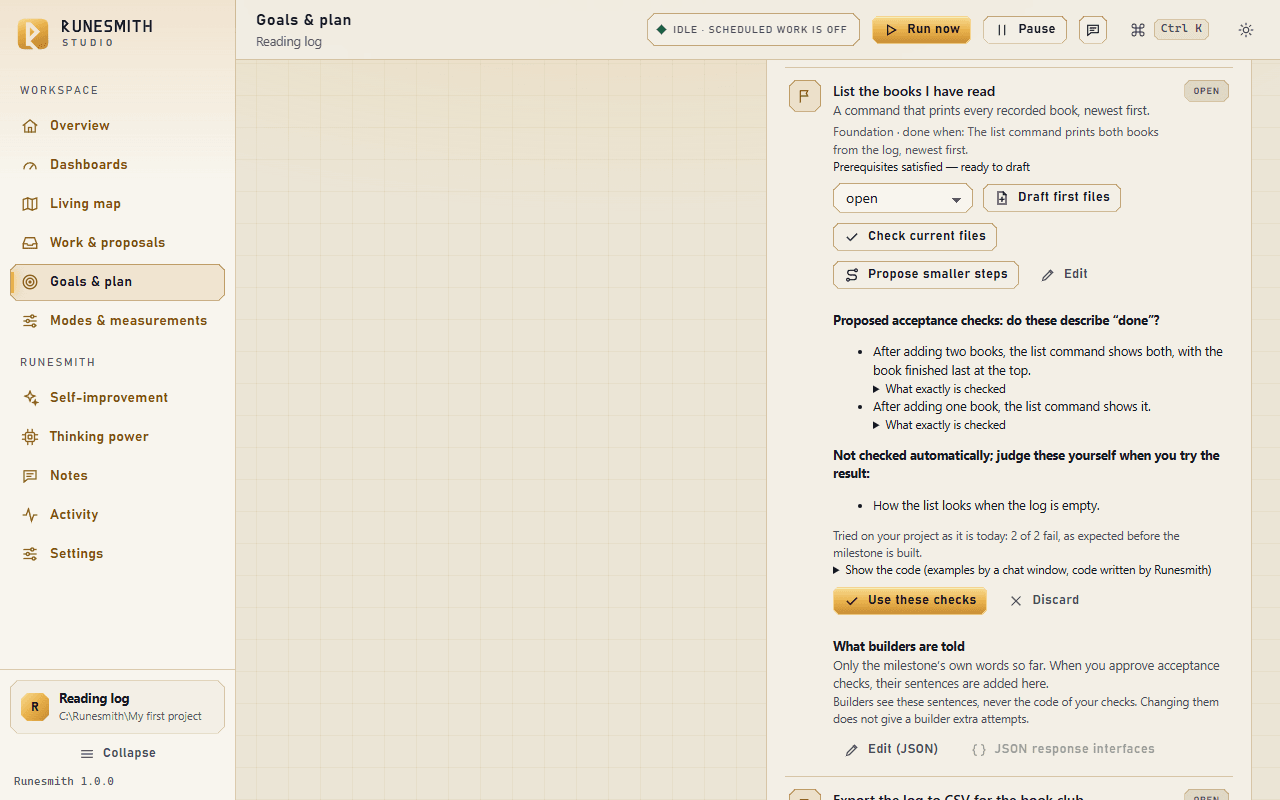
"Ask for new checks" #
- Find it: on a milestone that already has approved checks, button labelled "Ask for new checks".
- What it does: proposes a fresh set of checks alongside the ones you already approved, so you can compare them.
- Default: not asked for unless you click it.
- Use it when: a build that looks right keeps failing the current checks — which can mean the checks, not the build, are wrong.
- Leave it when: your current checks are working as expected.
- Safe to know: your existing approved checks stay in force, and keep judging automatic apply, until you explicitly replace them with the new proposal. If you are sure the current checks are plainly wrong, take them back with Withdraw these checks (below) instead.
"Replace my checks" (replace with a reason) #
- Find it: on a milestone with both an approved set and a new proposal, button labelled "Replace my checks".
- What it does: swaps the new proposal in as the milestone's acceptance checks. You are asked to type why — for example, "a correct build failed the old checks" — and that reason is kept with the change.
- Default: nothing is replaced until you confirm, with a reason.
- Use it when: you have decided the new checks describe "done" better than the ones currently in force.
- Leave it when: you are only comparing, or you are not sure yet.
- Safe to know: the old checks are kept, not deleted, so the change stays auditable. From the moment you confirm, the new checks are what automatic apply is judged against.
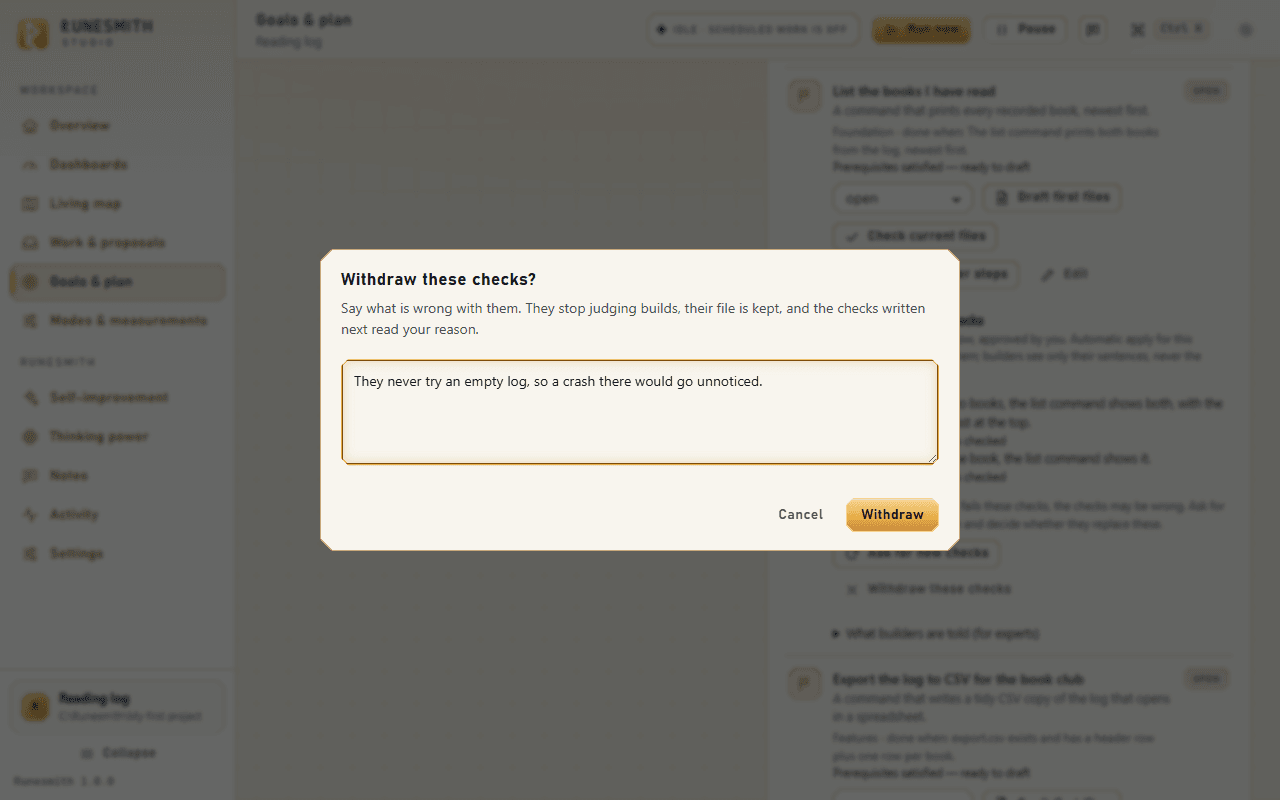
"Withdraw these checks" (take back approved checks, with a reason) #
- Find it: on a milestone card that has approved checks, a quiet button under the checks' sentences, labelled "Withdraw these checks". It is offered for a done or dropped milestone too. It is not there while a new proposal waits on the card (approve or discard that first), and not for a checks file you wrote yourself.
- What it does: takes the approved checks back. A box titled "Withdraw these checks?" asks you to say what is wrong with them; you type the reason and click Withdraw. From then on they stop judging builds, their file is kept, and builders are no longer shown their sentences (not under "What builders are told", not in the milestone's memories, not in a draft being revised). The next Checker reads your reason, ahead of any earlier turn-downs.
- Default: nothing is withdrawn until you confirm with a reason; a blank reason is not accepted ("Say what is wrong with the checks; it is kept with them.").
- Use it when: you have read approved checks and they check the wrong thing: a field in the wrong place, a value the milestone never states, a file nothing creates. Especially for checks the autopilot approved, and when a build that is right keeps failing.
- Leave it when: you simply have a better set to put in their place: ask for new checks and use Replace my checks instead.
- Safe to know: nothing is deleted. Version numbers carry on after the last one, and your own criteria and interfaces stay in force. If a proposal turns up while you are withdrawing, it is set aside, so the autopilot cannot approve it afterwards; the autopilot's rounds start afresh. What comes next depends on the milestone: for an open one, press Propose acceptance checks (or let the autopilot ask); for a done or dropped one, set its status to open first. The notice after you withdraw says which. If the button takes more than three seconds, a line beside it says "Withdrawing the checks is taking longer than usual", with the seconds so far; there is no need to press it again.
- Find it: on a milestone with both an approved set and a new proposal, button labelled "Replace my checks".
- What it does: swaps the new proposal in as the milestone's acceptance checks. You are asked to type why — for example, "a correct build failed the old checks" — and that reason is kept with the change.
- Default: nothing is replaced until you confirm, with a reason.
- Use it when: you have decided the new checks describe "done" better than the ones currently in force.
- Leave it when: you are only comparing, or you are not sure yet.
- Safe to know: the old checks are kept, not deleted, so the change stays auditable. From the moment you confirm, the new checks are what automatic apply is judged against.
"Withdraw these checks" (take back approved checks, with a reason) #
- Find it: on a milestone card that has approved checks, a quiet button under the checks' sentences, labelled "Withdraw these checks". It is offered for a done or dropped milestone too. It is not there while a new proposal waits on the card (approve or discard that first), and not for a checks file you wrote yourself.
- What it does: takes the approved checks back. A box titled "Withdraw these checks?" asks you to say what is wrong with them; you type the reason and click Withdraw. From then on they stop judging builds, their file is kept, and builders are no longer shown their sentences (not under "What builders are told", not in the milestone's memories, not in a draft being revised). The next Checker reads your reason, ahead of any earlier turn-downs.
- Default: nothing is withdrawn until you confirm with a reason; a blank reason is not accepted ("Say what is wrong with the checks; it is kept with them.").
- Use it when: you have read approved checks and they check the wrong thing: a field in the wrong place, a value the milestone never states, a file nothing creates. Especially for checks the autopilot approved, and when a build that is right keeps failing.
- Leave it when: you simply have a better set to put in their place: ask for new checks and use Replace my checks instead.
- Safe to know: nothing is deleted. Version numbers carry on after the last one, and your own criteria and interfaces stay in force. If a proposal turns up while you are withdrawing, it is set aside, so the autopilot cannot approve it afterwards; the autopilot's rounds start afresh. What comes next depends on the milestone: for an open one, press Propose acceptance checks (or let the autopilot ask); for a done or dropped one, set its status to open first. The notice after you withdraw says which. If the button takes more than three seconds, a line beside it says "Withdrawing the checks is taking longer than usual", with the seconds so far; there is no need to press it again.
Modes & measurements #
The cards under "Activity modes" on this page are switches for what kind of work Runesmith is willing to start at all. Any number of them can be on together, and — if "Work on a schedule" is also on, in Settings — Runesmith takes turns between the ones that are on, one job at a time. None of them grants a new permission: Build still needs "Check drafts on a throwaway copy…" (Goals & plan) before it can run, and Observe still blocks every mode's model calls regardless of what is switched on here.
One nuance worth knowing: until you save this page at least once (even unchanged), the switches shown are not yet enforced as a block. Before that first save, Runesmith behaves as if Map & Plan, Build and Troubleshoot were on (unless you have chosen Observe) and Optimize and Operations were off — without actually refusing anything based on this page's settings. Saving the page — with the "Save modes" button — is what turns each switch into an actual gate from then on. (Saving does not switch off the unattended steps: with Build on in the saved modes, the steps under "Running on its own" and the check autopilot's checks-first step still come first.) This is deliberate: it means opening this page and looking around never silently switches on work you have not asked for.
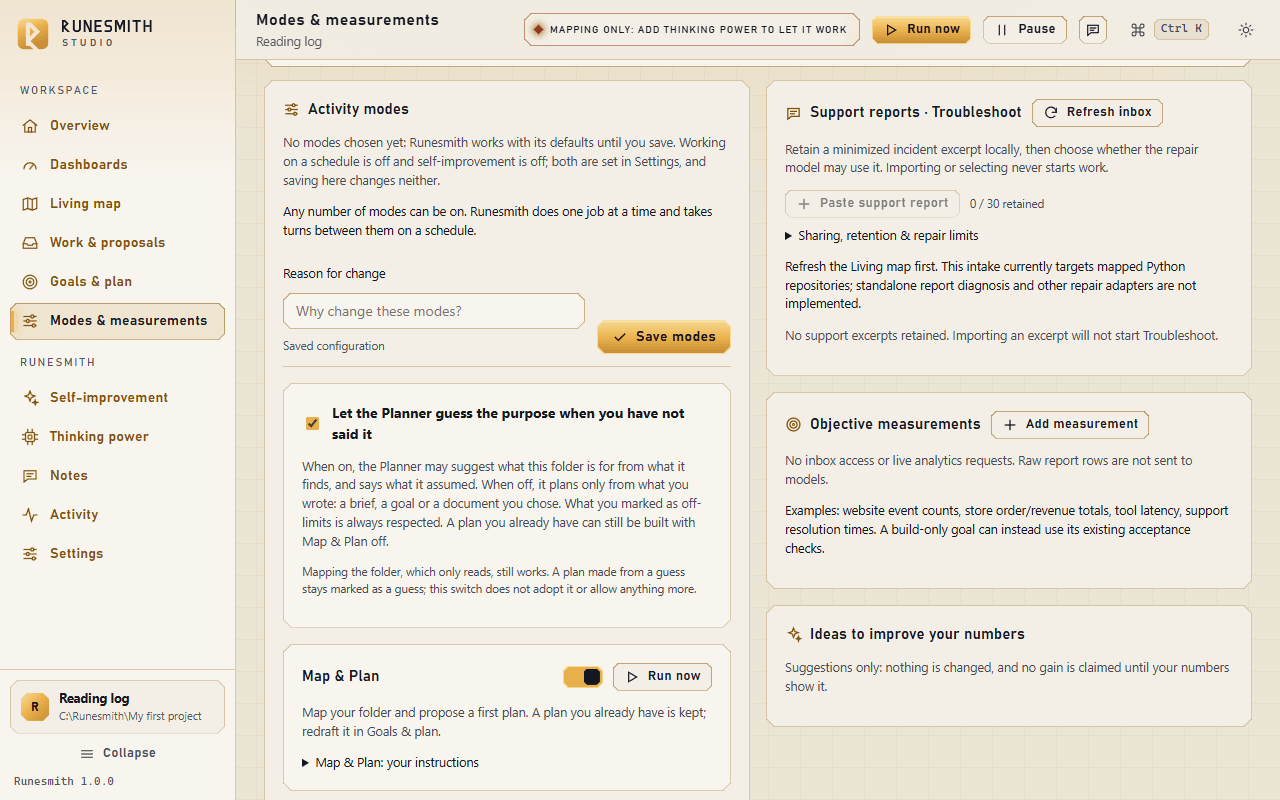
"Map & Plan" #
- Find it: Modes & measurements → "Activity modes" → Map & Plan card.
- What it does: maps your folder and proposes a first plan. A plan you already have is kept — redraft it deliberately from Goals & plan instead of relying on this mode to replace it.
- Default: on (unless you have chosen Observe; see the nuance above for what "on" means before you first save this page).
- Turn it off when: you do not want Runesmith drafting or redrafting a plan on its own or on a schedule.
- Turn it on when: you are happy for Runesmith to propose a first plan, or to help move planning forward, without you asking each time.
- Safe to know: refuses to run while you are observing. It also refuses to plan unless either "Let the Planner guess the purpose" (below) is on, or you have given it something explicit of your own — a brief, an active goal, or a chosen blueprint document.
"Build" #
- Find it: Modes & measurements → "Activity modes" → Build card.
- What it does: builds your plan's milestones — drafts files, checks them on a throwaway copy, and writes only when the checks pass and you have allowed it.
- Default: on (same conditions as Map & Plan).
- Turn it off when: you do not want any milestone building to start on a schedule or from this page's "Run now" button. (The "Build next step" button on Goals & plan uses this same switch — once the page has been saved, turning Build off here also stops that button.)
- Turn it on when: you want Runesmith able to draft and, if checked and allowed, apply milestone work.
- Safe to know: refuses to run at all until "Check drafts on a throwaway copy before they are written" is on, under Goals & plan → Build continuation.
"Troubleshoot" #
- Find it: Modes & measurements → "Activity modes" → Troubleshoot card.
- What it does: finds failing tests and proposes repairs, using any support reports you have selected as clues — the Studio's own words are "a report is a clue, not a test".
- Default: on (same conditions as Map & Plan).
- Turn it off when: you do not want Runesmith looking for things to repair by itself, whether by schedule or by this page's "Run now" button.
- Turn it on when: you want Runesmith actively looking for failing tests to propose fixes for.
- Safe to know: a Troubleshoot repair never writes itself in. It always lands under Work & proposals → Fixes, where you read the diff and click "Apply to my files" yourself (or "Reject", with an optional reason, or "Undo" after applying). This mode has no automatic-apply setting of its own.
"Optimize" #
- Find it: Modes & measurements → "Activity modes" → Optimize card.
- What it does: suggests one change that could improve one of your chosen numbers (measurements), drawn from your own reports. Nothing is changed automatically — it only writes an idea, shown under "Ideas to improve your numbers" on the same page.
- Default: off.
- Turn it on when: you have at least one measurement defined and successfully measured, and want suggestions for improving it.
- Turn it off when: you have no measurements set up yet, or you are not looking for improvement ideas right now.
- Safe to know: needs at least one measurement selected on its own card to run at all, and that measurement needs a successful, up-to-date observation first. It never claims a gain and never changes anything by itself.
"Operations" #
- Find it: Modes & measurements → "Activity modes" → Operations card.
- What it does: reads your own report files (local CSV or JSON, or a pasted structured report) and records each number against its target.
- Default: off.
- Turn it on when: you want Runesmith to log your own external numbers over time.
- Turn it off when: you have nothing to feed it, or you would rather record numbers yourself.
- Safe to know: it never contacts a live service, deploys anything, or sends messages — the Studio's own description is explicit about this. Like Optimize, it needs at least one measurement selected. A measurement of a "live connector" kind, such as GA4 or email, is a configuration placeholder rather than a live connection, so it is shown as unavailable rather than run.
"Let the Planner guess the purpose when you have not said it" (infer_purpose) #
- Find it: Modes & measurements page, the card just above the mode list.
- What it does: when on, the Planner may guess what your folder is for from what it finds, and it always says what it assumed. When off, it plans only from what you explicitly wrote — a brief, a goal, or a document you chose as a blueprint.
- Default: on, for a workspace that has never saved this page. A configuration upgraded from an older Runesmith starts with it off instead, and the page shows a note explaining this when it happens.
- Turn it off when: you never want Runesmith assuming your purpose, even a clearly labelled assumption.
- Turn it on when: you are comfortable with Runesmith making a stated, reviewable guess when you have not written anything explicit.
- Safe to know: mapping your folder — which only reads — works the same either way. Anything you have marked off-limits (an excluded folder) is respected regardless. A plan you already have can still be built even with Map & Plan switched off.
"Objective measurements" (Add measurement / Measure now) #
- Find it: Modes & measurements → "Objective measurements" card → "Add measurement" button (to create one) and "Measure now" (on each existing one).
- What it does: defines the report sources — local CSV/JSON files, or pasted structured reports — that Optimize and Operations read, and reads the latest one when you press "Measure now".
- Default: none defined.
- Use it when: you have external numbers (website events, order counts, latency, support times, and so on) you want tracked, or improvement ideas suggested for.
- Skip it when: your goal is purely about the code itself — a build-only goal can rely on its own acceptance checks instead, without any measurement defined.
- Safe to know: "Measure now" queues a read of a report file with no model call. GA4 and email source types are configuration placeholders, not live connections, and no raw report rows are ever sent to a model — only the structured, already-computed result is.
- Find it: Modes & measurements → "Activity modes" → Build card.
- What it does: builds your plan's milestones — drafts files, checks them on a throwaway copy, and writes only when the checks pass and you have allowed it.
- Default: on (same conditions as Map & Plan).
- Turn it off when: you do not want any milestone building to start on a schedule or from this page's "Run now" button. (The "Build next step" button on Goals & plan uses this same switch — once the page has been saved, turning Build off here also stops that button.)
- Turn it on when: you want Runesmith able to draft and, if checked and allowed, apply milestone work.
- Safe to know: refuses to run at all until "Check drafts on a throwaway copy before they are written" is on, under Goals & plan → Build continuation.
"Troubleshoot" #
- Find it: Modes & measurements → "Activity modes" → Troubleshoot card.
- What it does: finds failing tests and proposes repairs, using any support reports you have selected as clues — the Studio's own words are "a report is a clue, not a test".
- Default: on (same conditions as Map & Plan).
- Turn it off when: you do not want Runesmith looking for things to repair by itself, whether by schedule or by this page's "Run now" button.
- Turn it on when: you want Runesmith actively looking for failing tests to propose fixes for.
- Safe to know: a Troubleshoot repair never writes itself in. It always lands under Work & proposals → Fixes, where you read the diff and click "Apply to my files" yourself (or "Reject", with an optional reason, or "Undo" after applying). This mode has no automatic-apply setting of its own.
"Optimize" #
- Find it: Modes & measurements → "Activity modes" → Optimize card.
- What it does: suggests one change that could improve one of your chosen numbers (measurements), drawn from your own reports. Nothing is changed automatically — it only writes an idea, shown under "Ideas to improve your numbers" on the same page.
- Default: off.
- Turn it on when: you have at least one measurement defined and successfully measured, and want suggestions for improving it.
- Turn it off when: you have no measurements set up yet, or you are not looking for improvement ideas right now.
- Safe to know: needs at least one measurement selected on its own card to run at all, and that measurement needs a successful, up-to-date observation first. It never claims a gain and never changes anything by itself.
"Operations" #
- Find it: Modes & measurements → "Activity modes" → Operations card.
- What it does: reads your own report files (local CSV or JSON, or a pasted structured report) and records each number against its target.
- Default: off.
- Turn it on when: you want Runesmith to log your own external numbers over time.
- Turn it off when: you have nothing to feed it, or you would rather record numbers yourself.
- Safe to know: it never contacts a live service, deploys anything, or sends messages — the Studio's own description is explicit about this. Like Optimize, it needs at least one measurement selected. A measurement of a "live connector" kind, such as GA4 or email, is a configuration placeholder rather than a live connection, so it is shown as unavailable rather than run.
"Let the Planner guess the purpose when you have not said it" (infer_purpose) #
- Find it: Modes & measurements page, the card just above the mode list.
- What it does: when on, the Planner may guess what your folder is for from what it finds, and it always says what it assumed. When off, it plans only from what you explicitly wrote — a brief, a goal, or a document you chose as a blueprint.
- Default: on, for a workspace that has never saved this page. A configuration upgraded from an older Runesmith starts with it off instead, and the page shows a note explaining this when it happens.
- Turn it off when: you never want Runesmith assuming your purpose, even a clearly labelled assumption.
- Turn it on when: you are comfortable with Runesmith making a stated, reviewable guess when you have not written anything explicit.
- Safe to know: mapping your folder — which only reads — works the same either way. Anything you have marked off-limits (an excluded folder) is respected regardless. A plan you already have can still be built even with Map & Plan switched off.
"Objective measurements" (Add measurement / Measure now) #
- Find it: Modes & measurements → "Objective measurements" card → "Add measurement" button (to create one) and "Measure now" (on each existing one).
- What it does: defines the report sources — local CSV/JSON files, or pasted structured reports — that Optimize and Operations read, and reads the latest one when you press "Measure now".
- Default: none defined.
- Use it when: you have external numbers (website events, order counts, latency, support times, and so on) you want tracked, or improvement ideas suggested for.
- Skip it when: your goal is purely about the code itself — a build-only goal can rely on its own acceptance checks instead, without any measurement defined.
- Safe to know: "Measure now" queues a read of a report file with no model call. GA4 and email source types are configuration placeholders, not live connections, and no raw report rows are ever sent to a model — only the structured, already-computed result is.
- Find it: Modes & measurements → "Activity modes" → Optimize card.
- What it does: suggests one change that could improve one of your chosen numbers (measurements), drawn from your own reports. Nothing is changed automatically — it only writes an idea, shown under "Ideas to improve your numbers" on the same page.
- Default: off.
- Turn it on when: you have at least one measurement defined and successfully measured, and want suggestions for improving it.
- Turn it off when: you have no measurements set up yet, or you are not looking for improvement ideas right now.
- Safe to know: needs at least one measurement selected on its own card to run at all, and that measurement needs a successful, up-to-date observation first. It never claims a gain and never changes anything by itself.
"Operations" #
- Find it: Modes & measurements → "Activity modes" → Operations card.
- What it does: reads your own report files (local CSV or JSON, or a pasted structured report) and records each number against its target.
- Default: off.
- Turn it on when: you want Runesmith to log your own external numbers over time.
- Turn it off when: you have nothing to feed it, or you would rather record numbers yourself.
- Safe to know: it never contacts a live service, deploys anything, or sends messages — the Studio's own description is explicit about this. Like Optimize, it needs at least one measurement selected. A measurement of a "live connector" kind, such as GA4 or email, is a configuration placeholder rather than a live connection, so it is shown as unavailable rather than run.
"Let the Planner guess the purpose when you have not said it" (infer_purpose) #
- Find it: Modes & measurements page, the card just above the mode list.
- What it does: when on, the Planner may guess what your folder is for from what it finds, and it always says what it assumed. When off, it plans only from what you explicitly wrote — a brief, a goal, or a document you chose as a blueprint.
- Default: on, for a workspace that has never saved this page. A configuration upgraded from an older Runesmith starts with it off instead, and the page shows a note explaining this when it happens.
- Turn it off when: you never want Runesmith assuming your purpose, even a clearly labelled assumption.
- Turn it on when: you are comfortable with Runesmith making a stated, reviewable guess when you have not written anything explicit.
- Safe to know: mapping your folder — which only reads — works the same either way. Anything you have marked off-limits (an excluded folder) is respected regardless. A plan you already have can still be built even with Map & Plan switched off.
"Objective measurements" (Add measurement / Measure now) #
- Find it: Modes & measurements → "Objective measurements" card → "Add measurement" button (to create one) and "Measure now" (on each existing one).
- What it does: defines the report sources — local CSV/JSON files, or pasted structured reports — that Optimize and Operations read, and reads the latest one when you press "Measure now".
- Default: none defined.
- Use it when: you have external numbers (website events, order counts, latency, support times, and so on) you want tracked, or improvement ideas suggested for.
- Skip it when: your goal is purely about the code itself — a build-only goal can rely on its own acceptance checks instead, without any measurement defined.
- Safe to know: "Measure now" queues a read of a report file with no model call. GA4 and email source types are configuration placeholders, not live connections, and no raw report rows are ever sent to a model — only the structured, already-computed result is.
- Find it: Modes & measurements page, the card just above the mode list.
- What it does: when on, the Planner may guess what your folder is for from what it finds, and it always says what it assumed. When off, it plans only from what you explicitly wrote — a brief, a goal, or a document you chose as a blueprint.
- Default: on, for a workspace that has never saved this page. A configuration upgraded from an older Runesmith starts with it off instead, and the page shows a note explaining this when it happens.
- Turn it off when: you never want Runesmith assuming your purpose, even a clearly labelled assumption.
- Turn it on when: you are comfortable with Runesmith making a stated, reviewable guess when you have not written anything explicit.
- Safe to know: mapping your folder — which only reads — works the same either way. Anything you have marked off-limits (an excluded folder) is respected regardless. A plan you already have can still be built even with Map & Plan switched off.
"Objective measurements" (Add measurement / Measure now) #
- Find it: Modes & measurements → "Objective measurements" card → "Add measurement" button (to create one) and "Measure now" (on each existing one).
- What it does: defines the report sources — local CSV/JSON files, or pasted structured reports — that Optimize and Operations read, and reads the latest one when you press "Measure now".
- Default: none defined.
- Use it when: you have external numbers (website events, order counts, latency, support times, and so on) you want tracked, or improvement ideas suggested for.
- Skip it when: your goal is purely about the code itself — a build-only goal can rely on its own acceptance checks instead, without any measurement defined.
- Safe to know: "Measure now" queues a read of a report file with no model call. GA4 and email source types are configuration placeholders, not live connections, and no raw report rows are ever sent to a model — only the structured, already-computed result is.
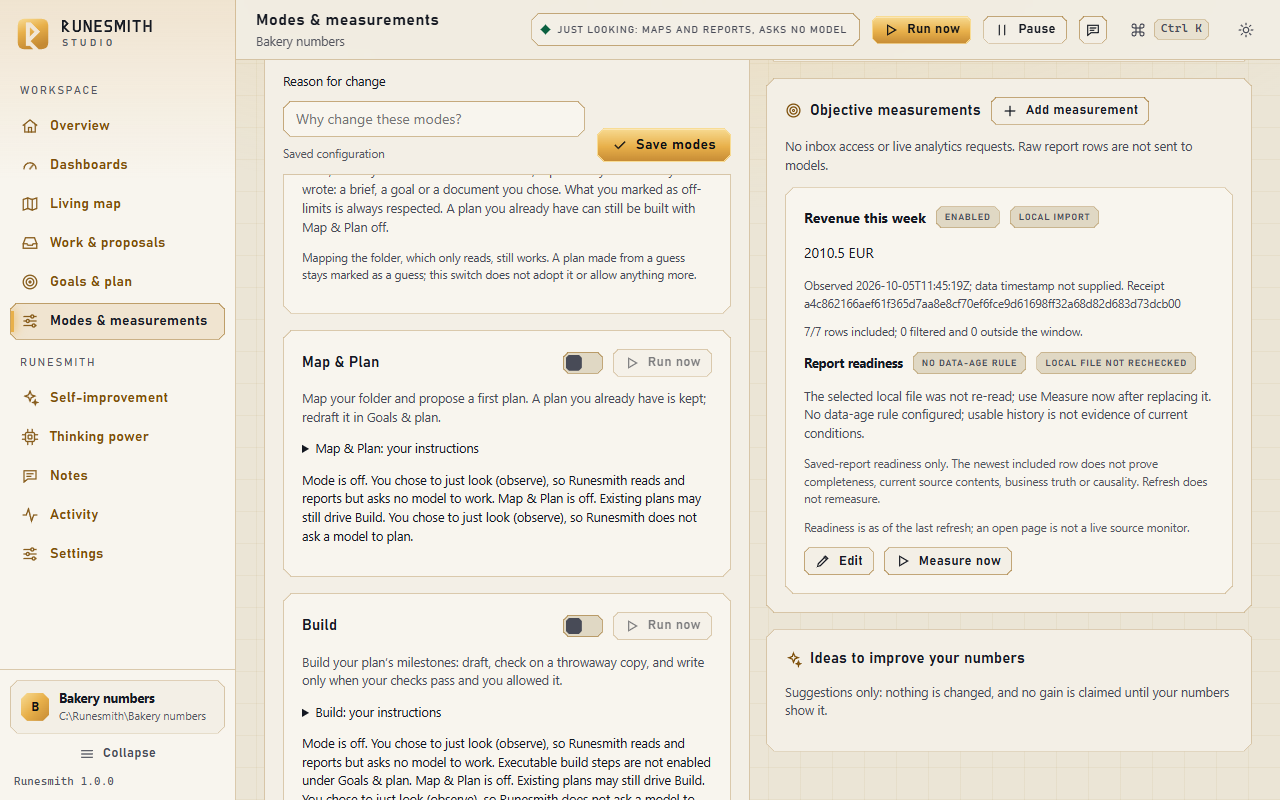
Thinking power — roles #
On the "Who does what" card, each of the four roles has its own lane of models. First add a model somewhere on the Thinking power page — a server running on this computer, a key you enter yourself, or a chat window you copy and paste into — then give it one or more of the four roles below. The card's own badge reads "first = preferred, then fallbacks": the first model you add to a role's lane is the one Runesmith tries first for that role; any others you add to the same lane are only tried if the first one fails, or has no quota left.
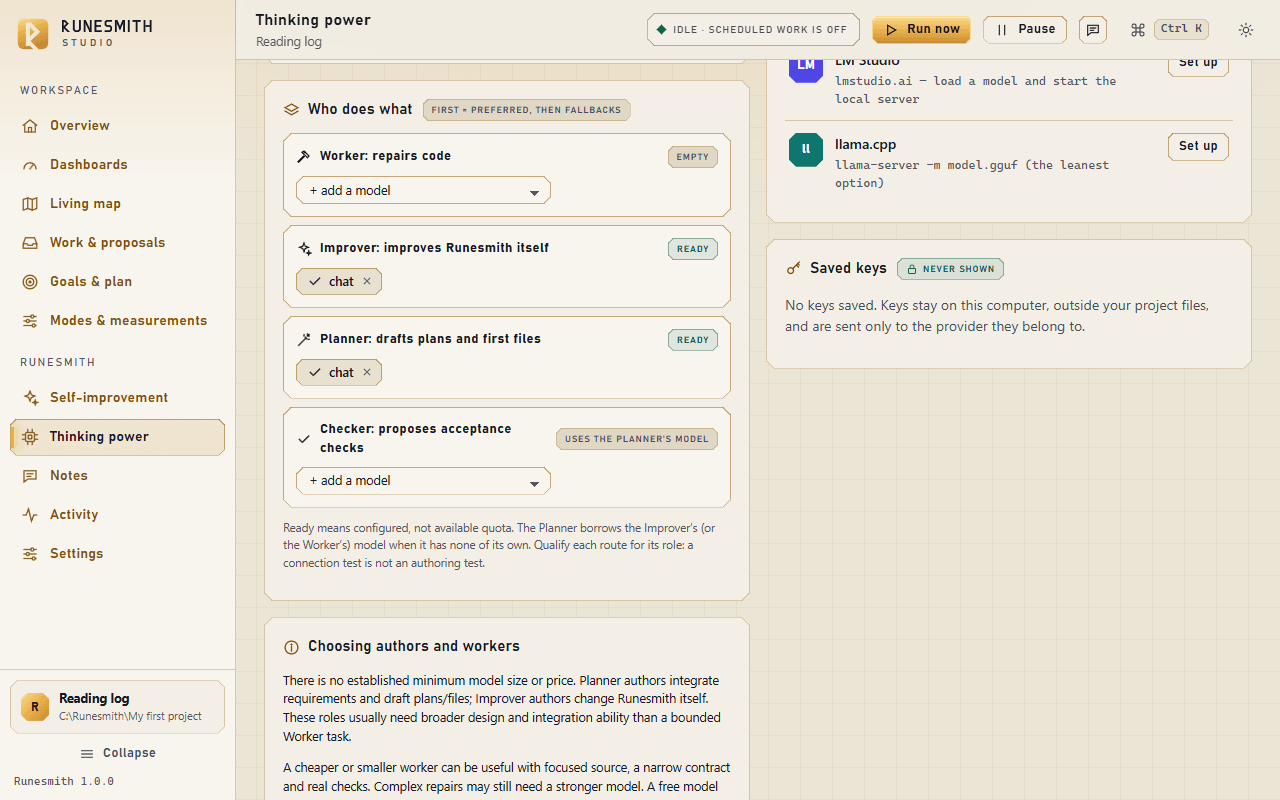
"Worker: repairs code" #
- Find it: Thinking power → "Who does what" → Worker lane.
- What it does: the role that repairs code — the model that drafts a Troubleshoot repair, and does the code-level work inside a Build.
- Default: no model assigned until you add one.
- Assign it when: you want repairs and build steps handled without you relaying every request by hand.
- Leave it empty when: you are only using a chat-window relay and are content to paste each request in yourself.
- Safe to know: an API or local model in this role avoids relaying every repair call by hand; a chat-window Worker still works, but a person must paste each request in and its reply back before that particular repair can finish.
"Improver: improves Runesmith itself" #
- Find it: Thinking power → "Who does what" → Improver lane.
- What it does: the role used for Kaizen self-improvement campaigns — proposing changes to Runesmith's own repair organ.
- Default: no model assigned.
- Assign it when: "Let Runesmith improve itself" is on, in Settings, and you want campaigns to actually have a model to author with.
- Leave it empty when: self-improvement is off, or you are not ready for it yet.
- Safe to know: matters only when self-improvement is on. Even with a model assigned, a self-made candidate only ever becomes active by winning a live trial on your own work, or through your own explicit "Make active" choice.
"Planner: drafts plans and first files" #
- Find it: Thinking power → "Who does what" → Planner lane.
- What it does: the role that drafts plans (the Map & Plan mode) and each milestone's first files.
- Default: no model assigned directly. If you have assigned an Improver, a Worker, or both, but no Planner, this card's own badge borrows one of them — it reads "uses the Improver's model" whenever an Improver is assigned (checked first), and only "uses the Worker's model" when a Worker is assigned with no Improver; it never names both at once. (The sentence "The Planner borrows the Improver's (or the Worker's) model when it has none of its own" is a separate footnote below all four role lanes, explaining the rule in general — it is not this card's own badge text.)
- Assign it when: you want planning handled by a model chosen specifically for that job, rather than borrowed from another role.
- Leave it empty when: you are content for planning to borrow whichever of Improver or Worker you have set up.
- Safe to know: the Studio's own guidance is that Planner and Improver authors "usually need broader design and integration ability than a bounded Worker task" — this role tends to benefit from a stronger model than a narrow code-repair task does.
"Checker: proposes acceptance checks" #
- Find it: Thinking power → "Who does what" → Checker lane.
- What it does: the role that proposes each milestone's acceptance checks — the "Propose acceptance checks" / "Ask for new checks" flow described above under Goals & plan.
- Default: no model assigned directly — the Studio borrows the Planner's model if none is set for Checker specifically, shown with the badge "uses the Planner's model".
- Assign it when: you want acceptance checks written by a model chosen specifically for that job.
- Leave it empty when: you are content for it to borrow the Planner's model.
- Safe to know: this role decides what "done" means for automatic apply, from only a handful of calls per milestone. The Studio's own advice is to give the Checker your best available model, even if a cheaper model does the actual building — a small model can build well but write weak checks, and weak checks undermine automatic apply more than a weak builder does. If you use the check autopilot, give the Checker lane (or the Planner lane) a second model, a different one from the model that wrote the checks and not a chat window: the autopilot asks it to cross-check them. With only one model, the autopilot leaves every proposal for you.
- Find it: Thinking power → "Who does what" → Improver lane.
- What it does: the role used for Kaizen self-improvement campaigns — proposing changes to Runesmith's own repair organ.
- Default: no model assigned.
- Assign it when: "Let Runesmith improve itself" is on, in Settings, and you want campaigns to actually have a model to author with.
- Leave it empty when: self-improvement is off, or you are not ready for it yet.
- Safe to know: matters only when self-improvement is on. Even with a model assigned, a self-made candidate only ever becomes active by winning a live trial on your own work, or through your own explicit "Make active" choice.
"Planner: drafts plans and first files" #
- Find it: Thinking power → "Who does what" → Planner lane.
- What it does: the role that drafts plans (the Map & Plan mode) and each milestone's first files.
- Default: no model assigned directly. If you have assigned an Improver, a Worker, or both, but no Planner, this card's own badge borrows one of them — it reads "uses the Improver's model" whenever an Improver is assigned (checked first), and only "uses the Worker's model" when a Worker is assigned with no Improver; it never names both at once. (The sentence "The Planner borrows the Improver's (or the Worker's) model when it has none of its own" is a separate footnote below all four role lanes, explaining the rule in general — it is not this card's own badge text.)
- Assign it when: you want planning handled by a model chosen specifically for that job, rather than borrowed from another role.
- Leave it empty when: you are content for planning to borrow whichever of Improver or Worker you have set up.
- Safe to know: the Studio's own guidance is that Planner and Improver authors "usually need broader design and integration ability than a bounded Worker task" — this role tends to benefit from a stronger model than a narrow code-repair task does.
"Checker: proposes acceptance checks" #
- Find it: Thinking power → "Who does what" → Checker lane.
- What it does: the role that proposes each milestone's acceptance checks — the "Propose acceptance checks" / "Ask for new checks" flow described above under Goals & plan.
- Default: no model assigned directly — the Studio borrows the Planner's model if none is set for Checker specifically, shown with the badge "uses the Planner's model".
- Assign it when: you want acceptance checks written by a model chosen specifically for that job.
- Leave it empty when: you are content for it to borrow the Planner's model.
- Safe to know: this role decides what "done" means for automatic apply, from only a handful of calls per milestone. The Studio's own advice is to give the Checker your best available model, even if a cheaper model does the actual building — a small model can build well but write weak checks, and weak checks undermine automatic apply more than a weak builder does. If you use the check autopilot, give the Checker lane (or the Planner lane) a second model, a different one from the model that wrote the checks and not a chat window: the autopilot asks it to cross-check them. With only one model, the autopilot leaves every proposal for you.
- Find it: Thinking power → "Who does what" → Checker lane.
- What it does: the role that proposes each milestone's acceptance checks — the "Propose acceptance checks" / "Ask for new checks" flow described above under Goals & plan.
- Default: no model assigned directly — the Studio borrows the Planner's model if none is set for Checker specifically, shown with the badge "uses the Planner's model".
- Assign it when: you want acceptance checks written by a model chosen specifically for that job.
- Leave it empty when: you are content for it to borrow the Planner's model.
- Safe to know: this role decides what "done" means for automatic apply, from only a handful of calls per milestone. The Studio's own advice is to give the Checker your best available model, even if a cheaper model does the actual building — a small model can build well but write weak checks, and weak checks undermine automatic apply more than a weak builder does. If you use the check autopilot, give the Checker lane (or the Planner lane) a second model, a different one from the model that wrote the checks and not a chat window: the autopilot asks it to cross-check them. With only one model, the autopilot leaves every proposal for you.
Chapter 3: Recipes: ready-made setups that were proven live #
A recipe is a whole job, start to finish, not a single switch. Each one below was walked through on a real Studio, by someone playing an owner who had never used Runesmith before, on the current released code. If you want to know what one switch does on its own, see the previous chapter; this chapter tells you which switches to set together, in what order, for a particular kind of day.
Every recipe assumes you have already started Runesmith on a folder and been through the introduction once (see Chapter 1). None of them needs a terminal.
The newer features (the check autopilot, taking back approved checks, Author context, "Needs first", the three "Running on its own" choices and Full speed) have their own step-by-step sections at the end of this chapter, after the recipes.
A note on models: wherever a recipe needs a model, add one under Thinking power → Add thinking power, then choose This computer (a free local server such as Ollama or LM Studio), With a key (a provider's own free or paid tier), or No key needed (a chat window you already use, copied and pasted by hand). Chapter 4 shows how.
Recipe: "No key at all" #
Who it is for. You have no programming background, no API key, and do not want to install anything. You already have a chat window open somewhere (ChatGPT, Claude, Gemini, or similar) that you can copy text into and out of.
What you need. A folder for your project — it can start completely empty. A chat window. Nothing else.
The exact settings. Leave autonomy at Propose (the default). Do not turn on "Run this project's tests while mapping" unless your project already has code of its own; this recipe never needs it. The only "thinking power" you add is a chat window.
Numbered steps.
- Start Runesmith on your folder (drop it on
Runesmith.cmd, or open it from the launcher). Watch the introduction, or press Space to skip ahead. - On the "What will you create?" screen, type a name, describe what you want in your own words, choose Build something new, then press Forge it.
- On the Overview page, press Use a chat window (it appears next to Add thinking power whenever no model is set up yet).
- A toast reads "A chat window is set up for planning. Next: Goals & plan → Draft a plan." and Runesmith takes you there.
- On Goals & plan, press Draft a plan.
- The status pill at the top of every page (its title is "What Runesmith is doing") now reads "Needs you: 1 request to relay to a chat model". Click it from any page to open the chat relay, or go to Thinking power.
- Under 1. Copy this request, press Copy. Paste the whole thing into your chat window and send it.
- Copy the model's whole reply. Paste it into the box under 2. Paste it into any chat model, then paste its reply here, then press Send the answer.
- Back on Goals & plan, your plan's milestones appear as cards. On the first one, press Draft first files.
- The chat relay opens again with a new request. Repeat steps 7–8.
- Go to Work & proposals → Drafts. If the draft's button reads Recheck saved draft and pressing it says "Checking drafts is off in this folder", confirm Turn checking on and check this draft.
- Once the draft's badge reads "its own tests passed" (or, once you have approved acceptance checks, "your checks passed" — see the next recipe), press Write these files.
- When asked "Is '…' done?", choose Mark done if it is, or Keep in progress if you want to try it first.
- Back on Overview, the Try what was built card lists commands taken from your own plan. Press one of the chips (or edit the "Command to try" box), then press Run.
What you will see. After you send an answer: "Answer delivered. Runesmith continues." After a write: "Written: …. Its milestone is now in progress." Under Try what was built: "Finished normally in … s, on the practice copy." followed by the program's own output. The practice copy keeps whatever it saved between runs; your real folder is only touched if you tick Use my real folder (changes are kept) and confirm.
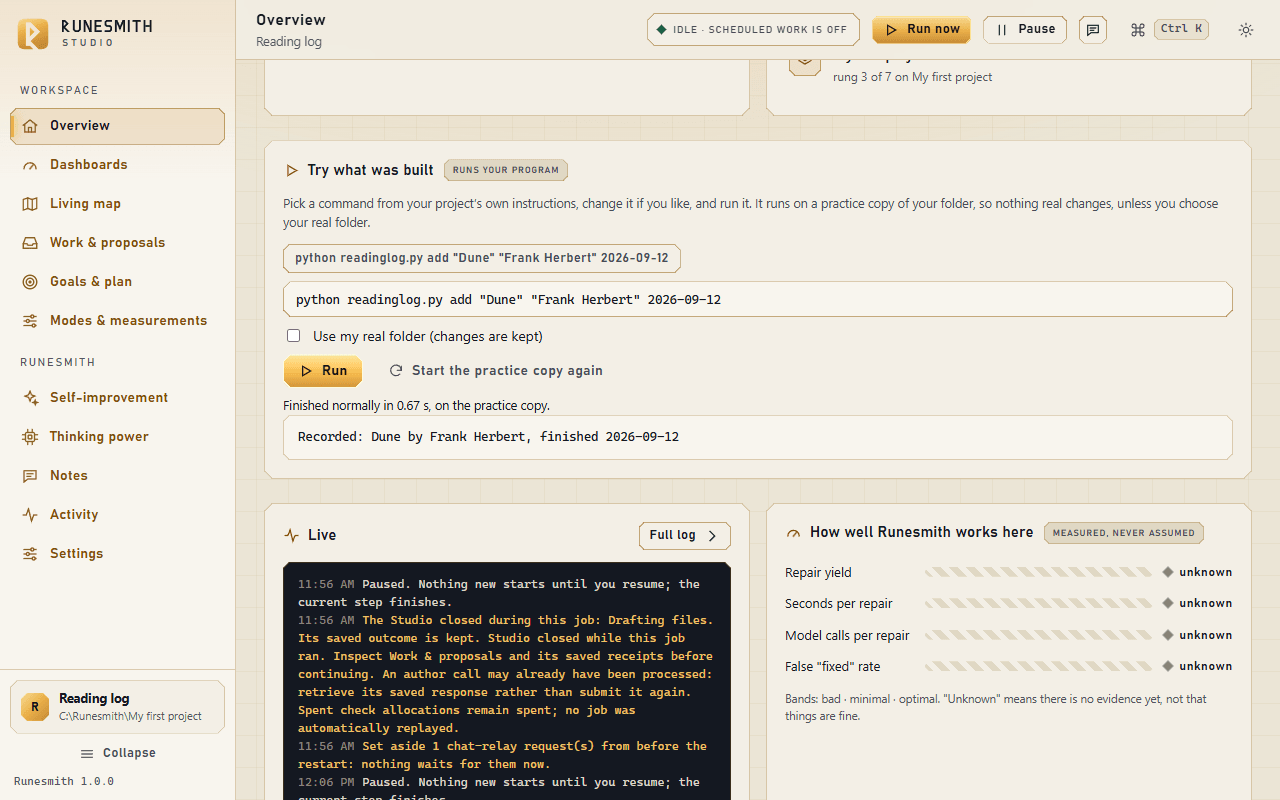
What to do when it stops.
- Waiting for you to relay a request is normal, not a fault: close the browser tab, the chat window, even the Studio, and come back whenever — the same request is still there to copy.
- If you decide not to answer a request at all, press Skip in the chat relay panel and confirm Skip it. Runesmith reads this as "you skipped the request, so nothing changed" and moves on; nothing it would have changed is changed.
- If Runesmith refuses the pasted reply because it does not fit the format it asked for, the panel lists what was wrong and offers Copy correction request — paste that into the same chat, then paste the corrected reply back into the same box.
- If your practice copy gets into a state you don't want, press Start the practice copy again under Try what was built; it starts fresh from your real folder. You don't need it after applying a draft: when your folder changes, Runesmith makes the practice copy again by itself before the next try, and the card says when it did.
Recipe: "Build while I'm away" #
Who it is for. You already have a plan with milestones (or are happy to draft one), and want Runesmith to keep building them on its own while you are elsewhere — checking each draft against tests you have approved, and applying only what passes, with no one sitting at the keyboard to relay anything.
What you need. A model that answers without you copying and pasting each request: a local server, or an API key. A plan with at least one open milestone. Your own idea of what "done" looks like for each milestone, so you can read and approve the checks Runesmith proposes.
The exact settings.
- Goals & plan → Build continuation card: tick Check drafts on a throwaway copy before they are written (the project's own tests, if it has any, and your acceptance checks) and Apply checked drafts automatically (needs your own acceptance checks for the milestone). Fill in Allowed files or folders, comma separated (for example
src, tests, or.for the whole folder). Press Save build settings. - Approved acceptance checks for every milestone you want built unattended (below).
- Settings → Behaviour → Rhythm card: turn on Work on a schedule and choose How often.
Numbered steps.
- On Goals & plan, for each milestone you want built while you're away, press Propose acceptance checks.
- Read the sentences under "Proposed acceptance checks: do these describe 'done'?", and anything listed under "They assume (your milestone does not say this)" or shown as "Also requires the exact text: …". If it warns "These checks already pass on your project as it is today", that milestone probably isn't built yet, so they may not test what it adds — consider discarding and asking again.
- If they look right, press Use these checks and confirm the dialog.
- If a build that looks right later keeps failing, go back to that milestone and press Ask for new checks; when the new proposal appears next to the old one, press Replace my checks and say why.
- Go to Goals & plan → Build continuation card. Tick both checkboxes and fill in Allowed files or folders (
.for the whole folder — the confirmation names it as "anywhere in this folder (never in Runesmith's own records or .git)"). Press Save build settings. - Go to Settings → Behaviour tab → Rhythm card. Turn on Work on a schedule and choose How often from the drop-down.
- Leave the Studio window open and walk away. Each round maps, finds the next milestone, drafts it, checks it on a throwaway copy against your acceptance checks, and writes it only if both the project's own tests (if it has any) and your checks pass.
- When you come back, look at Overview: "Next in your plan" says how far it got, and names the last attempt if it did not work.
What you will see. For example: "Next in your plan: 'Export library to CSV' (7 of 9 done)." Work & proposals → Drafts shows each checked draft with a badge like "its tests and your checks passed" just before it is applied.
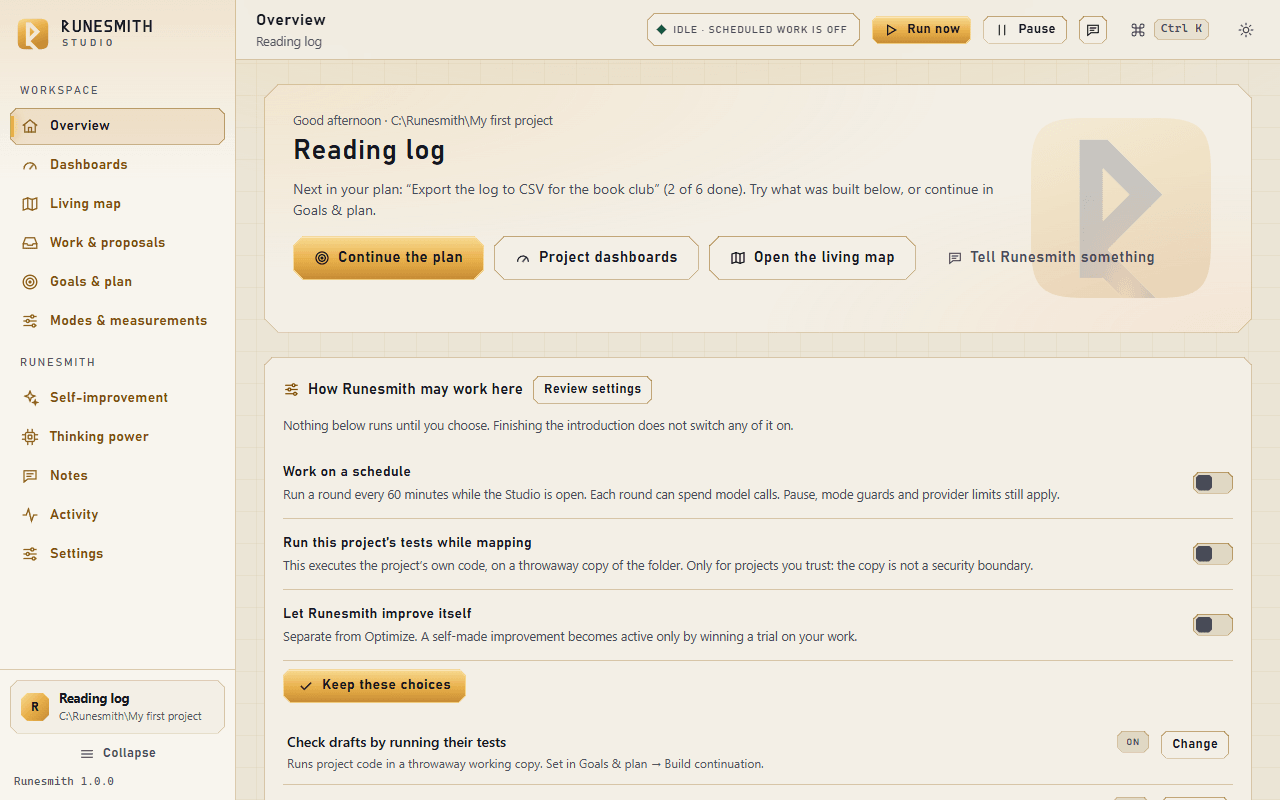
What to do when it stops.
- Three failed tries in a row: Overview reads "3 tries in a row did not work, so it waits for you: Work & proposals → Drafts shows what you can do." Go there; if offered, press Use alternate author to let the Planner's models try once more with what the earlier tries learned.
- An answer that could not be used is kept, not thrown away: Drafts shows "An answer for … could not be used" with Correct retained answer (asks the model to fix it, told exactly why it was refused) — or, if the last correction's answer never arrived, Set it aside (say why; this frees up another correction).
- A step's tries run out entirely: Overview reads "The tries for this step are used up, so building waits for you … Goals & plan may offer smaller steps to adopt." On Goals & plan, look under that milestone for a Proposed breakdown card and press Adopt prerequisites if the smaller steps look right, or Reconsider with a reason if they don't.
- One stuck milestone does not hold up the others: each round builds the next ready milestone that can move, and when every ready milestone needs you, the round names each one and says why.
- If one of a milestone's own smaller steps isn't needed — its goal's own approved checks already cover what it would have tested — you can drop it. A dropped step no longer leaves its goal waiting on it forever: it now counts as settled, and the goal's own checks still decide when the goal itself is done.
- A smaller step is not built blind: its own builder also sees the acceptance checks you approved for the goal it serves, not just the goal's title and "done when" — so it should not draft against a different command or file format than the goal expects.
- To stop everything, press Pause in the top bar (it holds scheduled rounds and anything you start yourself); press it again (now labelled Resume) to continue.
- A model at its free limit or busy: the toast says plainly that it is busy or at its free limit and that nothing was spent. A call that no model answered (every model you listed was busy or at its limit, so nothing ran) does not use up one of your three tries, or the one more try, either; only a call a model actually answered counts against them. Try again later, or put another model first for that role under Thinking power → "Who does what".
- If you will not be there to press these buttons yourself (the restart review, one more try, smaller steps, a check that ran out of time), or to approve checks, Runesmith can do them for you if you choose: see "Let it run to the end without me", at the end of this chapter.
Recipe: "Fix my failing tests" #
Who it is for. You have an existing Python project whose tests already fail, and you want them fixed without the rest of the project being rewritten.
What you need. Your project folder, with its tests. Any layout works — a src/ folder, or a plain package folder next to tests/. pytest helps but is not required; Runesmith falls back to Python's own unittest if it's missing.
The exact settings. Overview (or Settings → Behaviour → Mapping card) → turn on Run this project's tests while mapping ("Measure code by running its tests" on Settings), so Runesmith can see which tests fail. Add a Worker model under Thinking power.
Numbered steps.
- Start Runesmith on your project folder. On "What will you create?", name it, describe it, and press Forge it — Runesmith preselects Improve my code on its own for a folder of code with tests.
- On Overview, turn on Run this project's tests while mapping. It warns that this runs the project's own code, on a throwaway copy of the folder.
- Add a model under Thinking power (a local server, an API key, or a chat window) if you haven't already.
- Press Run now in the top bar, or wait for a scheduled round.
- Once failing tests are found, Overview shows a Fix the failing tests card, naming the share of tests that already pass (for example "38% of its tests pass").
- If you want the fix applied without reviewing it first, tick "Apply the fix automatically when every test passes" (it names exactly which folders it may write).
- Press Fix the failing tests, and confirm Fix them.
- If you left automatic apply off, once it finishes go to Work & proposals → Drafts, read the diff, and press Write these files yourself.
What you will see. If it applied automatically: something like "Applied …; acceptance passed; … complete." Your own test files are frozen as they were and never rewritten — only the code that makes them pass changes.
What to do when it stops.
- If a round reports it ran no tests, check that Run this project's tests while mapping is on. A project without a
src/folder, or withoutpytestinstalled, is still measured — with Python's ownunittest— as long as this switch is on; without it, Runesmith says plainly that it has not run the tests. - If a round says the project is "skipped" for its layout, that only means Runesmith's own repair organ can't build it a full repair yet — use Fix the failing tests from the Overview card instead; that path works for any layout.
Recipe: "Tend my documents" #
Who it is for. Your folder holds documents — a handbook, notes, a set of Markdown pages — rather than code, and you want Runesmith to check links and keep it tidy. You can start by just looking, then let it help, and you can do the whole thing with a chat window and no key.
What you need. A folder of Markdown (or plain text) documents. No key required if you use a chat window.
The exact settings. Choose Tend my documents on the introduction if you're ready to have it work, or Just explore if you want to look first (this sets autonomy to Observe). On Goals & plan, tick every document under "Documents a model may read" that you want a model to actually see — nothing is sent to a model until you do.
Numbered steps.
-
Start Runesmith on your documents folder.
-
On "What will you create?", name it, and choose Tend my documents, or Just explore to look first, then press Forge it.
-
If you chose Just explore, Overview reads "You chose to just look. Runesmith maps your folder and reports what it finds; it asks no model and changes nothing." Press See what it found to open the Living map, or press Let it help (and confirm) once you're ready for it to plan and draft.
-
Go to Goals & plan → Brief card. Write what you want tended, in your own words (for example: every link leads somewhere, every page is reachable from the index, TODOs are finished or turned into questions, no recipe content is invented).
-
Under "Documents a model may read", tick each page you want a model to see — or, if a callout offers it, press Tick all, then save. Press Save brief.
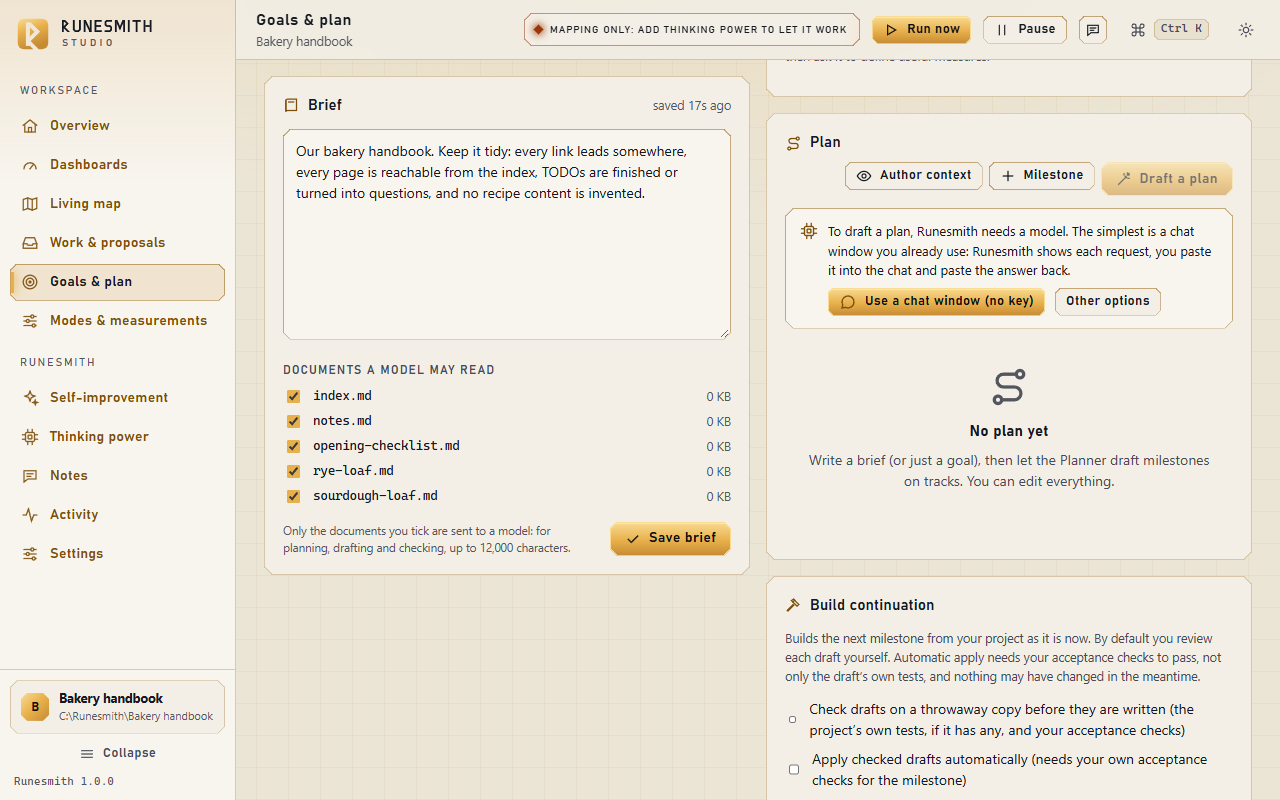
-
If you have no model yet, press Use a chat window (no key) on Goals & plan (or Add thinking power for another way).
-
Press Draft a plan and relay the request if you're using a chat window (see the "No key at all" recipe, steps 7–8, for the copy-and-paste details).
-
On each milestone, press Propose acceptance checks. For documents these are checks about files, not commands — for example, "the index links the seeded loaf" or "every page is reachable from the front page". Read them and press Use these checks.
-
Press Draft first files on a milestone, relay if asked, then on Work & proposals → Drafts press Recheck saved draft (confirming Turn checking on and check this draft if it asks), then Write these files.
-
Confirm Mark done when asked, once a milestone is finished.
What you will see. A checked draft's badge reads "your checks passed" — with no mention of tests, since a folder of documents has none to run. The Living map lists the flaws it found in plain words: a broken link, a page nothing else links to, a TODO note.
What to do when it stops.
- If drafting, checking or planning is refused because a folder of only documents has nothing ticked, go back to step 5 — at least one document has to be ticked before a model can plan, draft or check anything in it.
- If the map looks stale after an update (a badge reads "made by an earlier version: map again"), press that same button, on the Living map or from the Overview tile, to map again.
Recipe: "Keep an eye on my numbers" #
Who it is for. You want Runesmith to read your own report files — a shop's weekly till exports, for instance — and keep an eye on the numbers and a target, without it touching any code.
What you need. Report files (CSV or JSON) in your project folder, with the numbers you care about as columns.
The exact settings. On the introduction, choose Keep an eye on my numbers — Runesmith already has it picked for you when your folder is mostly report files (CSV, TSV or Excel); choose it yourself otherwise. Add a measurement for each number you want tracked. Modes & measurements → Activity modes → turn on Operations (to read your reports), and Optimize too if you want suggestions — tick, under each, which measurements it should read.
Numbered steps.
-
Start Runesmith on the folder that holds your reports.
-
On "What will you create?", name it. Choose Keep an eye on my numbers (it is preselected for you when the folder is mostly report files), then press Forge it.
-
On Overview, Runesmith's one next step reads: "You want to keep an eye on your numbers. Runesmith found report files in reports. Choose one number to watch: which file, which column, and your target. Measuring asks no model." Press Choose a number to watch.
-
This opens Add measurement, already filled in from what Runesmith found — for example "From your folder: the newest of 6 reports, reports/week-*.csv. Its columns: date, item, baked, sold, revenue." The "Relative report path" carries the pattern (a
*means the newest matching file, so next week's file is read too), and the columns it found are offered as suggestions wherever a column name is asked for.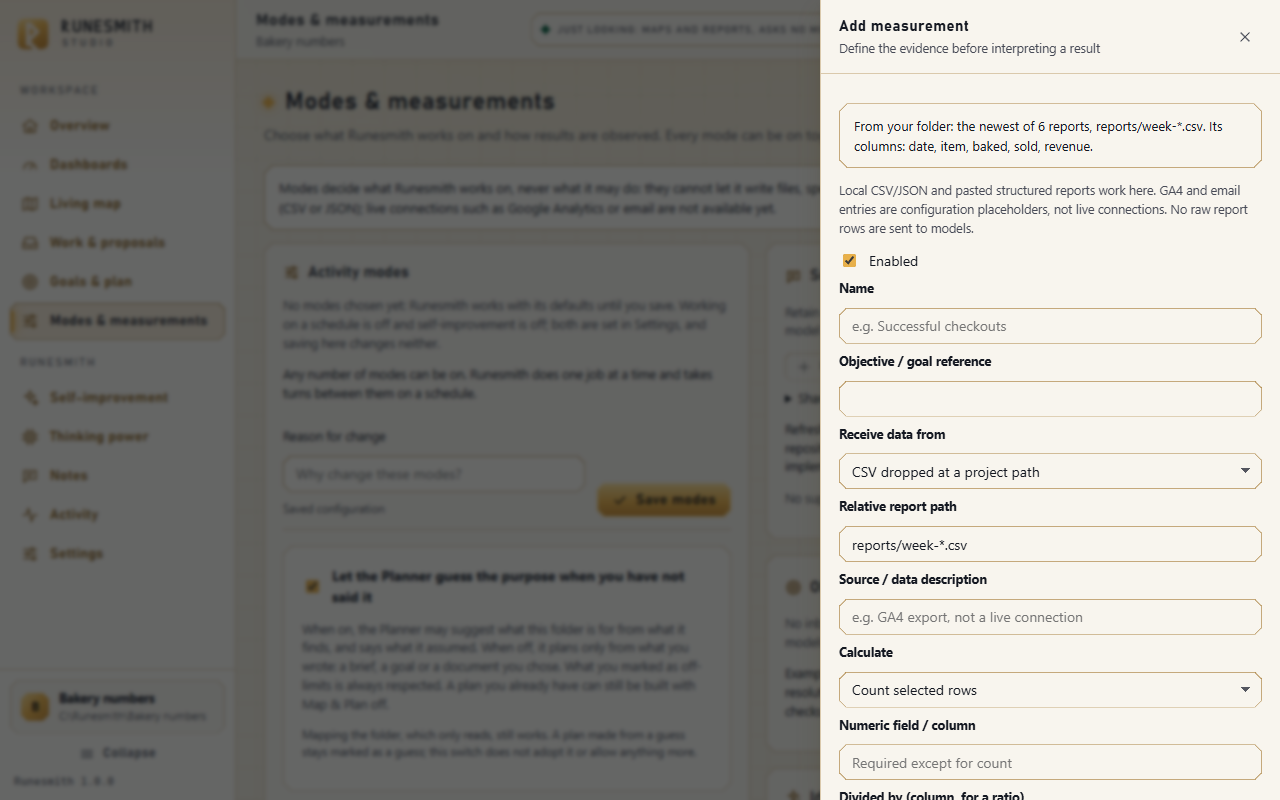
-
Check the Name and "Receive data from" (CSV or JSON) fields, and adjust them if you like.
-
Choose "Calculate": Sum, Mean, Count selected rows, Latest timestamped value, or "Ratio: this column's total divided by another's" for a share (for example sold ÷ baked).
-
Fill in the column name — pick one of the suggested columns, or type your own — and, for a ratio, "Divided by (column, for a ratio)", and, if you want one, a target under "Threshold comparison" ("At least" or "At most") with its value.
-
Press Save definition.
-
Back on Modes & measurements → Activity modes, turn on Operations; turn on Optimize too if you want ideas. Under each, tick the measurements it should read, under "Numbers this mode reads".
-
Press Save modes.
-
Press Run now on a mode's own card, or wait for a scheduled round (Settings → Work on a schedule).
-
To watch another number, go to Modes & measurements → Objective measurements card → press Add measurement — it fills in the same way, from whatever report files the map found.
What you will see. Once a number is watched, Overview's one next step changes: the hero now reads "Runesmith keeps an eye on your numbers, below. Each measurement reads the newest report and asks no model. To measure without clicking, turn on the Operations mode and "Work on a schedule"." with a button reading "Your numbers and targets". Below it, the "Your numbers" card shows each measurement's latest value, for example "Revenue this week: 2,010.5 EUR, from reports/week-39.csv · measured 13s ago" and "Share sold: 73.5%, target at least 85%, off target". If Optimize found something, it appears on Modes & measurements under "Ideas to improve your numbers", already open, in plain labels: "The idea", "What it should change", "How to tell if it worked", "Limits".
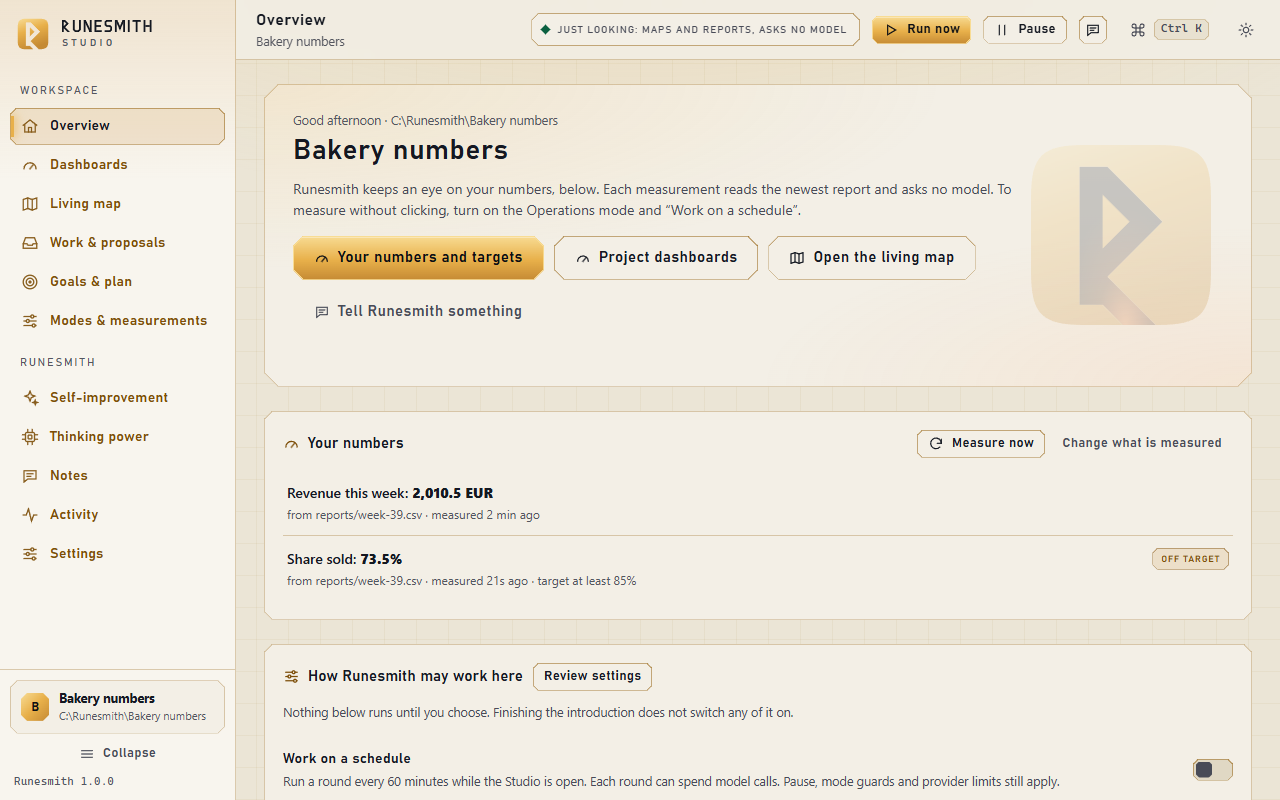
What to do when it stops.
- If two people (or two browser tabs) edit the same measurement at the same time, the second save is refused with "Measurement definitions changed; reload before saving." — reload and redo your edit; nothing is silently overwritten.
- If a measurement reads "not measured" or shows an error, open Edit on that measurement's card and check the report path and column names.
- If your folder isn't mostly report files, Keep an eye on my numbers is still there to choose by hand on the introduction — nothing about the recipe depends on it being preselected.
Recipe: "Let it improve itself" #
Who it is for. A developer whose project has failing tests they want Runesmith to fix, who is also willing to let Runesmith try to improve its own ability to make repairs — trialling any such improvement against what runs today, on your own work, before it is ever used for real.
What you need. A Python project with tests, in a src/ layout: the repair organ that Kaizen improves only works with that layout today (the "Fix the failing tests" card from the previous recipe works with any layout, but it bypasses the repair organ, so it plays no part in self-improvement). pytest helps but is not required.
The exact settings. Settings → Behaviour → Mapping card → turn on "Measure code by running its tests". Settings → Behaviour → Self-improvement card → turn on "Let Runesmith improve itself". Add a model to the Worker role under Thinking power (and to Improver, if you want Kaizen campaigns to have a model to author with).
Numbered steps.
-
Start Runesmith on your project. On the introduction, choose Improve my code.
-
Turn on "Run this project's tests while mapping" on Overview, or "Measure code by running its tests" on Settings.
-
Add a model under Thinking power, and give it the Worker role at minimum; add it to Improver too if you want self-improvement campaigns.
-
Press Run now (or wait for a scheduled round). Runesmith finds failing tests, attempts repairs on a private copy, and a held-out judge decides which are accepted.
-
Go to Work & proposals → Fixes. For each accepted fix, read the diff and press Apply to my files (or Reject, with an optional reason).
-
Turn on "Let Runesmith improve itself" in Settings.
-
Go to Self-improvement. Under "Library of proven generations", read a candidate's evidence and caveat, then press "Adopt: start a trial" and confirm "Adopt and start the trial". Runesmith checks it (digests, allowed imports, a confined smoke test), freezes it next to your active generation, and opens an online trial against it, on your own work. The card is badged "ships with Runesmith", and a candidate becomes active only if it wins the trial on your own work.
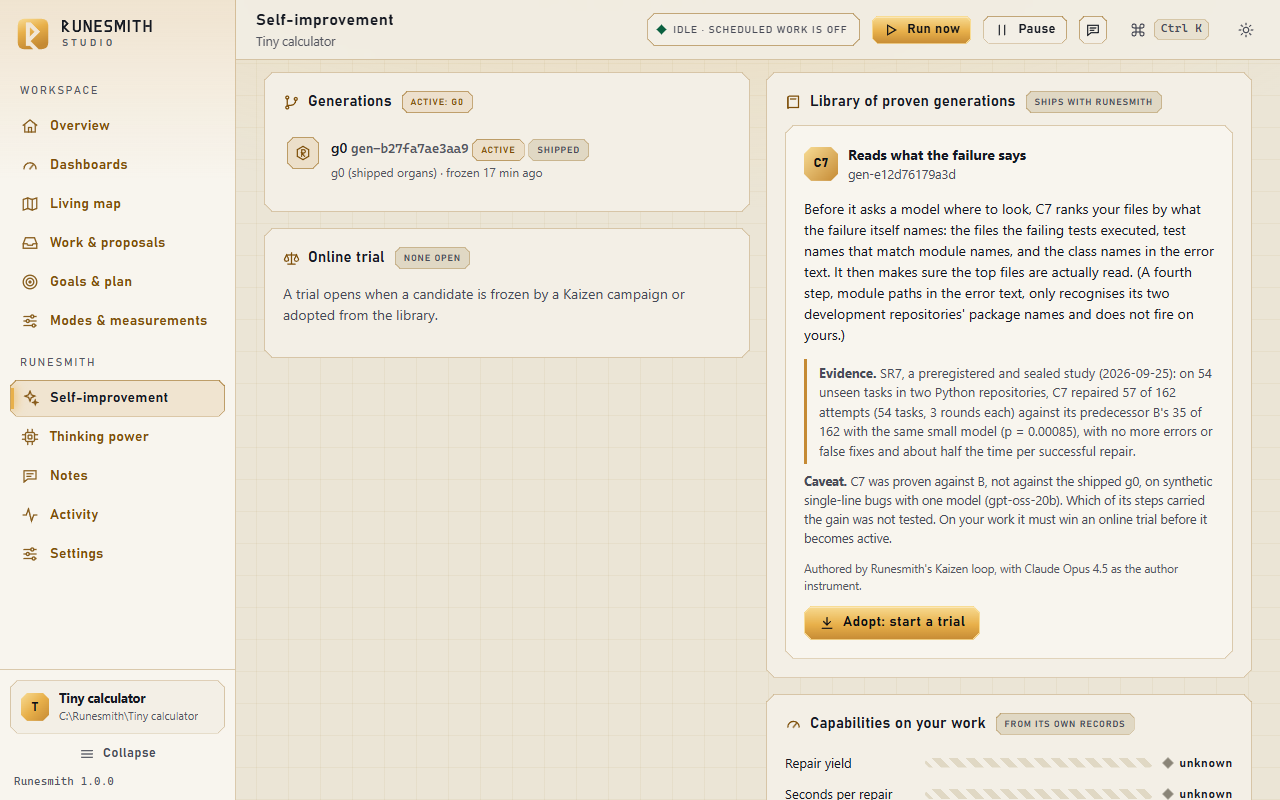
-
Keep working as usual. New repair work that's eligible for the trial is split between the two by a coin toss, and the "Online trial" card shows how many each has repaired so far.
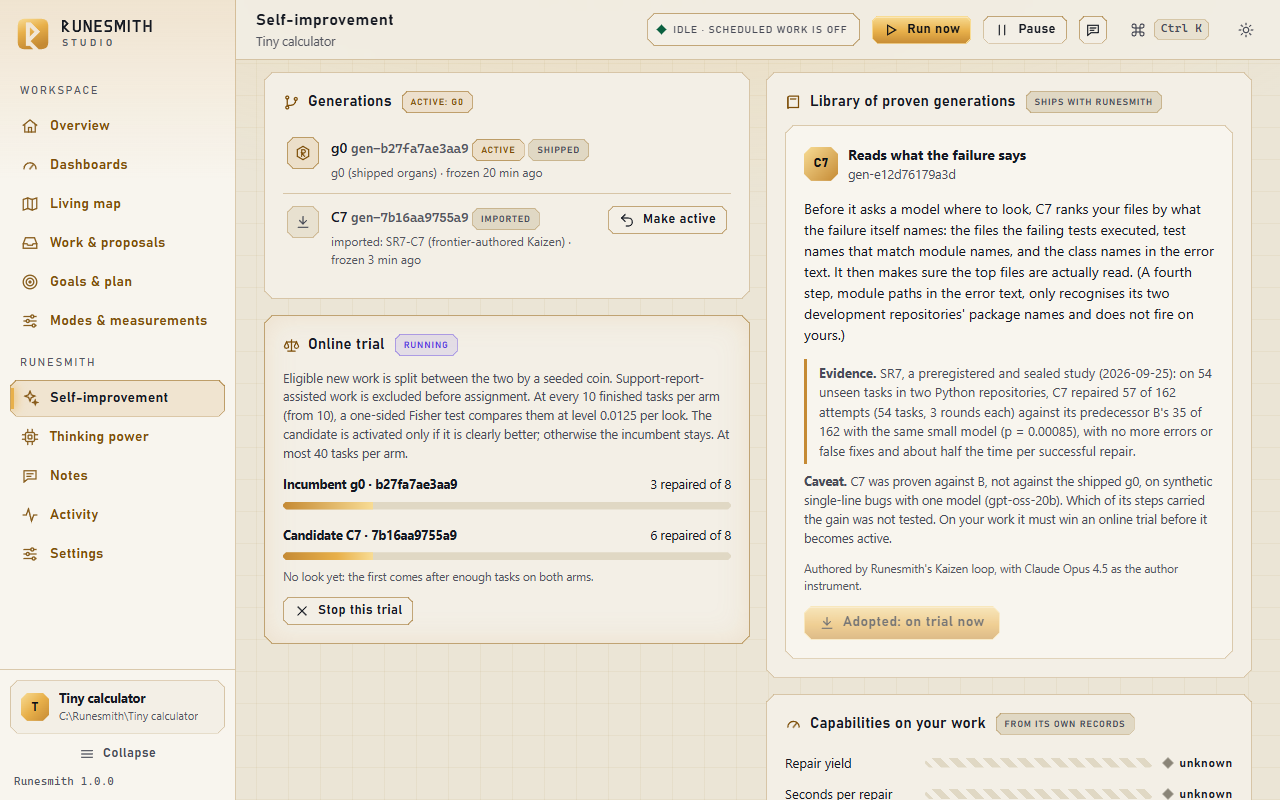
-
If the candidate clearly wins, it is activated on its own; the trial moves to "Closed trials", reading "won: activated".
-
To roll back at any time, press "Make active" next to any earlier generation under "Generations" and confirm — this is recorded as your own choice, and closes any trial that is still open.
What you will see. "Generations" names the active one. "Online trial" shows bars for Incumbent and Candidate, each with a count repaired out of tasks seen. "Capabilities on your work" shows measured Repair yield, Seconds per repair, Calls per repair and False "fixed" rate, each banded bad, minimal or optimal — never assumed, only shown once there is evidence.
What to do when it stops.
- Turning "Let Runesmith improve itself" off while a trial is running stops new campaigns, but not the trial itself — the page says so. To stop the trial and keep exactly what currently runs, press "Stop this trial" and confirm.
- A fix that "waits for you" can go stale if another fix already changed the same files: its badge then reads "no longer fits", with "Nothing to do here: the files changed after this fix was made, often because another fix already covered them, so it no longer fits" underneath, and it offers only Copy patch or Comment, no Apply.
Recipe: "Make something new from a brief" #
Who it is for. You want Runesmith to build something new and larger from a written brief — not a single small script, but a real small application — with a model doing the building and your strongest available model (or a chat window) deciding what "done" means for each part of it.
This recipe was walked through on a larger project: Runesmith's first companion tool, Runesmith Motion (a browser animation studio), was grown this way from a one-paragraph brief, with free models doing the building. Each milestone was built, checked against approved acceptance checks and applied ("done" means exactly that, not that every feature has been judged good). It ran for long stretches with nobody at the keyboard, but it was not hands-off: the person running it read and approved checks, took back wrong ones, added milestones the plan missed, and found gaps in Runesmith that were fixed along the way. If the plan the Planner drafts misses something your brief calls for, you can add it yourself — see step 6 below.
What you need. An empty (or near-empty) folder for the new project. A written brief: what it does, how someone starts it, what it's built from, and ideally a command that can check it without needing a full user interface. A model for planning and building, and a strong model for the Checker role — your best available model, even a chat window, while a faster or cheaper model does the actual building.
The exact settings. Thinking power → "Who does what": add your building model to Planner, with fallbacks after it. Add your strongest available model to Checker. Goals & plan → Build continuation: tick both checks and automatic apply, and set "Allowed files or folders" to . — for a brand-new project, nobody knows its eventual file layout yet.
Numbered steps.
- Start Runesmith on a new, empty folder.
- On "What will you create?", name it, paste your brief into the description, choose Build something new, and press Forge it.
- Add your building model(s) under Thinking power, in the Planner lane, with any fallbacks listed after the first.
- Add your strongest available model to the Checker lane.
- On Goals & plan, press Draft a plan.
- If the drafted plan misses something your brief calls for, add it yourself: press Milestone, fill in Title, What it should do and Done when and, if it cannot start before others are finished, choose them under Needs first, then Save.
- For the first milestone, press Propose acceptance checks. Read the sentences, and anything under "They assume" or "Also requires the exact text". For a brand-new project, the first milestone's checks effectively define your file format, so open "What exactly is checked" and read it whole.
- Press Use these checks once you're happy; repeat for the next milestones. Runesmith shows the Checker your other approved checks as it writes each new proposal, so later milestones shouldn't contradict earlier ones — but read them yourself too.
- Go to Goals & plan → Build continuation card. Tick both checkboxes, type
.into "Allowed files or folders", and press Save build settings — the confirmation names this as "anywhere in this folder (never in Runesmith's own records or .git)". - Turn on "Work on a schedule" in Settings, and choose "How often".
- Let it run, and check in on Goals & plan and Work & proposals as milestones are drafted, checked, and — if they pass — written and marked done.
- When you want it to go on while you are away for longer, through restarts and stuck milestones, with Runesmith approving the checks itself, see "Let it run to the end without me", below.
What you will see. Each approved milestone's card shows "What exactly is checked", naming the starting files and the commands the checks run. Drafts move from "waiting for you" to "applied" as they pass; a milestone's status moves from "open" to "doing" to "done".
What to do when it stops.
- If a milestone gives the Checker nothing it can run from the command line, and no file it could check either (a page's on-screen look, for instance), "Propose acceptance checks" is refused with "Nothing in this milestone could be checked automatically: …", plus the Checker's own note on why. Read each draft yourself, or reword the milestone so its result can be checked by running a command; both tries' answers are kept on disk for you to read. A different kind of failure — both tries broke some other rule of the examples format — is refused instead with "Both answers broke a rule of the examples format…".
- Some everyday slips no longer sink the whole proposal: an expectation written as a step of its own is quietly joined to the step before it, and file checks written inside a step move to where they belong. A check that lists more than 12 texts to find keeps its first 12 instead of being refused outright. You won't see these as failures — only in that the proposal came back where it used to be refused.
- A weak proposal is not quietly offered as if it checked something real: wording your milestone never stated is dropped, but a file that wording pointed at is still checked to exist, so a check cannot pass by testing nothing at all. If a proposal still looks too weak, or it warns that these checks already pass on your project today, discard it with a reason and ask again.
- If unattended building writes nothing, and a draft's check reads "unsupported: Output is outside the local verification profile: …", the draft wrote a kind of file Runesmith does not check (for example a secret, a log or a database file). Read that draft yourself; its files are not written automatically. (JavaScript modules,
.mjsand.cjs, are checked like.js.) - Two Studios open in the same browser used to log each other out: opening one replaced the other's session cookie, so reloading the first showed "Runesmith Studio is locked". Each Studio's cookie is now named for its own port, so this should no longer happen. If it ever does, reloading will not fix it by itself — the one-time key that unlocks the page is only in the address bar on its very first visit — so start Runesmith again from its launcher (double-click it, or run
runesmithin your folder) and it opens the page for you.
Recipe: "Let it run to the end without me" #
Who it is for. You have a plan with many milestones, you will be away for hours or days, and you want Runesmith to keep going on its own: approving checks, building, going on after a restart, and not stopping at the first milestone that is hard. It is "Build while I'm away" with each waiting point taken away, one at a time, by your own choice.
What you need. Everything "Build while I'm away" needs: a model that answers on its own, a plan, and a folder you are happy for Runesmith to write in. And two different models for the Checker's lane: the first writes the checks, a different one cross-checks them. Keep the launcher window open: it is Runesmith running, and closing it stops Runesmith.
How far this has been proven. Full speed, the check autopilot, taking back approved checks and prioritizing files in Author context were all used on the larger project described in the previous recipe. "Needs first", the three "Running on its own" choices and showing big files in parts were added because of what that project taught: it once stood still for about two days because no model was shown the file it had to change, and its restarts, stuck milestones and checks that ran out of time each waited for a person who was not there. They are covered by Runesmith's own tests, but they have not yet had a long unattended run of their own, so check in on the first long stretch.
The exact settings.
- Thinking power → "Who does what": the Checker lane holds two different models, your best one first. The Planner lane holds your building model, with fallbacks after it.
- Goals & plan → Build continuation: all three boxes ticked (check drafts, apply checked drafts, the check autopilot), Allowed files or folders filled in, then Save build settings.
- Settings → Behaviour → Rhythm: Work on a schedule on, How often at "every 5 minutes", Full speed on.
- Settings → Behaviour → Running on its own: Keep and continue, One more try, then break it down, Recheck once.
- Modes & measurements: you do not need to open it. If you press Save modes there, keep Build switched on (it is on to start with). With Build on in the saved modes, the check autopilot's request for checks, One more try… and Recheck once still start by themselves; with every Build mode off they wait for your click (see Chapter 2, "Running on its own").
Numbered steps.
- Add your models under Thinking power and place them in their lanes as above. Two different models for the Checker is what lets the autopilot judge: with one, it leaves every proposal for you.
- If some milestones cannot start before others are done, tell the plan: see "How to: make a milestone wait for others", below.
- If a file your project depends on is large, or builds were refused for a file "not shown to the model", prioritize it: see "How to: show Runesmith a big file", below.
- Go to Goals & plan → Build continuation. Tick Check drafts on a throwaway copy before they are written…, Apply checked drafts automatically… and Let Runesmith approve acceptance checks that pass every test (check autopilot). Fill in Allowed files or folders (
.for the whole folder). Press Save build settings and confirm both dialogs. The autopilot has its own how-to, below ("How to: let Runesmith approve checks itself"). - Go to Settings → Behaviour → Rhythm. Turn on Work on a schedule, choose How often, and turn on Full speed (see "How to: skip the waiting between steps", below).
- In the card Running on its own, press Keep and continue, One more try, then break it down and Recheck once (see "How to: keep going after a restart…", below).
- Look at the top bar. If it reads "Paused", press Resume.
- Walk away.
- When you come back, start on the Overview: read "Next in your plan" and the card Decided by your settings. Then open Goals & plan and read the checks the autopilot approved, one milestone at a time. Take back any that are wrong (see "How to: take back approved checks", below).
What you will see.
- On the Overview: "Next in your plan: “…” (N of M done)." and, under the top card, Decided by your settings, with rows such as "“…” had used up its tries. By your setting, Runesmith gave it one more try with another model: …", each with its time and "Runesmith (your setting)" beside it.
- On a milestone card: "Proposed by [model], approved by Runesmith’s check autopilot ([why]). Read them; you can replace them at any time."
- In Activity, jobs such as "Proposing acceptance checks", "Building the next step", "Giving the step one more try", "Breaking a stuck step down" and "Rechecking a draft whose checks did not finish".
What to do when it stops.
- The Overview reads "… waits for you" although every choice is made: read the reason on that line. Common ones: a model at its free limit (nothing to do: with Full speed, Runesmith waits 1, 2, 4 … minutes and asks again); a file models are not shown (prioritize it under Author context); or checks the autopilot left for you ("Runesmith’s check autopilot left these for you: …", under that milestone's checks): read them and press Use these checks or Discard, or add the second model it asked for.
- A milestone has no checks and its card says "Runesmith stopped asking for them by itself": two requests for its checks failed in a row, so the schedule builds other work meanwhile. It asks again when the project’s files or the milestone change, or after two hours; press Propose acceptance checks to ask now, or look at the reason on the card (often a busy model).
- Smaller steps that could not be adopted wait for you, and the Overview says so. On Goals & plan, find the Proposed breakdown card and press Adopt prerequisites, or Reconsider.
- After a restart you still see Review restart recovery: Runesmith could not decide the review by itself (its saved records were damaged or changed, a write-recovery conflict is open, or a job was still running). Do the review once, as Chapter 5 describes.
- The free allowances run out faster than you like: turn Full speed off, or lengthen How often.
Newer features, one at a time #
Each section below is one feature, step by step. They were added after 28 September. Chapter 2 has a reference card for each; Chapter 5 explains the messages you may see.
How to: let Runesmith approve checks itself (the check autopilot) #
What you need. A model for the Checker that answers on its own, and a second, different model in the Checker or Planner lane (not a chat window). "Check drafts on a throwaway copy before they are written" has to be on: the autopilot tries each set of checks on a copy of your project, and without that it can judge nothing.
-
Open Thinking power → "Who does what". In the Checker lane, put your best model first and add a different model after it.
-
Open Goals & plan and find the Build continuation card.
-
Tick Check drafts on a throwaway copy before they are written… if it is not ticked.
-
Tick Let Runesmith approve acceptance checks that pass every test (check autopilot).
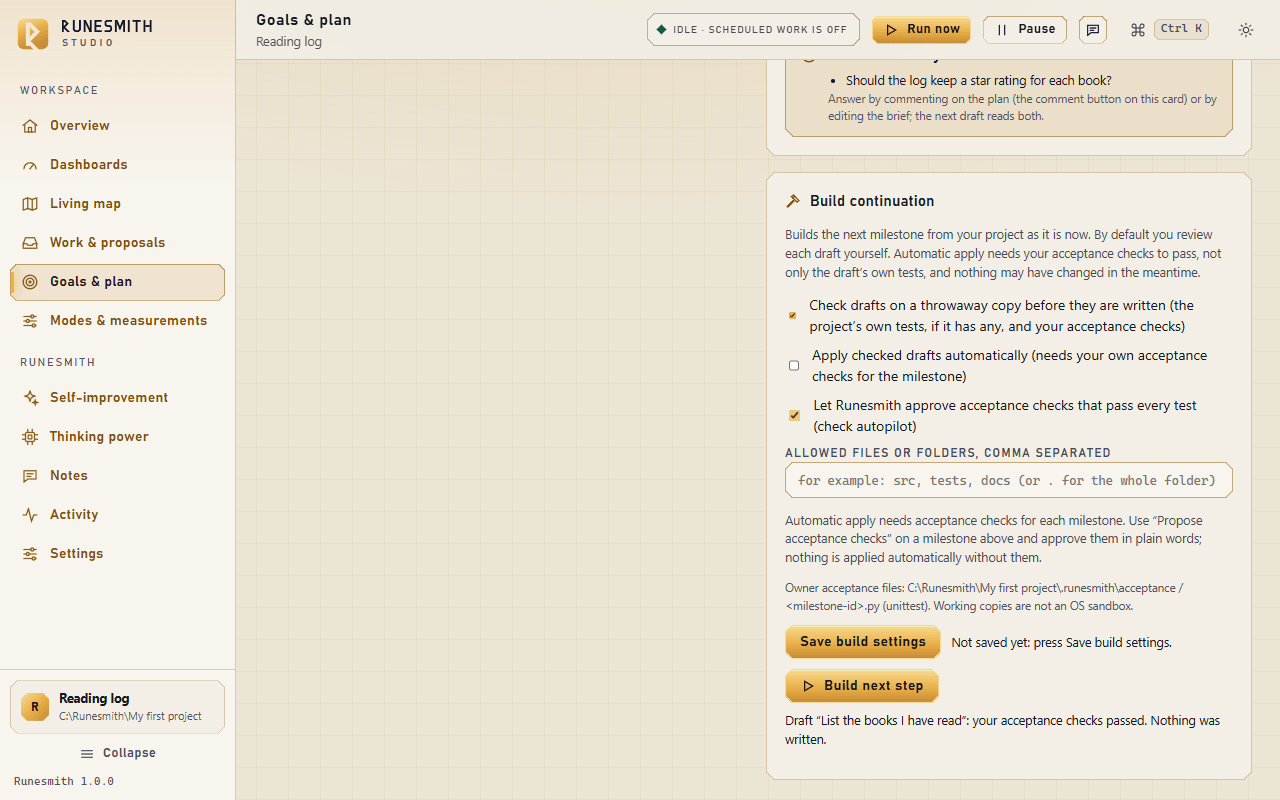
-
Press Save build settings. A dialog, "Let Runesmith approve checks itself?", says what it will do and what it will never do. Press Turn on the check autopilot.
-
On a milestone that has no checks, press Propose acceptance checks. Or leave it: with the schedule on, Runesmith asks for a ready milestone's checks itself before it builds it. The status reads "Proposing acceptance checks for a milestone (the check autopilot reviews them)".
-
Wait for the verdict. It comes in one of three forms:
- Approved. The milestone's card reads "Proposed by [model], approved by Runesmith’s check autopilot ([why]). Read them; you can replace them at any time." With "Work on a schedule" and checking drafts both on, the build starts at once.
![A milestone card on Goals & plan reading "Proposed by [a model], approved by Runesmith’s check autopilot", followed by the reason, the four checks in plain sentences, and the "Ask for new checks" and "Withdraw these checks" buttons.](/assets/guide/milestone-checks-approved-by-autopilot.png)
- Turned down. Runesmith asks the Checker again and tells it why. It does this twice at most.
- Left for you. The proposal stays on the card with "Runesmith’s check autopilot left these for you: [reason]". Read it, then press Use these checks or Discard, as you always could.
-
When you have a moment, read the checks it approved. If one is wrong, take it back: see "How to: take back approved checks", below.
What you will see. The reasons are in plain words: for example "trial and findings clean; [model] worked out the same 12 expected values", "there is no second model to cross-check with (add another under Thinking power)", or "the checks were not tried on the project (checking drafts is off)".
Good to know. The autopilot never replaces checks you approved yourself. With it on, even a set of checks you ask for with Propose acceptance checks is reviewed by it: to read a proposal first, turn it off. Write the exact values you care about in a milestone's Done when: the autopilot turns down checks that leave out an exact text that "Done when" names. It is a convenience, not a guarantee: the checks it approves can still be wrong, and checks that read files and printed text cannot see how something looks.
How you stay in control.
- It is off until you tick it, and the first time it asks you to confirm.
- It never replaces checks you approved yourself. Its approvals say "approved by Runesmith’s check autopilot", never "approved by you".
- Approving checks writes nothing into your project. Whether a build is written is still decided by Apply checked drafts automatically and the folders you named.
- You can read every set it approved, replace it (Ask for new checks, then Replace my checks) or take it back (Withdraw these checks).
- Untick it to stop new approvals. Checks it already approved stay in force until you replace or withdraw them.
If it does not work. If Runesmith's own request for a milestone's checks fails twice in a row, a line under that milestone reads "The last 2 requests for these checks did not work (…), so Runesmith stopped asking for them by itself. It asks again when the project’s files or this milestone change, or when you ask." The schedule then builds other work. Press Propose acceptance checks to ask yourself, or fix what the reason names (often a model that is busy or has no more free allowance). It also asks again by itself after two hours.
How to: take back approved checks (Withdraw) #
-
Open Goals & plan and find the milestone.
-
Under "✓ Your acceptance checks", read each sentence. Open "What exactly is checked" beneath it to see the commands, texts and numbers.
-
If the checks require the wrong thing (a field in the wrong place, a value the milestone never states, a file nothing creates), press Withdraw these checks, the quiet button below the sentences.
-
In the box "Withdraw these checks?", say what is wrong, in plain words. For example: the milestone keeps the envelope inside "project"; these checks put it at the top level. Press Withdraw. A blank reason is not accepted.
-
Read the notice. For an open milestone it says "Checks withdrawn. Press “Propose acceptance checks” to have new ones written with your reason." Press Propose acceptance checks (or, with the autopilot on, wait for it to ask).
-
For a done or dropped milestone the notice says "Checks withdrawn. This milestone is done: set its status to open to have new checks written with your reason." (or "…is dropped:…"). Use the status drop-down on its card, choose open, then press Propose acceptance checks.
-
Read the new proposal like any other, and press Use these checks when it is right.
Open Goals & plan and find the milestone.
Under "✓ Your acceptance checks", read each sentence. Open "What exactly is checked" beneath it to see the commands, texts and numbers.
If the checks require the wrong thing (a field in the wrong place, a value the milestone never states, a file nothing creates), press Withdraw these checks, the quiet button below the sentences.
In the box "Withdraw these checks?", say what is wrong, in plain words. For example: the milestone keeps the envelope inside "project"; these checks put it at the top level. Press Withdraw. A blank reason is not accepted.
Read the notice. For an open milestone it says "Checks withdrawn. Press “Propose acceptance checks” to have new ones written with your reason." Press Propose acceptance checks (or, with the autopilot on, wait for it to ask).
For a done or dropped milestone the notice says "Checks withdrawn. This milestone is done: set its status to open to have new checks written with your reason." (or "…is dropped:…"). Use the status drop-down on its card, choose open, then press Propose acceptance checks.
Read the new proposal like any other, and press Use these checks when it is right.
What you will see. The old checks stop judging builds at once, and their file is kept. Builders are no longer shown their sentences. The Checker that writes the new set is told your reason first.
If it does not work. There is no Withdraw these checks button while a new proposal waits on the card (approve or discard that first), and none for a checks file you wrote yourself. If the button is slow, a line beside it counts the seconds ("Withdrawing the checks is taking longer than usual"): leave it be.
How to: make a milestone wait for others ("Needs first") #
-
Open Goals & plan. On the Plan card, press Milestone to add one, or press Edit on one that is already there.
-
Fill in Title, and, if you like, What it should do and Done when.
-
Under Needs first, click the milestone that has to be finished first. To choose several, hold Ctrl (Cmd on a Mac) while you click. Each is listed with its status, for example "Add a stage (open)".
-
Press Save.
-
The milestone's card now reads "Waiting for: …" with what is missing. Its Draft first files button is greyed out, and the schedule skips it.
-
When everything it needs is done or dropped, the card reads "Prerequisites satisfied — ready to draft".
-
To take a prerequisite away, press Edit, Ctrl-click the highlighted milestone to clear it, and press Save.
Open Goals & plan. On the Plan card, press Milestone to add one, or press Edit on one that is already there.
Fill in Title, and, if you like, What it should do and Done when.
Under Needs first, click the milestone that has to be finished first. To choose several, hold Ctrl (Cmd on a Mac) while you click. Each is listed with its status, for example "Add a stage (open)".
Press Save.
The milestone's card now reads "Waiting for: …" with what is missing. Its Draft first files button is greyed out, and the schedule skips it.
When everything it needs is done or dropped, the card reads "Prerequisites satisfied — ready to draft".
To take a prerequisite away, press Edit, Ctrl-click the highlighted milestone to clear it, and press Save.
If it does not work. A save that would make a milestone wait for itself, directly or through others, is refused: "Not saved: That would make “…” wait for itself through its prerequisites; nothing was saved." The form opens again with what you typed. A text over its limit is refused the same way (title 200 characters, "What it should do" 1,500, "Done when" 400).
How to: show Runesmith a big file (Author context) #
-
Open Goals & plan. On the Plan card, press Author context. A drawer opens.
-
Read its first line: "N files included (M in parts); K omitted. Source text uses X / 48000 characters." Below it, each file shows its size and either "included", "omitted: …" or "shown in parts: lines 120–180, 300–340 of 1150". Type in Filter file paths to find one (the list shows the first 100 matches).
-
In the large text box (its hint reads "One exact relative file path per line"), type the files that matter, one path on each line, relative to your folder, for example src/motion.mjs. You can prioritize up to 12.
-
In the box below it, whose hint reads "Why does the author need these files?", write a short reason. It is required.
-
Press Save future context. The notice reads "Future source selection saved. No model call, project write or permission change."
-
Open the drawer again: your files now read "prioritized", and "included" or "shown in parts".
-
To go back to the default choice, empty the box, give a reason, and save.
Open Goals & plan. On the Plan card, press Author context. A drawer opens.
Read its first line: "N files included (M in parts); K omitted. Source text uses X / 48000 characters." Below it, each file shows its size and either "included", "omitted: …" or "shown in parts: lines 120–180, 300–340 of 1150". Type in Filter file paths to find one (the list shows the first 100 matches).
In the large text box (its hint reads "One exact relative file path per line"), type the files that matter, one path on each line, relative to your folder, for example src/motion.mjs. You can prioritize up to 12.
In the box below it, whose hint reads "Why does the author need these files?", write a short reason. It is required.
Press Save future context. The notice reads "Future source selection saved. No model call, project write or permission change."
Open the drawer again: your files now read "prioritized", and "included" or "shown in parts".
To go back to the default choice, empty the box, give a reason, and save.
What you will see. A file up to 40,000 bytes that you prioritized is shown whole. A bigger file is shown in parts: an outline of its declarations, then the exact lines the next step is about. If a prioritized file cannot be shown, the drawer says which and what to do: "… is gone or hidden: take it out of the list.", "… is not UTF-8 text: save it as UTF-8, or take it out of the list.", "… does not fit the 48000-character budget with the other prioritized files: take one out.", or, for a file over 40,000 bytes whose lines are all too long to quote, "split it, then take it out of the list."
Good to know. This chooses only what models see. Requests already made keep what they were shown, and prioritizing a file does not let a model change it. A change to a file shown in parts is accepted only as exact edits that quote lines which were shown.
If it does not work. A save is refused, with the reason, if you name more than 12 files, name a path twice, name a file that cannot be shown (gone, hidden, not UTF-8 text, or too big to fit), or leave the reason empty ("Explain this author-context selection."). If your project's files changed while the drawer was open, the save says "Source changed; inspect the current context before saving.": close the drawer, open it again and save again. When a build is refused because a file was "not shown to the model", Chapter 5 has that message and what to do.
How to: keep going after a restart, a stuck milestone, or a check that ran out of time (Running on its own) #
What you need. "Work on a schedule" on. For the last two choices, also "Check drafts on a throwaway copy before they are written" on, and Propose chosen under "How Runesmith may act". For the breakdown, "Allowed files or folders" filled in.
-
Open Settings and stay on the Behaviour tab. Find the card Running on its own, between "Rhythm" and "Mapping".
-
Under After an interrupted job, press Keep and continue if nobody will be there to review a restart.
-
Under When a milestone’s tries are used up, press One more try, or One more try, then break it down if you also want smaller steps adopted for you.
-
Under When a draft’s checks did not finish, press Recheck once.
-
Each press saves at once ("Saved"). Nothing else needs confirming.
-
When you come back, open the Overview and read Decided by your settings. Each row says what Runesmith did and, beside the time, "Runesmith (your setting)". The same words are in the ledger under Activity.
-
To take a choice back, press Wait for me in its row.
What you will see. For example: "The Studio was restarted after a job was interrupted. By your setting, Runesmith kept the waiting work (2 jobs) and went on. The interrupted job itself was not run again." Or: "“…” had used up its tries and its one more try. By your setting, Runesmith broke it down into 3 smaller steps, which now come first; the goal itself is unchanged."
If it does not work. Runesmith decides only what it can read and what you have not decided yourself. It leaves a pause you set; it leaves a milestone whose cause is a file no model is shown; it leaves a breakdown you rejected or already adopted. Those wait for you, and the Overview says so. If you have pressed Save modes on Modes & measurements with every Build mode switched off, the schedule does only what your saved modes say and does not start One more try… or Recheck once by itself; Keep and continue still works. With Build on there, all three keep working (Chapter 2, "Running on its own").
How to: skip the waiting between steps (Full speed) #
- Open Settings → Behaviour tab. In the Rhythm card, make sure Work on a schedule is on.
- Choose How often. With Full speed on this is the longest Runesmith ever waits, so "every 5 minutes" (the shortest) means it never waits more than five.
- Turn on Full speed. It saves at once.
- Watch Activity: when a model answers, the next step starts straight away. When none answers (busy, or at its free limit), the waits are 1, 2, 4 … minutes, up to your "How often". With nothing to do, it waits 2 minutes.
- If your free allowance runs out faster than you like, turn Full speed off again.
Good to know. Pause still holds everything. Full speed changes only how soon the next scheduled step starts; it adds no permission and does not change any limit on tries, checks or automatic apply.
Chapter 4: Thinking power: where to get a model for free, and how to connect it #
Runesmith calls the page where you set up models Thinking power. Its own words, at the top of that page: "Runesmith works with any model, weak or strong, and even with none: without a model it maps and watches. Add a model that runs on this computer (free and private), an API key, or simply a chat window you copy and paste into. Keys are saved on this computer only and are never shown again." This chapter covers every way to get thinking power without paying for it: nothing at all, a model on your own machine, a free tier from a provider's API, and a chat window you already use, relayed by hand.
Before you have added any model at all, the Thinking power page shows one extra card, "Three ways to give Runesmith a mind", with the note "Pick one now; add more any time." Its three tiles are On this computer ("Free and private: Ollama, LM Studio or llama.cpp. Runesmith finds them for you."), With an API key ("OpenRouter, Groq, Gemini, Mistral, DeepSeek, OpenAI, Anthropic… several have free tiers."), and Copy and paste ("No key, no install: relay requests to any chat window you already use."). This chapter is those three tiles, plus the zero-model case, in order.
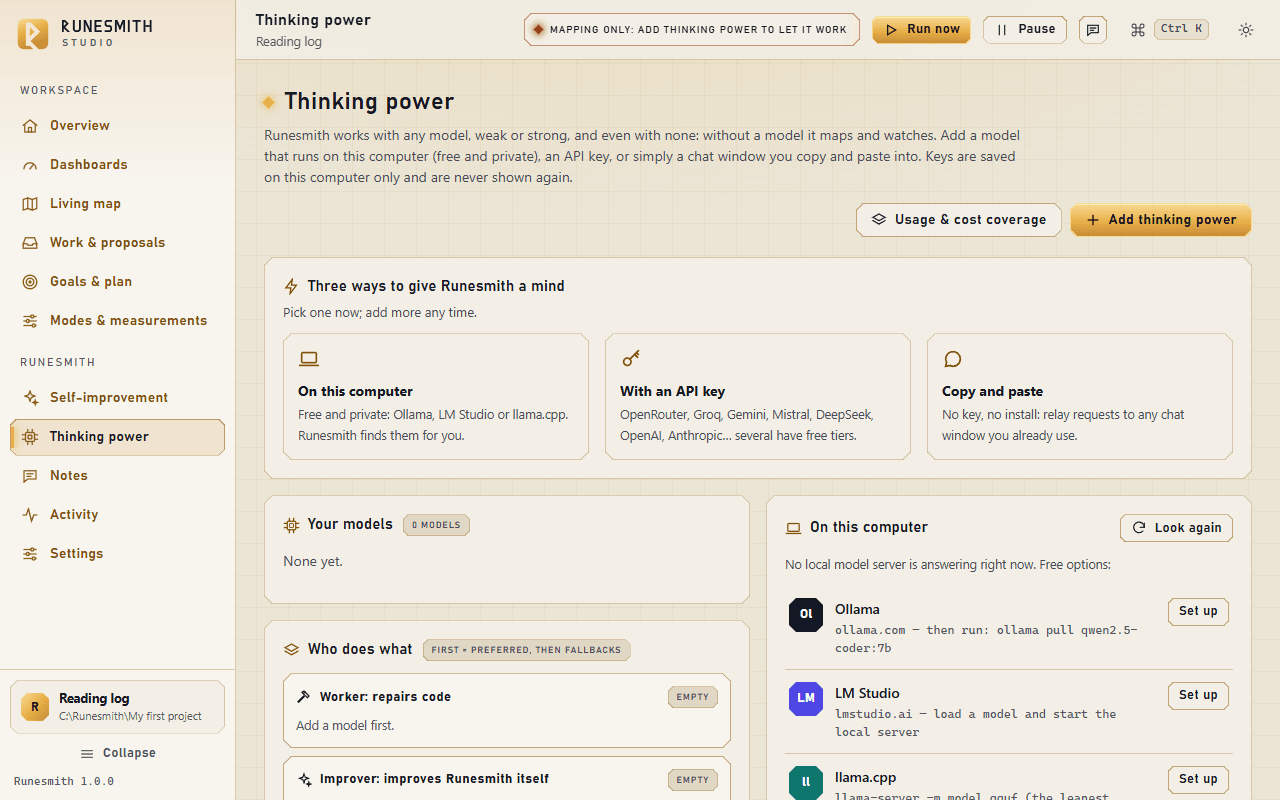
1. No model at all: what still works #
Checked 5 October 2026. The provider facts in this chapter were re-checked on each provider’s own pages on 5 October 2026 (Cerebras, which is not a Runesmith tile, was last checked on 28 September), and each provider ends with a source note. The free inference guide shows the same facts as a shorter page.
Checked 5 October 2026. The provider facts in this chapter were re-checked on each provider’s own pages on 5 October 2026 (Cerebras, which is not a Runesmith tile, was last checked on 28 September), and each provider ends with a source note. The free inference guide shows the same facts as a shorter page.
You do not need a model to open Runesmith or to start looking around. With nothing configured:
-
The introduction plays, and choosing "Just explore" switches you into Observe (Settings → Behaviour → "How Runesmith may act"), where it "maps your folder and reports what it finds; it asks no model and changes nothing" — its own words on the Overview.
-
Your folder is mapped automatically. The Getting set up checklist's "Folder mapped" box ticks itself with no model involved, and the Living map page shows what was found.
-
Settings → Health tab lists a row for thinking power even with none configured. Its detail reads, word for word: "no model is set up yet: Runesmith can map and watch, but not work or plan."
-
If your project is a Python project with tests, turning on Settings → Behaviour → "Measure code by running its tests" lets Runesmith run them, with Python's own built-in
unittest, on a throwaway copy — no model needed for this part. If any fail, the round's own line in the Live panel on the Overview names the exact count, word for word: "N of M tests fail in." The Overview also grows a card titled "Fix the failing tests," which shows what share of your tests currently pass (or, the first time, "Some of its tests fail.") and offers a button of the same name, "Fix the failing tests." Finding and counting the failures needs no model; only pressing that button, which asks a Worker model to draft the actual repair, does. Without one, Runesmith says so plainly: "No Worker model is set up, so Runesmith can map but not repair. Add one under Thinking power."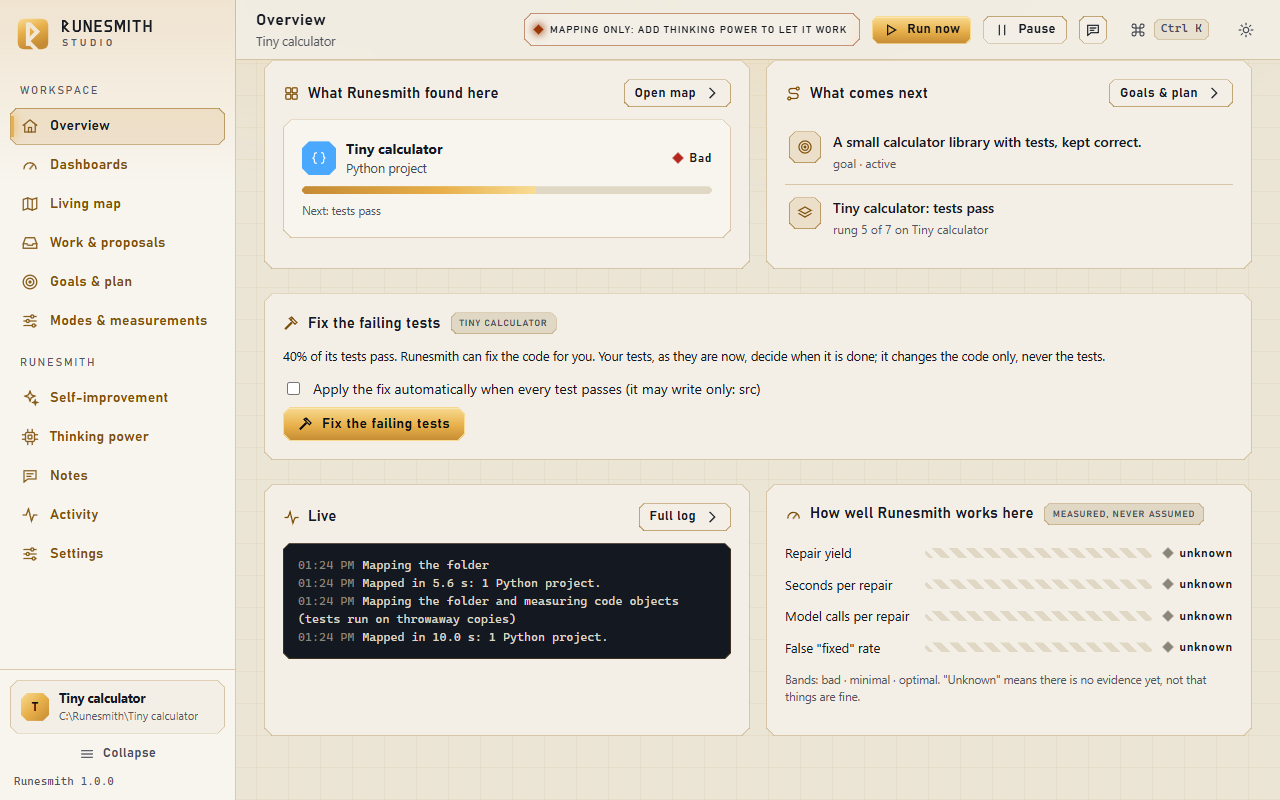
-
Under Modes & measurements, the Operations mode reads your own local report files (CSV or JSON) and records each number against its target with no model call at all — its own description says plainly it "never contacts a live service, deploys or sends messages." You can turn this on and use it with zero models configured, once you have added at least one measurement under "Objective measurements."
-
Optimize, by contrast, needs a model: it asks a role to write an improvement hypothesis from your measurements, so it stays blocked until you add one.
-
Map & Plan, Build, and Troubleshoot all need a model for their actual thinking (planning, drafting, repairing). Without one, trying to plan says, word for word: "no model is set up for planning: add one under Thinking power." Proposing acceptance checks says the close variant, word for word: "no model is set up for planning or checking: add one under Thinking power."
So: with no model at all, you can open a folder, watch it get mapped, read the Living map, write goals and a brief by hand, add blueprint documents, leave notes, read failing-test counts, and track your own numbers through Operations. Planning, drafting, repairing, and Optimize's suggestions all wait for you to add a model — the rest of this chapter is how.
2. A model on your own computer (free and private) #
This is the only way with nothing to sign up for and nothing that leaves your computer. Runesmith speaks to three local server programs, each on its own default address:
| Program | Default address | Free download |
|---|---|---|
| Ollama | http://127.0.0.1:11434/v1 |
ollama.com/download |
| LM Studio | http://127.0.0.1:1234/v1 |
lmstudio.ai/download |
llama.cpp server (llama-server) |
http://127.0.0.1:8080/v1 |
github.com/ggml-org/llama.cpp (the leanest of the three; no separate app) |
Setting one up #
-
Install one of the three. For Ollama, after installing, pull a model from a terminal: ollama pull qwen2.5-coder:7b (Runesmith's own suggested starting model). For LM Studio, load a model inside the app and, per Runesmith's own setup hint, "load the model with a context length of at least 16384 tokens, then Developer: Start Server." For llama.cpp, run llama-server -m model.gguf --ctx-size 16384 — a context of 16,384 tokens or more, in Runesmith's own words.
-
With the server running, open Runesmith's Thinking power page. Under the "On this computer" card, click "Look again." If it finds your server, it shows an item such as "Ollama is running" with either the number and names of the models it has loaded, or "no model loaded yet" if none is. Click "Use it" next to a server that has a model loaded.
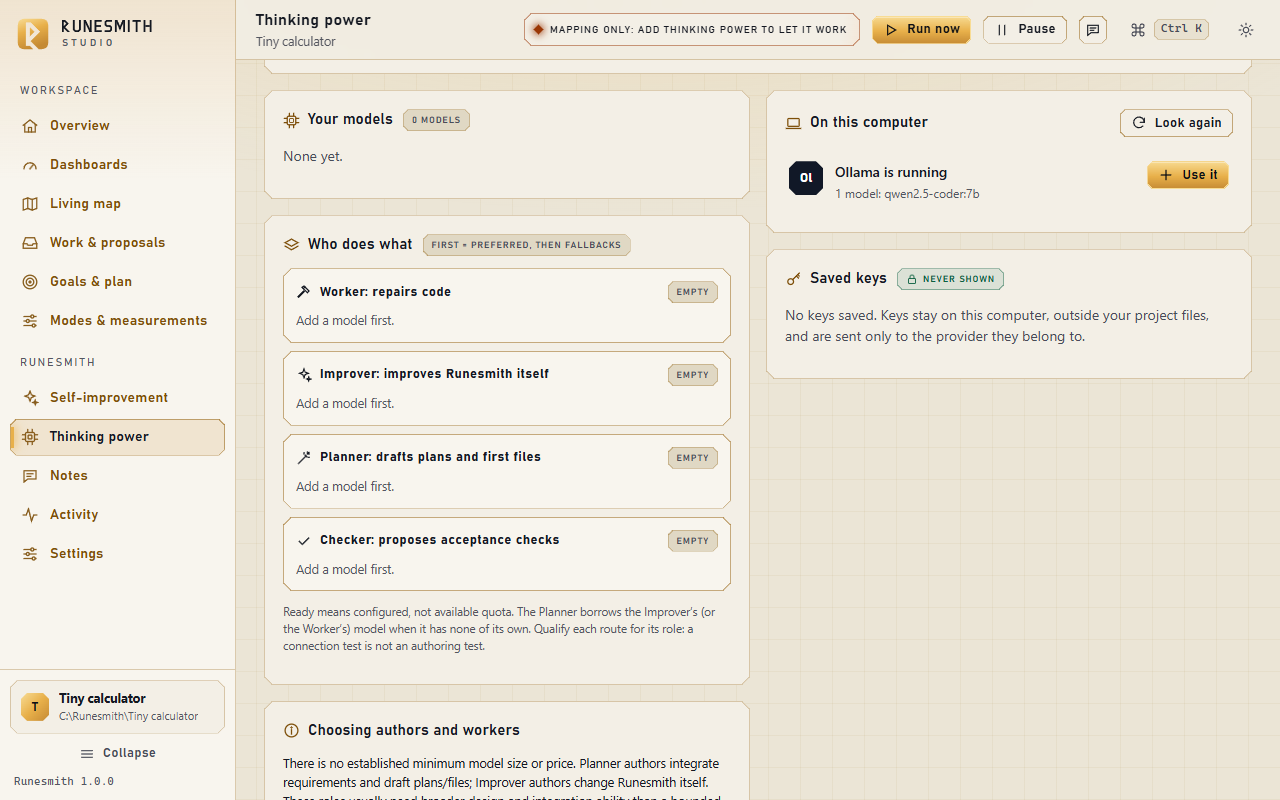
-
Runesmith often finds a running local server on its own, before you ask. The very first time you open a folder with, say, Ollama already running and a model loaded, the Overview itself says so: "Ollama is already running on this computer, with 1 model (qwen2.5-coder:7b). It is free and nothing leaves this computer." — with a button reading "Use Ollama" (or LM Studio, or llama.cpp) right there, already filled in with that server's address and model.
-
Either way — "Use it" on Thinking power, or "Use Ollama" on the Overview — opens the same setup form, prefilled: the server's address, its first loaded model, and role checkboxes already ticked (see "Which role" under section 3, below — the same guidance applies here). Review it and click "Save and test." Runesmith makes one tiny call to confirm the server answers, and reports the result as a toast, for example "ollama works: answered with usable JSON in 0.02 s."
-
If no local server answers, the same card explains what to do instead, plainly: "No local model server is answering right now. Free options:" followed by the three programs above, each with a "Set up" button that opens the same add-model form with that program preselected.
Install one of the three. For Ollama, after installing, pull a model from a terminal: ollama pull qwen2.5-coder:7b (Runesmith's own suggested starting model). For LM Studio, load a model inside the app and, per Runesmith's own setup hint, "load the model with a context length of at least 16384 tokens, then Developer: Start Server." For llama.cpp, run llama-server -m model.gguf --ctx-size 16384 — a context of 16,384 tokens or more, in Runesmith's own words.
With the server running, open Runesmith's Thinking power page. Under the "On this computer" card, click "Look again." If it finds your server, it shows an item such as "Ollama is running" with either the number and names of the models it has loaded, or "no model loaded yet" if none is. Click "Use it" next to a server that has a model loaded.
Runesmith often finds a running local server on its own, before you ask. The very first time you open a folder with, say, Ollama already running and a model loaded, the Overview itself says so: "Ollama is already running on this computer, with 1 model (qwen2.5-coder:7b). It is free and nothing leaves this computer." — with a button reading "Use Ollama" (or LM Studio, or llama.cpp) right there, already filled in with that server's address and model.
Either way — "Use it" on Thinking power, or "Use Ollama" on the Overview — opens the same setup form, prefilled: the server's address, its first loaded model, and role checkboxes already ticked (see "Which role" under section 3, below — the same guidance applies here). Review it and click "Save and test." Runesmith makes one tiny call to confirm the server answers, and reports the result as a toast, for example "ollama works: answered with usable JSON in 0.02 s."
If no local server answers, the same card explains what to do instead, plainly: "No local model server is answering right now. Free options:" followed by the three programs above, each with a "Set up" button that opens the same add-model form with that program preselected.
If Runesmith later cannot reach a server you had added (you closed it, or the computer restarted), the Studio's own troubleshooting page (docs/STUDIO.md) names this exactly: "The Worker model is not reachable." A local model server is not running. Start Ollama, LM Studio or llama.cpp, or choose another model.
What the three programs' own pages say today #
Checked 2026-10-05, on each program's own pages (the page addresses are in the source note at the end of this section):
- Ollama: the download page lists the install for macOS, Linux and Windows. The pricing page lists a Free plan at $0 that includes "Run models locally," and says running models on your own hardware is always unlimited. The same pages now also advertise Ollama's cloud models (a name ending in
:cloud), which run on Ollama's servers, not on your computer. Only a model that runs locally keeps everything on your machine, so the "free and private" description in this section applies to the local ones. Ollama's own OpenAI-compatibility page shows the addresshttp://localhost:11434/v1/, the same port as in the table. - LM Studio: the download page offers LM Studio for Windows (the page showed version 0.4.25), macOS and Linux, plus a headless daemon called llmster for servers. The home page now leads with a newer product, Bionic, so look for the LM Studio download link rather than the first button. The pricing page lists a Free plan at $0 with the line "Run local LLMs on your machine," and its FAQ says the Free plan includes local model support. LM Studio's developer documentation shows its OpenAI-compatible server on port 1234, matching the table.
- llama.cpp: the project's page on GitHub shows an MIT license badge. Its quick start offers install scripts for a shell and for PowerShell, and shows
llama serve -hf ggml-org/Qwen3.5-0.8B-GGUFto start an OpenAI-compatible server. Its server README gives 8080 as the default port and still documentsllama-server -m model.gguf, so either command name may exist on a given build: follow the README that matches the version you installed.
Source note, all checked 2026-10-05: https://ollama.com/download, https://ollama.com/pricing, https://docs.ollama.com/api/openai-compatibility, https://lmstudio.ai/download, https://lmstudio.ai/pricing, https://lmstudio.ai/docs/developer/openai-compat, https://github.com/ggml-org/llama.cpp, https://github.com/ggml-org/llama.cpp/blob/master/tools/server/README.md
What to expect #
Runesmith's own guidance on local models (docs/LOCAL_MODELS.md) is candid: it is built for people who cannot rent frontier models, and it works with genuinely small, free, local models — but small models fail more often, especially on larger projects. Runesmith's self-improvement loop is meant to find where your particular model struggles and adjust the organs around it; it does not lower the bar for what counts as a correct fix. docs/LOCAL_MODELS.md's own "What to expect (measured, not promised)" section reports research probes on particular small models. One sealed study is worth knowing: a 2.6-billion-parameter model working inside Runesmith's shipped setup repaired 5 of 68 tasks, while the same model inside a plain fixed scaffold repaired 12 of 68, so the setup did not help that small model. That is a controlled experiment on one model, not a general promise or a forecast for whatever model you run.
3. Free API tiers #
An API key lets a provider's model answer over the internet, without installing anything. Runesmith ships nine ready-made "With a key" tiles: OpenRouter, Groq, Google Gemini, Mistral, NVIDIA, DeepSeek, OpenAI, Anthropic, and Together. A separate tile, "Any OpenAI-compatible endpoint," lives in the same dialog's "Advanced" group, for everything else. Of the nine, the Studio's own one-line descriptions claim a free tier for five: OpenRouter ("several of them free"), Groq ("a free tier"), Gemini ("a free tier through Google AI Studio"), Mistral ("the free plan includes monthly API credits"), and NVIDIA ("many models with a free endpoint"). DeepSeek, OpenAI, Anthropic, and Together are not claimed as free in the Studio's own text, so this chapter does not chase their pricing.
Before you build with one free Gemini key, read this. A free Gemini key allows about 20 requests a day for each model: in a real first run, Google's own refusal said "limit: 20" for gemini-3.8-flash (Google shows the figure for your key in AI Studio, and a busy answer seemed to count). One milestone (its checks, its draft, its plan, a test) takes more than that, so on one model nobody gets an app built in a day. Runesmith therefore uses several free Gemini models in turn on the one key (see "Google Gemini" below), and for building comfortably you should add a second free provider: Groq is the one we suggest (its free tier is far larger, below). If you would rather not make a second key, the chat window (Section 4) needs no key at all.
Free tiers change without notice. Each provider below was re-checked against its own pages on 2026-10-05. Every fact carries that date, and each provider ends with a source note naming the pages behind it. Cerebras, which is not one of Runesmith's tiles, was last checked on 2026-09-28 and is marked that way. Look at the provider's own page before you rely on a number. Where a page does not say something plainly, this chapter says so and sends you there rather than guess.
Google Gemini (Google AI Studio) #
- Free today: yes, a free tier through Google AI Studio (the Studio's own words for this preset). Google's pricing page, checked 2026-10-05 (the page is marked "Last updated 2026-10-01 UTC"), shows
gemini-3.8-flash as "Free of charge" in its Free Tier column, for input and for output. It shows the same for gemini-3.7-flash, gemini-3.6-flash, gemini-3.5-flash, gemini-3.5-flash-lite and gemini-3.1-flash-lite. With a key added, Runesmith asks Google which models it serves today and suggests the newest flash model (gemini-3.8-flash on 2026-10-05; the Studio's own fallback names were last checked on 2026-10-04). It then sets up, on the same saved key, the next stable flash model and the newest flash-lite from Google's list as further models for the same roles, so one key has several allowances (see "Limits" below).
- Older 2.5 models: the same pricing page still shows Gemini 2.5 Pro and 2.5 Flash as free of charge, but Google's models page, checked 2026-10-05, says access to the 2.5 models is limited to users who have used them before, and recommends 3.8 Flash and 3.5 Flash-Lite for new projects. A new key may therefore not get 2.5.
- Your prompts and the free tier: the pricing page, checked 2026-10-05, marks "Used to improve our products" as Yes for the free tier and No for the paid tier. Read Google's terms, linked from that page, before you point Runesmith at private code.
- Getting a key: aistudio.google.com/apikey (the address the Studio's own "Get a key" link opens for this preset). Google's API-key page, checked 2026-10-05 and marked "Last updated 2026-09-25 UTC", sends you to the same address ("Create or view a Gemini API Key") and says a new user gets a default Google Cloud project and key automatically after accepting the Terms of Service. That page does not say whether a card is asked for. The rate-limits page, checked 2026-10-05, lists the Free tier's qualification as "Active project or free trial" and says that moving from the Free tier to a paid tier first requires setting up billing. When this guide was first checked by hand, on 2026-09-28, no card was asked for at the key step; no Google page states that, so treat it as an observation, not a promise.
- Limits: Google publishes no fixed free-tier numbers. Its rate-limits page, checked 2026-10-05 and marked "Last updated 2026-09-02 UTC", says rate limits depend on several factors, such as your usage tier, and can be viewed in Google AI Studio, so your own per-model figures for requests per minute (RPM), input tokens per minute (TPM) and requests per day (RPD) show on your own account there, not on a public page. The same page says limits apply per project, not per API key, that daily request quotas reset at midnight Pacific time, and that the specified limits are not guaranteed.
- What one free key did in a real first run (2026-10-05): Google's own refusal read "Quota exceeded for metric: generativelanguage.googleapis.com/generate_content_free_tier_requests, limit: 20, model: gemini-3.8-flash": 20 requests a day for that model on that key. It names the model, so the daily allowance is counted for each model on its own, and the "busy" (503) answers that came before it seemed to spend from it too. Its "retry in" words (17 hours) were wrong: the key answered again at midnight Pacific time (07:00 UTC in October). Runesmith therefore holds a used-up Gemini model until Pacific midnight, whatever the refusal says it will retry in, and keeps Google's own words beside the hold.
- How Runesmith stretches one free key: when you save a Gemini key, it also sets up the next free Gemini models on that key (the newest flash, the next stable flash, the newest flash-lite, chosen from Google's own list: nothing is typed again) as separate models for the same roles, in that order. A model that says it is at its limit is skipped at once and the next one answers; each is held on its own until its day ends. A busy answer is not asked again on the spot. The Thinking power page marks the model that is answering and shows "about 3 of 20 used today" on each model's row (the 20 is the first guess for a Google free key, replaced by the limit Google's first refusal names; the count is what this Runesmith sent, so another program on the same key spends from it too). The Overview's "Free thinking power today" card shows the same, and says who answers while another waits. You can remove any of these models (its trash button: the saved key stays while another model uses it), or, for a key saved earlier, press "Add the other free Gemini models" on the Gemini model's row.
- What it does not fix: several models on one key is still one provider. When every one of them is used up, work waits for Google's midnight; a second free provider (Groq) is what keeps work going.
gemini-3.8-flash as "Free of charge" in its Free Tier column, for input and for output. It shows the same for gemini-3.7-flash, gemini-3.6-flash, gemini-3.5-flash, gemini-3.5-flash-lite and gemini-3.1-flash-lite. With a key added, Runesmith asks Google which models it serves today and suggests the newest flash model (gemini-3.8-flash on 2026-10-05; the Studio's own fallback names were last checked on 2026-10-04). It then sets up, on the same saved key, the next stable flash model and the newest flash-lite from Google's list as further models for the same roles, so one key has several allowances (see "Limits" below).Source note, all checked 2026-10-05: https://ai.google.dev/gemini-api/docs/pricing, https://ai.google.dev/gemini-api/docs/models, https://ai.google.dev/gemini-api/docs/api-key, https://ai.google.dev/gemini-api/docs/rate-limits
Groq #
- Free today: yes. Groq's rate-limits page, checked 2026-10-05, has a Free Plan Limits tab (next to a Developer Plan Limits tab) with named numbers per model. For
openai/gpt-oss-20b and openai/gpt-oss-120b (Runesmith's own suggested models for this preset) the Free tab lists 30 requests/minute, 1,000 requests/day, 8,000 tokens/minute, 200,000 tokens/day. This matches Runesmith's own code exactly: the preset carries max_request_tokens: 8000 and its blurb reads "Very fast, with a free tier (up to 8,000 tokens a minute per model, so large requests need another model)."
- How the limits count: the same page, checked 2026-10-05, says limits apply to the organization, not to each user, that you can hit any one of them first, that cached tokens do not count toward them, and that its table is a high-level summary with possible exceptions: the exact current numbers for your account are on the Limits page in your account settings.
- Getting a key: console.groq.com/keys (the Studio's own "Get a key" link for this preset). Groq's quickstart, checked 2026-10-05, sends you to its console to create a key.
- Sign-up: neither the rate-limits page nor the quickstart, both checked 2026-10-05, says what the free plan needs at sign-up, for example whether a card is asked for. The key page tells you when you make the key.
openai/gpt-oss-20b and openai/gpt-oss-120b (Runesmith's own suggested models for this preset) the Free tab lists 30 requests/minute, 1,000 requests/day, 8,000 tokens/minute, 200,000 tokens/day. This matches Runesmith's own code exactly: the preset carries max_request_tokens: 8000 and its blurb reads "Very fast, with a free tier (up to 8,000 tokens a minute per model, so large requests need another model)."Source note, all checked 2026-10-05: https://console.groq.com/docs/rate-limits, https://console.groq.com/docs/quickstart
OpenRouter #
- Free today: yes, for models whose id ends in
:free. OpenRouter's limits page, checked 2026-10-05: free models are capped at 20 requests/minute; the daily cap is 50 requests/day while the credits you have ever purchased total fewer than 10, and 1,000 requests/day once they total at least 10 (an all-time total, not a subscription). The page says the higher daily ceiling is granted starting one credit below that threshold (at 9 credits) and counts free-model requests per UTC day. It says "credits," not a currency, so check what a credit costs on OpenRouter's own page. It also says that a negative credit balance can produce payment errors even for free models.
- What OpenRouter says about free models: its FAQ, checked 2026-10-05, says the free models have low rate limits and are usually not suitable for production use, and names a Free Models Router (
openrouter/free) that picks a free model for you.
- Getting a key: openrouter.ai/keys (the Studio's own "Get a key" link). The API base address Runesmith uses,
https://openrouter.ai/api/v1, matches OpenRouter's own quickstart documentation (checked 2026-10-05).
- Sign-up: the limits page tells accounts apart only by whether you have bought credits. None of the pages checked says whether a card is asked for when you make a key; OpenRouter's own sign-up page shows it.
:free. OpenRouter's limits page, checked 2026-10-05: free models are capped at 20 requests/minute; the daily cap is 50 requests/day while the credits you have ever purchased total fewer than 10, and 1,000 requests/day once they total at least 10 (an all-time total, not a subscription). The page says the higher daily ceiling is granted starting one credit below that threshold (at 9 credits) and counts free-model requests per UTC day. It says "credits," not a currency, so check what a credit costs on OpenRouter's own page. It also says that a negative credit balance can produce payment errors even for free models.openrouter/free) that picks a free model for you.https://openrouter.ai/api/v1, matches OpenRouter's own quickstart documentation (checked 2026-10-05).Source note, all checked 2026-10-05: https://openrouter.ai/docs/api-reference/limits, https://openrouter.ai/docs/faq, https://openrouter.ai/docs/quickstart
Mistral #
- Free today: yes. Runesmith's own tile reads "Code-strong models; the free plan includes monthly API credits." That matches what Mistral's pricing page showed on 2026-10-05: the current Free plan includes limited use of Mistral's Vibe assistant plus, in the page's own words, "$10 /mo in API credits" and "Test Mistral models in Studio" — a monthly credit allowance. Mistral's quickstart, checked 2026-10-05, says that in Free mode API access is on by default with no credit card required, and that usage and rate limits apply.
- Getting a key: console.mistral.ai/api-keys (the Studio's own "Get a key" link). Mistral's quickstart "Activate Studio and generate an API key" walks through it and says the full key is shown only once.
- Limits: Mistral's help centre, checked 2026-10-05, says the API enforces three limits (requests per second, tokens per minute and tokens per month), that Free mode has the lowest limits, meant for evaluation and prototyping, and that you read yours in the Admin Panel under API, then Limits. It publishes no number for Free mode. It also says higher tiers come from pay-as-you-go billing, and that adding credits does not raise your limits.
Source note, all checked 2026-10-05: https://mistral.ai/pricing, https://docs.mistral.ai/getting-started/quickstarts/studio/activate-and-generate-api-key, https://docs.mistral.ai/admin/billing-usage/usage-limits, https://help.mistral.ai/en/articles/698531-why-am-i-hitting-api-rate-limits-and-how-do-i-increase-them
NVIDIA (build.nvidia.com) #
NVIDIA is one of Runesmith's ready-made "With a key" tiles: base address https://integrate.api.nvidia.com/v1, key page https://build.nvidia.com/models, with nvidia/nemotron-3-super-120b-a12b and moonshotai/kimi-k3 as its two suggested starting models. Its hosted model catalogue speaks the same OpenAI-compatible API as everything else here. Runesmith's own one-line blurb for the tile: "Many models with a free endpoint, among them NVIDIA Nemotron and Kimi."
- Free today: yes, for many models. NVIDIA's models page (
build.nvidia.com/models), checked 2026-10-05, shows a "Free Endpoint" tag onmoonshotai/kimi-k3. The individual pages of both of Runesmith's suggested models,moonshotai/kimi-k3andnvidia/nemotron-3-super-120b-a12b, checked 2026-10-05, list "Free Endpoint" as available under Model Availability and say "Start building with a free API endpoint." NVIDIA's NIM documentation FAQ, checked 2026-10-05, says members of the NVIDIA Developer Program have free access to NIM API endpoints for prototyping, and that the Developer Program is free to join throughbuild.nvidia.com. - Address and model id: on an individual model's page (
build.nvidia.com/moonshotai/kimi-k3, checked 2026-10-05) the code example callshttps://integrate.api.nvidia.com/v1/chat/completions, so the OpenAI-compatible base addresshttps://integrate.api.nvidia.com/v1matches the preset, and the model id to type is the slug in the page's address, for examplemoonshotai/kimi-k3. - Getting a key: the tile's own "Get a key" link opens
build.nvidia.com/models(Runesmith's own key page for this preset); from there, a "Generate API Key" button sits directly on each model's page, as checked 2026-10-05. - Limits: the data served with a model page, checked 2026-10-05, includes the rate-limit text "Up to 40 rpm" and "10,000 requests per day", with the note that rate limits may vary by model and that traffic from other users may cause throttling. That text is part of the page's content but was not displayed anywhere on the signed-out page, so treat it as indicative and look for your own limit once you have a key.
- Credits and sign-up: none of the NVIDIA pages checked on 2026-10-05 says whether free credits are given, how many, or whether a card is asked for. The API description served with the Nemotron model page does list a 402 "Payment Required" response with the example text "You have reached your limit of credits," so a credit limit of some kind may exist; the pages do not say how large it is. Do not rely on any figure you read about NVIDIA credits on other sites: this chapter does not use them.
- Read the terms: the trial terms text on NVIDIA's model page, checked 2026-10-05, says your input and output are recorded to provide the trial and to improve NVIDIA's products and services, and asks you not to upload confidential information or personal data. Think about that before you point Runesmith at private code.
Source note, all checked 2026-10-05: https://build.nvidia.com/models, https://build.nvidia.com/moonshotai/kimi-k3, https://build.nvidia.com/nvidia/nemotron-3-super-120b-a12b, https://docs.api.nvidia.com/nim/docs/product
Add it the same way as any other keyed provider — see "Adding a keyed provider under Thinking power," below.
Cerebras — a caution, not a recommendation #
Cerebras is not a ready-made tile, and this chapter cannot recommend it as a no-cost option with confidence today. It was not part of the 2026-10-05 re-check: everything in this section is as checked on 2026-09-28. Checked live at www.cerebras.ai/pricing on 2026-09-28, the word "free" does not appear on the page at all. inference-docs.cerebras.ai/support/rate-limits, the official docs page, checked the same day, states plainly: "New accounts receive $5 in free credits after adding a verified payment method" and "If you skip adding a payment method at sign-up, Playground and API access remain inactive until you do." That page's Free Trial numbers (once a card is added) were 5 requests/minute and 1,000,000 tokens/day for models such as gpt-oss-120b. Check Cerebras's own pages for what is on offer today. If you want to try it anyway, it is added through "Any OpenAI-compatible endpoint," under "Advanced" — see "Adding a keyed provider under Thinking power," next.
Adding a keyed provider under Thinking power #
-
On the Thinking power page, click "Add thinking power."
-
In the "Add thinking power" dialog, under the group "With a key" (or, for Cerebras, "Advanced" → "Any OpenAI-compatible endpoint"), click the provider's tile.
-
Fill in the fields shown: Name (a short label you choose; Runesmith suggests one), Model (type or use "List models" to ask the provider what it currently serves and pick from the list), and, for "Any OpenAI-compatible endpoint," Address (the base URL from the tables above).
-
Paste your key into the API key field. Runesmith's own note beside it: "Saved in this folder's .runesmith/secrets.json, never in your project, never shown again." That file is not encrypted: it relies on your computer account's file permissions, so keep the folder private. The .runesmith folder ignores itself for version control, so it is not committed by accident. A "Get a key" link, when the provider has one, opens the exact page named above.
-
Under Roles, tick which of Worker, Improver, Planner, or Checker this model should do (see "Which role," next).
-
Click "Save and test." Runesmith makes one tiny call to confirm the key and model work, and reports the result as a toast. For Google Gemini, the dialog tells you before the key box what a free key allows (about 20 requests a day for each model) and offers "Also set up the other free models on this key, to be used in turn (recommended)", ticked; the toast then names the models it added.
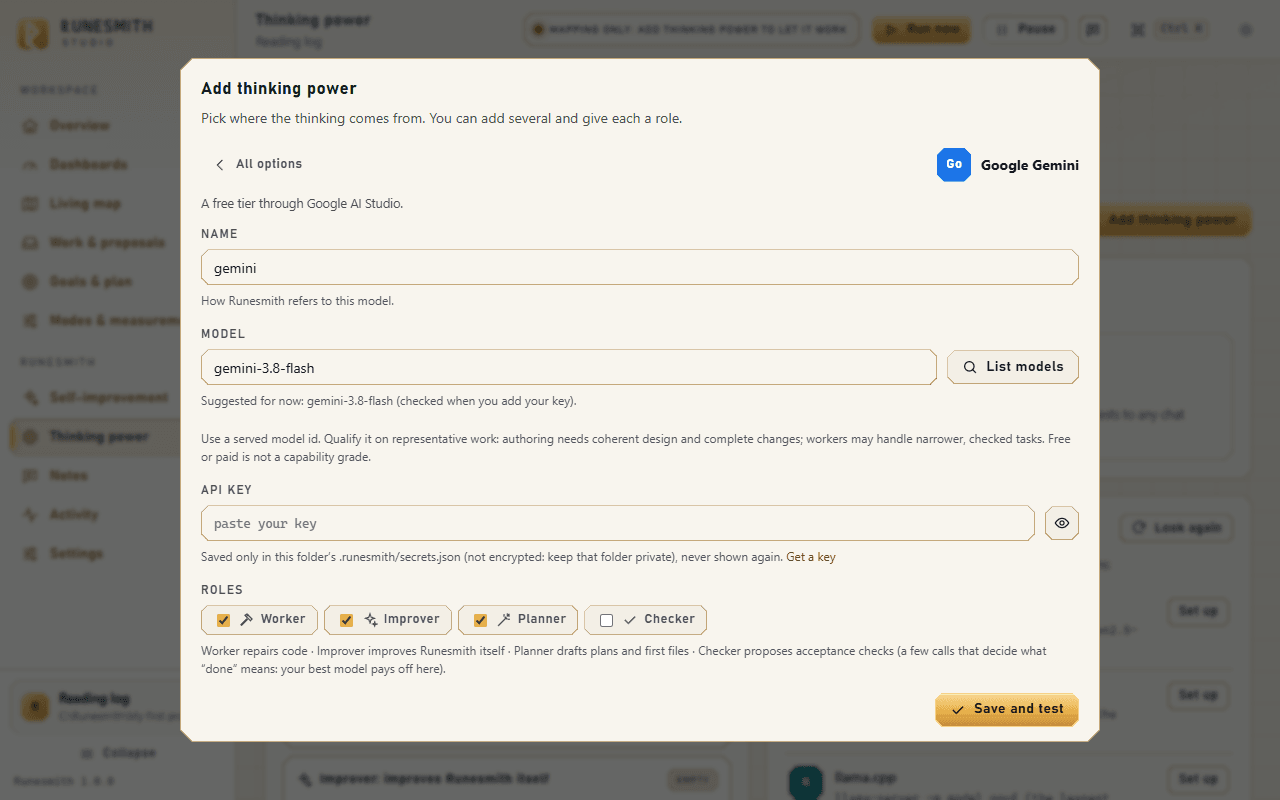
Which role #
On the Thinking power page, click "Add thinking power."
In the "Add thinking power" dialog, under the group "With a key" (or, for Cerebras, "Advanced" → "Any OpenAI-compatible endpoint"), click the provider's tile.
Fill in the fields shown: Name (a short label you choose; Runesmith suggests one), Model (type or use "List models" to ask the provider what it currently serves and pick from the list), and, for "Any OpenAI-compatible endpoint," Address (the base URL from the tables above).
Paste your key into the API key field. Runesmith's own note beside it: "Saved in this folder's .runesmith/secrets.json, never in your project, never shown again." That file is not encrypted: it relies on your computer account's file permissions, so keep the folder private. The .runesmith folder ignores itself for version control, so it is not committed by accident. A "Get a key" link, when the provider has one, opens the exact page named above.
Under Roles, tick which of Worker, Improver, Planner, or Checker this model should do (see "Which role," next).
Click "Save and test." Runesmith makes one tiny call to confirm the key and model work, and reports the result as a toast. For Google Gemini, the dialog tells you before the key box what a free key allows (about 20 requests a day for each model) and offers "Also set up the other free models on this key, to be used in turn (recommended)", ticked; the toast then names the models it added.
Runesmith's own guidance card on Thinking power, "Choosing authors and workers," puts it this way: "Planner authors integrate requirements and draft plans/files; Improver authors change Runesmith itself. These roles usually need broader design and integration ability than a bounded Worker task," while "a cheaper or smaller worker can be useful with focused source, a narrow contract and real checks." Its sharpest, most specific advice concerns the Checker: it "proposes each milestone's acceptance checks: a few calls that decide what 'done' means for automatic apply," and the card's own words, drawn from test runs, are blunt: "give the Checker your best model (a chat window works well), and let a free API model build." A weak Checker writing weak checks undermines automatic apply more than a weak builder does.
Give every role a second model #
Free tiers run out. A free key's own published caps are real limits, not suggestions: Groq's free tier is capped at 1,000 requests and 200,000 tokens a day per model (see "Free API tiers," above), and OpenRouter's free daily cap is 50 requests for an account that has purchased fewer than 10 credits. Once a day's cap is spent, calls fail until the provider's own reset — ordinary, expected behaviour of a free tier, not a bug. The reset time differs by provider: Gemini's rate-limits page says daily quotas reset at midnight Pacific time, and OpenRouter's limits page counts free-model requests per UTC day (both above, checked 2026-10-05). Runesmith's role lanes are built for exactly this: the "Who does what" card's own badge reads "first = preferred, then fallbacks." The first model you add to a role is tried first. When it is busy or at its free limit, Runesmith moves on to the next model you listed for that role, without you having to notice or intervene. A call that was turned away before any model started on it (nothing ran, nothing was charged) goes straight on to the next model, so it costs nothing. A call that was accepted and is still running is never sent to another model, because that could mean paying for the same answer twice.
Nor does it cost you one of Runesmith's own limited build tries. Each step gets three ordinary tries before a milestone needs a person's help. A call that ends with no answer and no token used (turned away when it was sent, turned away by every model you listed, or failed because a model was at capacity) is recorded and uses up nothing, while a call where a model actually generated an answer still counts. Between that and the move to the next model above, giving a role a second free model costs close to nothing: at worst the first one's capacity is skipped in an instant and for free, at best it saves the round.
To use this: add a second (or third) keyed model as its own instrument, exactly as in "Adding a keyed provider," above — a different provider is best, since same-provider quotas often run out together. (Google Gemini is the one exception Runesmith handles for you: its daily limit is counted for each model, so saving a Gemini key already sets up a few more free Gemini models on that key. That stretches one key; it does not replace a second provider.) Then, on the "Who does what" card, find the role's lane and use its "+ add a model" drop-down to add the new instrument to the same role. It appears as a numbered fallback tag after your first, preferred model. Use each tag's "Move up" button to promote a fallback ahead of another; each tag also has a "Remove from this role" button.
Two newer features lean on a second model. The check autopilot (Goals & plan → Build continuation) asks a second, different model to cross-check the checks the first one wrote, so put one after your best model in the Checker lane, or in the Planner lane. A chat window cannot do this job: the autopilot has to ask it without you. And Full speed (Settings → Behaviour → Rhythm) asks the models more often, so a free allowance runs out sooner; with a second free model in each lane, a busy first one is simply skipped.
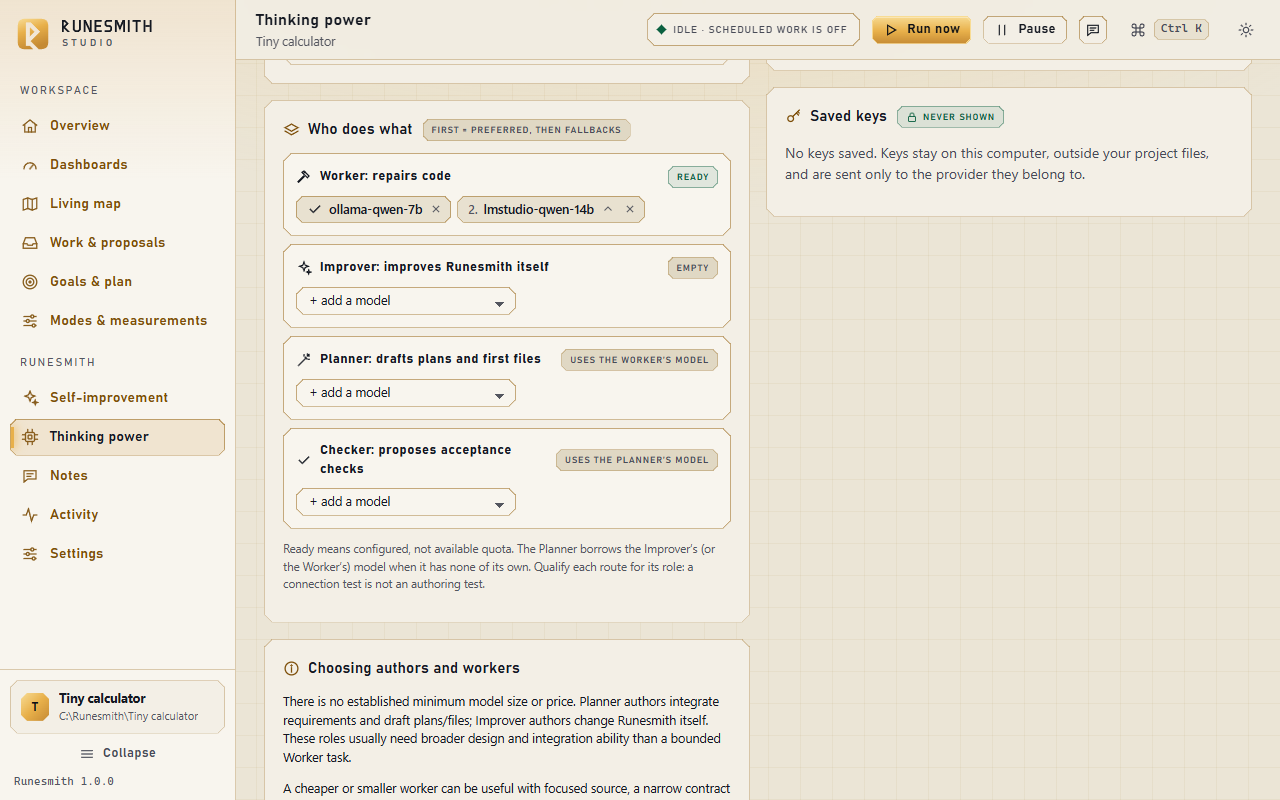
4. The chat window, relayed by hand #
This needs no key and nothing installed: you copy Runesmith's request into any chat window you already use — ChatGPT, Claude, Gemini, or anything else — and paste the reply back.
-
On Thinking power, click "Add thinking power," then, under the group "No key needed," click the tile "A chat window (copy and paste)." (Before you have added any model at all, the same thing is one click away on the Overview: the button "Use a chat window.")
-
Fill in Name, and, optionally, "Which chat will you use? (for the record)" — for example "ChatGPT" or "Claude." This label is only for your own records; nothing here is checked against the provider.
-
Under Roles, tick which of Worker/Improver/Planner/Checker this chat window should answer for. Runesmith's own guidance is that a chat window "is best for the author role: a few calls per improvement" — well suited to Planner or Improver work, where only a handful of calls are needed. A Worker set this way still works, but every single repair call then needs a person to paste it in and its reply back before that repair can finish.
-
Click "Save chat instrument." No model call happens when you save; there is nothing to test.
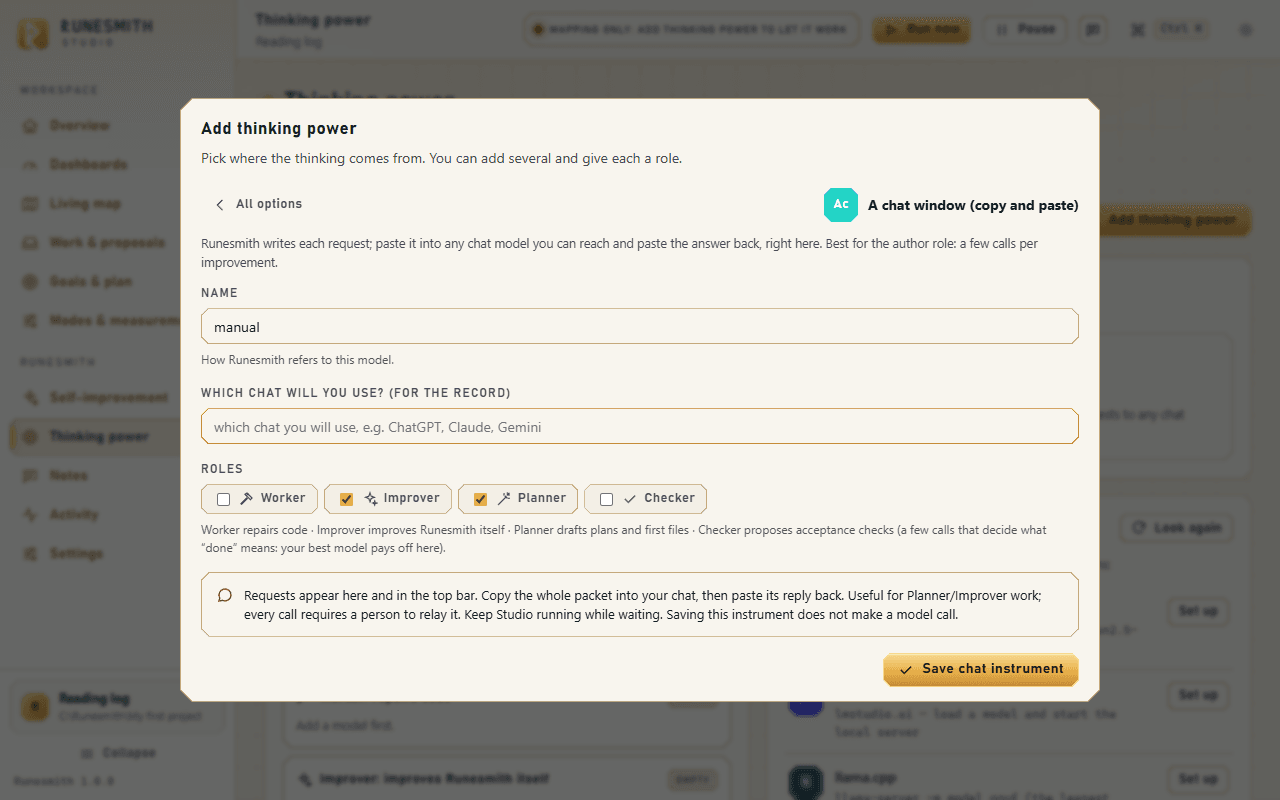
Answering a request #
Whenever a step needs this chat window, Runesmith cannot send anything itself — it waits for you.
- A notice appears: "Runesmith needs you: a request is ready to relay to your chat model." Click its button, "Open the relay," or open the same thing at any time from the status pill in the top bar, or from the Chat relay card that appears on Thinking power itself whenever a request is waiting.
- Under "1. Copy this request," click Copy.
- Paste it into your chat window, and let it answer in full.
- Back in Runesmith, paste the whole reply into the box under "2. Paste it into any chat model, then paste its reply here," and, if you like, note which model answered in the field beside it — this is only for the record; it is not checked. Click "Send the answer."
- If the reply does not fit the format Runesmith asked for, nothing is thrown away: it says so plainly, lists what was wrong, and offers "Copy correction request" — a ready-made follow-up message asking your chat model to correct just the format, keeping the original task. Paste that in, and paste its corrected reply back the same way.
- If you would rather not answer a particular request, Skip declines it: Runesmith's own confirmation is exact — "The step that asked stops without an answer, and nothing it would have changed is changed: a plan or draft stays as it is." This is recorded, not silently dropped.
Runesmith's own guidance calls this "human-assisted transport, not unattended execution" — every call through a chat window needs a person at the keyboard, which is exactly why the free API tiers in section 3, and the local servers in section 2, are worth adding once you are ready: they let Runesmith work on without you standing by for each answer.
Chapter 5: If you see this, do that — and a glossary #
This chapter is a lookup table. Down the left, in quotation marks, are words the Studio actually shows. Down the right: what it means, and exactly what to click. Entries are grouped by the page you're on when you meet them. A short glossary follows, for words the Studio uses as if you already know them.
Nothing here is dangerous to click through. Runesmith never writes a file, spends a model call it warned you about, or loses your place because you clicked the "wrong" button on one of these screens.
Before the Studio opens #
"Runesmith Studio is locked" #
Where: the whole browser tab, before anything else loads. The page shows the Runesmith logo above the heading — not a padlock; the browser tab's own icon is the same rune logo Runesmith always uses.
What it means: you reached Runesmith's address without the one-time link its launcher just printed — for example by typing the address from memory, opening an old bookmark, or opening it in a second browser. This is not caused by running more than one Studio at once: each Studio now keeps its own separate sign-in, so opening a second Runesmith folder in another tab of the same browser does not lock you out of the first one. Chapter 1 covers this screen in full.
What to do: go back to the launcher's console window and use the link it printed. If you closed that window, start the launcher again; if Runesmith is still running, it prints a fresh working link for you.
"Runesmith Studio is not answering. Is it still running?" #
Where: two places, depending on when it happens. If the Studio was still loading (for example, right after you opened its link), you see a full page headed "Runesmith is not answering", with this sentence underneath and a "Try again" button. If the Studio had already loaded and you then clicked something, you see it as a red toast instead.
What it means: the browser tried to talk to Runesmith and got nothing back — most often because the launcher's console window was closed, which stops Runesmith.
What to do: check the launcher's console window. If it's gone, start the launcher again; it reopens your last folder. On the full-page version, "Try again" reloads the page once the launcher is running again.
On any page #
"[Something] is taking longer than usual ([n] s)." #
Where: a small line that appears beside any button that takes more than three seconds, for example "Withdrawing the checks is taking longer than usual (7 s). Checking whether Runesmith is busy…". It updates every two seconds and disappears when the action ends.
What it means: your click was not lost, and Runesmith is working. The line then says what is slow, in one of three ways:
- "Runesmith answers other requests quickly, so this one is waiting for a step that is saving to your project, or for the disk. This will finish; there is no need to press it again."
- "Runesmith is answering slowly right now (a simple request took [n] s), so the computer or Runesmith is busy with other work. This will finish; there is no need to press it again."
- "Runesmith is not answering right now; if it is still running, this will finish when it does."
What to do: wait, and do not press the button again. In the third case, look at the launcher's console window (see "Runesmith Studio is not answering", above).
Overview #
"Runesmith was restarted in the middle of a job. Nothing was repeated or sent twice, and nothing continues until you have had a look." #
Where: the hero card at the top of the Overview, with the button "Review restart recovery".
What it means: Runesmith (or its launcher window) closed while something was in progress — a build, a check, a request waiting for your chat window. Nothing from that interrupted step was silently retried, and nothing new starts until you have reviewed what was saved.
What to do:
- Click "Review restart recovery". This takes you to Activity.
- Read the plain summary there (see "Restart recovery", under Activity, below).
- Tick the review checkbox, then click either "Keep waiting jobs · stay paused" or "Set aside waiting jobs · stay paused".
- Click "Resume queue" when you're ready to let work continue.
If you chose Keep and continue (Settings → Behaviour → "Running on its own" → "After an interrupted job"), you will usually not see this message: Runesmith does the review's "keep" itself and says so in the card Decided by your settings (next entry). You still see it when Runesmith could not decide by itself: its saved records were damaged or changed, a write-recovery conflict is open, or a job was still running.
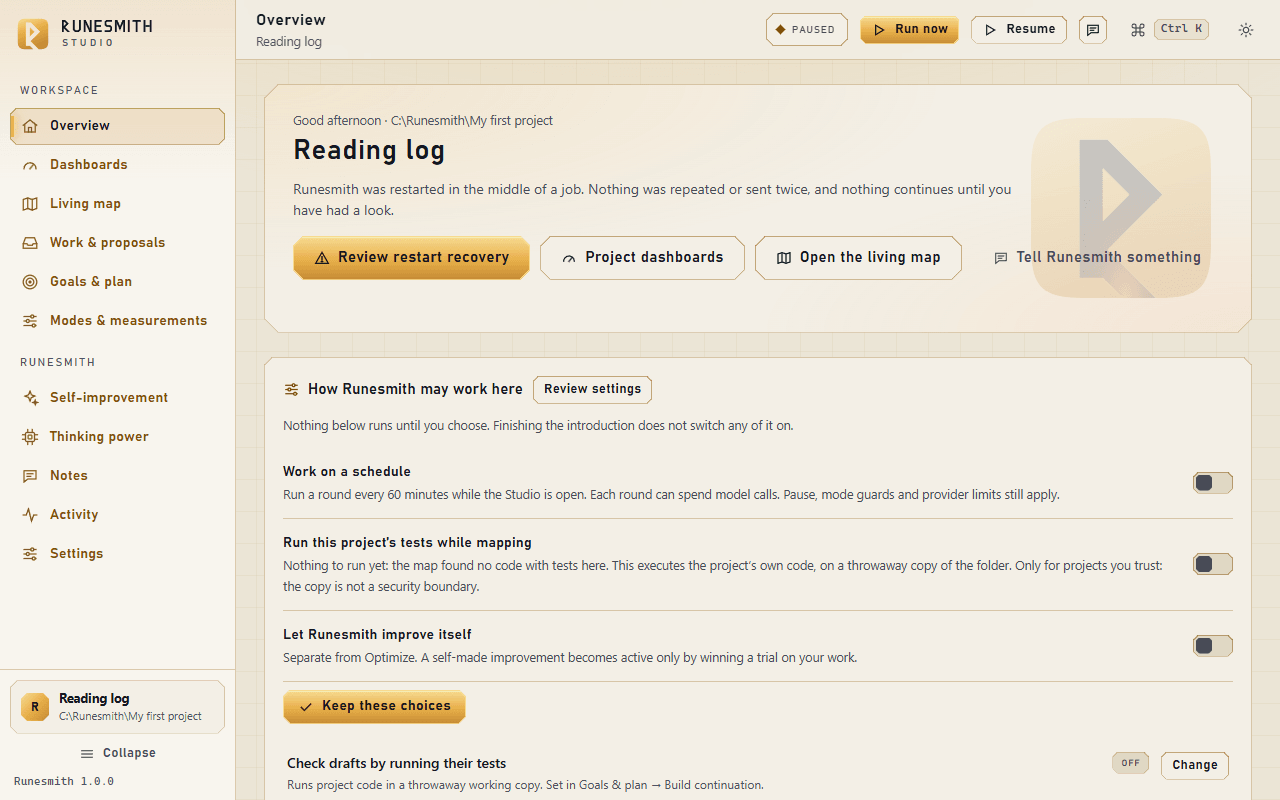
"Decided by your settings" (a card on the Overview) #
Where: a card just below the hero card on the Overview. It is there only after Runesmith has acted by one of your "Running on its own" choices, and it shows the newest few decisions, each with its time and Runesmith (your setting) beside it. The same words are in the ledger under Activity.
What it means: this is not an error. It is the record of what Runesmith decided for you because you allowed it. The sentences you may read there:
- "The Studio was restarted after a job was interrupted. By your setting, Runesmith kept the waiting work (N jobs) and went on. The interrupted job itself was not run again." (If you had paused the queue yourself: "…and left the pause you set.")
- "“[milestone]” had used up its tries. By your setting, Runesmith gave it one more try with another model: …"
- "“[milestone]” had used up its tries and its one more try. By your setting, Runesmith broke it down into N smaller steps, which now come first; the goal itself is unchanged." (Or: "…proposed smaller steps by your setting, but could not adopt them (…); they wait for you." Then see "Proposed breakdown", under Goals & plan.)
- "“[draft]”: a draft’s checks did not finish (they ran out of time). By your setting, Runesmith ran them once more with a longer limit and no model call: …"
- "…Runesmith tried to run them once more, but could not: … It waits for you."
What to do: nothing is needed. If you did not want one of these decisions to be made for you, go to Settings → Behaviour → "Running on its own" and press Wait for me in that row.
"You chose to just look. Runesmith maps your folder and reports what it finds; it asks no model and changes nothing." / the header pill "Just looking: maps and reports, asks no model" #
Where: the Overview hero, and a small pill in the top bar on every page, whenever "How Runesmith may act" (Settings → Behaviour, or the Overview's own choice) is set to Observe.
What it means: this is not an error. Observe mode is a deliberate, safe setting: Runesmith reads your folder and reports, and never asks a model anything, plans, drafts or writes a file, no matter what else is switched on. This is what "observe mode asks no model" means throughout the Studio — it's a hard rule, not a suggestion.
What to do: nothing is wrong. If you want Runesmith to plan and draft (still only ever changing files when you approve, unless you separately turn on automatic apply), click "Let it help" on the Overview, confirm, and it switches you to Propose.
"No Worker model is set up, so Runesmith can map but not repair. Add one under Thinking power." #
Where: the live log on Overview or Activity, after a round that found failing tests but has no model to fix them with; also as a toast, "Runesmith needs a Worker model to repair code. Add one under Thinking power."
What it means: measuring your project's tests needs no model at all, so Runesmith can still tell you tests are failing. Actually repairing them needs a model in the Worker role.
What to do: go to Thinking power → Who does what → Worker, and add a model (a local server, an API key, or a chat window).
"No Python project with tests was found here, so no tests were run. To build something new, draft a plan under Goals & plan." #
Where: the live log, after "Find work now" / "Run now" on a folder with no code Runesmith recognises as a Python project with tests.
What it means: Runesmith is being honest that it looked and found nothing to measure — this is not the same as "everything passes". If your project has tests in an unusual layout, it may still not be seen (see the next entry).
What to do: if you're building something new, go to Goals & plan and draft a plan. If you have an existing project with tests that Runesmith should have found, check it really is a Python project (or see "Fix the failing tests", next).
"N of M tests fail in [name]. […]: use "Fix the failing tests" on the Overview, which works for any project." — and the "Fix the failing tests" card #
Where: the live log after a round, and a card on the Overview headed "Fix the failing tests", with a checkbox "Apply the fix automatically when every test passes" and a button also labelled "Fix the failing tests".
What it means: Runesmith found failing tests but its own repair organ can't work on this project directly (for example, the code isn't under a src/ folder, or the tool it needs isn't installed). This card is the fallback: it builds a milestone, "Make the failing tests pass", whose acceptance is your project's own tests, frozen exactly as they are now — Runesmith may change the code, never the tests.
What to do:
- Read the card: it shows what share of your tests currently pass.
- Tick the checkbox if you want a passing fix applied automatically (it can only write the code folders named on the card, never the tests).
- Click "Fix the failing tests", then "Fix them" on the confirmation.
- Follow progress on Goals & plan and Activity.
"Nothing to run yet: the map found no code with tests here." #
Where: the Overview's "How Runesmith may work here" card, next to "Run this project's tests while mapping", when your folder has nothing Runesmith recognises as code with tests. (The same switch also lives in Settings → Behaviour → "Mapping", labelled "Measure code by running its tests" there; that copy doesn't show this line.)
What it means: this switch has nothing to do yet — it isn't broken, there's just no test suite for it to run.
What to do: nothing, until your folder has code with tests. If you believe it should already, see "Fix the failing tests" above, or check the folder layout against what Runesmith looks for (a tests/ folder, or a common Python packaging file).
"The tries for this step are used up, so building waits for you: Work & proposals → Drafts shows what you can do, and Goals & plan may offer smaller steps to adopt." #
Where: the Overview's "Next in your plan" line, after a scheduled round finds every ordinary attempt at the current milestone already spent.
What it means: Runesmith tried the current milestone the allowed number of times and none of the attempts passed its checks. A scheduled round will not keep trying the same thing forever — it stops and, where it can, proposes breaking the milestone into smaller steps instead.
What to do:
- Go to Work & proposals → Drafts and read what happened on the last few tries (see "An answer for … could not be used" and "Three tries at … did not work", below).
- Or go to Goals & plan, find the milestone, and look for a proposed breakdown with the button "Adopt prerequisites" (see "Proposed breakdown", under Goals & plan, below).
Other ready milestones keep building meanwhile: one stuck milestone does not hold up the others, and when every ready milestone needs you, the round names each one and says why. If you would rather not be asked, Settings → Behaviour → "Running on its own" → When a milestone’s tries are used up can give the one more try, or the one more try and then the breakdown, for you; each decision then shows under Decided by your settings. A milestone whose cause is a file no model is shown is left for you even then (see "was not shown to the model", below).
"The last attempt did not work ([time] ago): [reason]" — with, sometimes, "[N] tries in a row did not work, so it waits for you…" or "The next round tries again." #
Where: the Overview's "Next in your plan" line, right after "Next in your plan: '[milestone]' ([n] of [m] done)."
What it means: the most recent automatic build attempt for the current milestone failed its checks, and the plain reason is shown (often one of the messages under "Work & proposals", below). What follows tells you whether to expect another try:
- If this was the third (or a later) failure in a row, it stops here and waits for you — go to Work & proposals → Drafts.
- If fewer than three tries have failed and "Work on a schedule" is on, it says "The next round tries again" — you don't need to do anything; the next scheduled round will have another go.
- If the schedule is off, nothing more happens until you click something yourself (for example "Build next step" on Goals & plan, or one of the options on Work & proposals → Drafts).
Work & proposals #
The badge on a draft (next to its title) is one of a short list of plain words. None of these badges are an error by themselves; they tell you exactly how far a draft has been checked.
| Badge | What it means |
|---|---|
| unverified | Runesmith has written the files but hasn't run any check on them yet. |
| its own tests passed | the draft's own tests (the ones a model wrote alongside the code) passed on a throwaway copy. You haven't approved acceptance checks for this milestone yet, so this is the model marking its own work. |
| your checks passed | your approved acceptance checks passed, and this project has no tests of its own to also run. |
| its tests and your checks passed | both the project's own tests and your approved acceptance checks passed. |
| checks failed | at least one check — the project's own tests, or your acceptance checks — failed on this draft. |
| checks did not finish | a check ran out of time or was interrupted; this is not the same as failing, and the draft is kept. Work & proposals → Drafts offers Resume timed-out check once (see below), and Runesmith can press it for you if you choose Recheck once under Settings → "Running on its own". |
| nothing checked it yet: add acceptance checks | there is nothing at all to check this draft against yet. |
What to do with any of these: click "Recheck saved draft" to run the checks again, or open the draft to read its files and check receipts, then "Write these files" if you're satisfied.
"Checking drafts is off in this folder" #
Where: a dialog that opens when you click "Recheck saved draft" while "Check drafts on a throwaway copy before they are written" (Goals & plan → Build continuation) is off.
What it means: Runesmith checks a draft by running your project's own tests, and your acceptance checks, on a disposable copy of your folder — which means running your project's code, even if only on a copy. It won't do that until you say so.
What to do: click "Turn checking on and check this draft" to turn the switch on and check this one draft immediately, or go to Goals & plan → Build continuation and tick it yourself first.
"no longer fits" (a fix's badge) #
Where: Work & proposals → Fixes, on a waiting fix whose files have changed since the fix was made — usually because another fix already covered the same ground.
What it means: this specific fix can no longer be applied cleanly; nothing is lost, and no action is needed from you.
What to do: nothing. The card explains itself ("the files changed after this fix was made, often because another fix already covered them") and offers only "Copy patch" and "Comment", not Apply.
"Three tries at [milestone] did not work: one more is available" #
Where: Work & proposals → Drafts, a highlighted card with the button "Use alternate author".
What it means: the ordinary number of automatic attempts at this milestone (through your configured Planner chain, in the order shown on Thinking power) is used up. This offer is a single additional try, using what the earlier tries learned. A try where no model ever answered at all — turned away when it was sent, turned away by every model you listed, or failed at capacity before generating anything — does not count toward the three, or toward this one extra try; only a try where a model actually generated an answer uses one up.
What to do: read the reason shown under the card. If you want to try once more, click "Use alternate author", then confirm "Allow one more try?". If you'd rather change which model answers first, go to Thinking power → Who does what and move a different model first for the relevant role (see "Fall-through", in the glossary) before trying again.
If nobody will be there to click it, Settings → Behaviour → "Running on its own" → When a milestone’s tries are used up can give this one more try for you, once for each milestone. It is then said under Decided by your settings, so you will seldom meet this card.
"The one more try at [milestone] was refused, and its answer is kept" #
Where: Work & proposals → Drafts, after the one extra try above was refused (for example, its edits didn't match your files).
What it means: the model's answer for that one extra try couldn't be used as it stands, but Runesmith kept it rather than throwing it away. A later version of Runesmith might accept the same answer. If you've already clicked "Check it again" once, the card also shows a line "Checked again [time] ago: [reason]" — that's just the result of that last recheck, kept for the record; checking again gives the same answer until Runesmith itself is updated.
What to do: click "Check it again". This asks no model at all — it just runs the kept answer through the same checks again, and writes nothing unless they pass.
"An answer for [file] could not be used" — with "Correct retained answer" or "Set it aside" #
Where: Work & proposals → Drafts, whenever a build attempt's edit was refused (for example, the exact text it tried to change wasn't found).
What it means: a model's answer didn't fit your files as they actually are, so nothing was written. Up to two corrections are allowed per attempt, where the model is told exactly why it was refused and tries again on the same files only.
What to do:
- If the card says a correction's answer did not arrive in time, click "Set it aside", type why (this is kept for the record), and confirm. This does not use up another correction — the late one already counted as one of the two — and you can then ask for a correction again.
- Otherwise, click "Correct retained answer", confirm "Ask the model to correct this answer?", and Runesmith makes one bounded call: the model sees only why it was refused and the files as they are; it cannot touch other files, and your checks still decide.
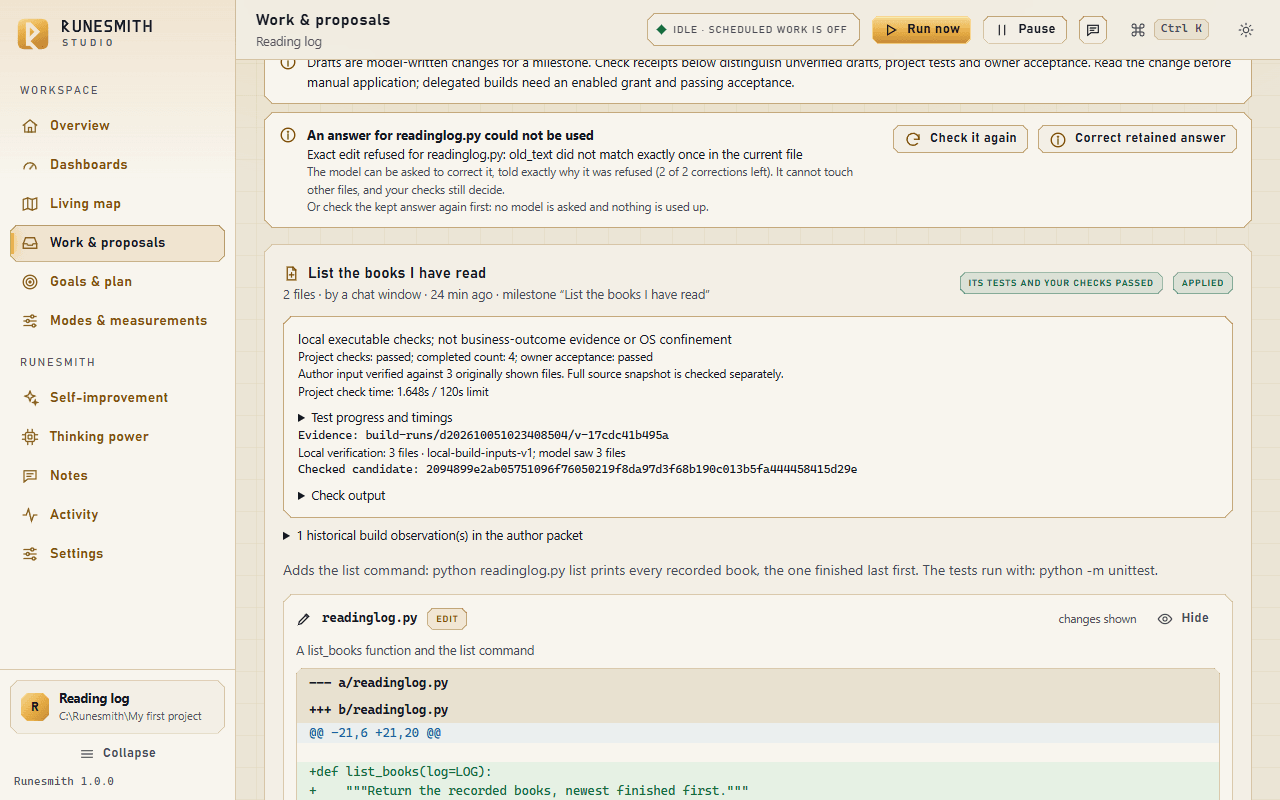
"Resume timed-out check once" (a draft whose checks did not finish) #
Where: Work & proposals → Drafts, a button on a draft whose badge reads "checks did not finish".
What it means: the draft's checks ran out of time, often because the computer was busy with other work, so there is no verdict yet. It is not a failure. Runesmith offers one extended check for each draft, and asks no model for it.
What to do:
- Click "Resume timed-out check once".
- In the box "One extended check, no model call", read the time it grants, type a short reason, and click "Grant one check extension". An ordinary build gives your own acceptance checks 60 seconds plus 2 seconds for every check, never less than 120 and never more than 600. The extension gives them twice that, still at most 600 seconds, and the project's own tests up to 240 seconds.
- Watch Activity for "Rechecking a draft whose checks did not finish". If it times out again, the draft stays "checks did not finish" and is kept.
If you would rather not press this yourself, choose Recheck once under Settings → Behaviour → "Running on its own" → "When a draft’s checks did not finish"; the schedule then does it once for each draft and says so under Decided by your settings.
"[file] was not shown to the model (the other files filled the source budget), so its change cannot be checked against it. Prioritize [file] under Goals & plan, Author context, so models see it (the next round also shows it by itself); this used up no try." #
Also worded: "[file] is not shown to the models, so builds of this milestone cannot change it. Prioritize [file] under Goals & plan, Author context."
Where: Work & proposals → Drafts, as the reason under a refused answer; and in the summary of the round that found it, in Activity.
What it means: a model's answer changed a file it was never shown, and Runesmith never accepts an edit to text the model did not see. Each build request has a fixed room for source text (48,000 characters), and other files filled it. The model did nothing wrong, so no try was used up. The next round puts that file right after your prioritized files, so it is usually shown then and you need do nothing. If it still cannot be shown, the milestone waits for you with the second wording above, instead of failing the same way again.
What to do, if the milestone is waiting for you with the second wording (or keeps meeting the first):
- Go to Goals & plan, and on the Plan card press Author context.
- In the large text box (its hint reads "One exact relative file path per line"), type the file's path, give a reason in the box below it, and press Save future context.
- The next build of that milestone is shown the file. Chapter 3 has the steps in full ("How to: show Runesmith a big file").
Two other wordings are not fixed by prioritizing, and do use up a try: "…do not fit the source budget together, so no model can be shown them all… Remove prioritized files this step does not need, or split this step into smaller ones.", and "…is too large to show a model, even in parts (its lines are too long to quote)… Split it into smaller files." (a file that is not UTF-8 text gets its own words: save it as UTF-8, or keep it out of the milestone).
"[file] line [n] leaves code out (“…”): write the code in full; never abbreviate." #
Where: Work & proposals → Drafts, as the reason a model's answer was refused. It counts as a failed try.
What it means: the answer contained a comment standing in for code ("rest of the code", "for brevity", "implementation omitted", "goes here"), which would have written a file with the real code missing. Runesmith refuses that rather than write a stub. An ordinary comment such as "wait for the frame..." is fine, and so is a comment that was already in the file.
What to do: usually nothing: the next try is told to write the code in full. If one milestone keeps hitting it, press Propose smaller steps on it, or put a stronger model first under Thinking power.
"Write these files?" / "Write files despite unresolved checks or review?" #
Where: the confirmation dialog after clicking "Write these files" on any draft.
What it means: the plain title tells you whether this draft has cleanly passed everything Runesmith knows to check. The second, more serious wording appears when something is unresolved — the checks haven't passed, or there's recorded review feedback on this draft — and asks you to read the change yourself before writing.
What to do: read what the dialog says about project checks and owner acceptance. If you're satisfied, click "Write files". Anything it replaces is backed up, and can always be undone from Work & proposals.
"Is '[milestone]' done?" #
Where: a dialog offered right after a draft's files are written, when that draft's checks passed.
What it means: writing files and passing checks doesn't by itself mark a milestone done — Runesmith always asks you.
What to do: click "Mark done" if it is, or "Keep in progress" if there's more to do. You can change this later from Goals & plan.
Goals & plan #
"No acceptance checks yet. Automatic apply needs them, and you approve them in plain words." — the "Propose acceptance checks" button #
Where: every milestone card, until it has checks.
What it means: this is normal, not an error — a milestone with no checks yet simply can't be applied automatically, and every draft for it must be reviewed and written by hand.
What to do: click "Propose acceptance checks" if you want a model to draft some sentences describing "done", which you then read and approve yourself.
"The last [n] requests for these checks did not work ([reason]), so Runesmith stopped asking for them by itself. It asks again when the project’s files or this milestone change, or when you ask." #
Where: on a milestone card under Goals & plan, below "No acceptance checks yet…". In Activity, the failed request itself ends with "(Failed request 1 of 2; Runesmith asks once more.)" the first time, and with "That was failed request 2 of 2 for these checks, so Runesmith stops asking for them by itself and builds other work until the project’s files or this milestone change." the second time.
What it means: Runesmith asks by itself for a milestone's checks (with the check autopilot on, ahead of building it). Twice in a row the Checker's answer could not be used, or no model answered. Rather than ask for ever and hold up every build, Runesmith stops asking for that milestone and builds other work. Nothing is wrong with your project.
What to do: nothing is needed. Runesmith asks again when the project's files or the milestone change, and after two hours at the latest. To ask now, press Propose acceptance checks: your own request always runs. If the reason names a model that is busy, at its limit or refusing its key, fix that under Thinking power → Who does what. If the Checker keeps giving answers that cannot be used, put a stronger model first in the Checker lane.
"Already passes on your project today, so it may not test what this milestone adds." #
Where: a small warning line under one check in a list of proposed or approved acceptance checks.
What it means: this particular check would already pass on your project exactly as it is now — often because the command it's testing doesn't exist yet, so any call to it simply fails the way the check expected. It may not really be testing what the milestone is meant to add.
What to do: no action is forced. You can still approve the checks (it's flagged, not blocked) — after the milestone is actually built, that same check starts testing the real thing. If you'd rather have a stronger check, discard the proposal and click "Ask for new checks".
"These checks already pass on your project as it is today. If this milestone is not built yet, they may not test what it adds. …Consider discarding them and asking again." #
Where: a warning banner above a whole proposed set of checks (not just one line), shown after Runesmith trial-runs the proposal on a throwaway copy of your project as it stands today.
What it means: the whole set of proposed checks, not just one, would already pass before the milestone is built — a stronger sign that they may be too weak to prove anything.
What to do: read the assumptions and "What exactly is checked" under each one. You can discard and ask again, or, if this keeps happening, put a stronger model first for the Checker role under Thinking power, or use "Propose smaller steps" on the milestone.
"These checks could not run on your project as it is today, so they may be broken. Consider discarding them and asking again." #
Where: the same warning banner, when the trial run couldn't execute the proposed checks at all (rather than passing or failing them).
What it means: something in the proposed check code doesn't run cleanly against your project — most often a mistake in what the model wrote, not in your project.
What to do: discard the proposal (with a reason, if you like) and ask again.
"Nothing in this milestone could be checked automatically: … Build it and read each draft yourself before writing it, or reword the milestone so what it makes can be checked by running a command." #
Where: a toast after "Propose acceptance checks", when two attempts in a row produced checks that, once cleaned up, checked nothing at all — usually because the milestone describes something (like an on-screen interaction) that can't be checked by running a command from outside a browser.
What it means: this particular milestone genuinely can't get automatic acceptance checks as things stand. Nothing is broken; it's an honest limit.
What to do: either build the milestone and read each draft yourself before writing it (checks aren't the only way to review work), or reword the milestone so its result can be checked by running a command (for example, naming a script or a page that a command-line tool can call). The model's own attempts are kept in the folder the message names, if you want to see what it tried.
"Both answers broke a rule of the examples format. First: … Then: … Both are kept in …" #
Where: a toast after "Propose acceptance checks", when a weak model's two attempts both failed to follow the required format for writing checks (rather than failing to check anything, as above).
What it means: this is a formatting problem with the model's answer, not a judgement about your milestone.
What to do: try again — often a different attempt succeeds — or give the Checker role a stronger model under Thinking power. The refused answers are kept at the path the message names, in case you want to look.
"Proposed by [model], approved by Runesmith’s check autopilot ([why]). Read them; you can replace them at any time." #
Where: under "✓ Your acceptance checks" on a milestone card, when the check autopilot approved the checks and you did not.
What it means: you switched the check autopilot on (Goals & plan → Build continuation), and these checks passed all its tests: they failed on your project as an unbuilt milestone should, Runesmith found nothing wrong in them, and a second, different model worked out the same expected values. They are in force, so builds of this milestone are judged by them, and (with automatic apply on) written when they pass. It is not the same as "approved by you": nobody has read them yet.
What to do: read the sentences, and open "What exactly is checked" under each. If they are right, nothing more. If one requires the wrong thing, take them back with "Withdraw these checks" (see below). Chapter 3 has the steps ("How to: take back approved checks").
"Runesmith’s check autopilot left these for you: [reason]" #
Where: on a milestone card, above the Use these checks and Discard buttons of a waiting proposal.
What it means: the autopilot is on, but it could not or would not decide, so the decision is yours, as it always was. The reason says why. The ones you may meet:
- "there is no second model to cross-check with (add another under Thinking power)": give the Checker lane (or the Planner lane) a second, different model that is not a chat window.
- "the checks were not tried on the project (checking drafts is off)": tick "Check drafts on a throwaway copy before they are written" under Build continuation.
- "only checks written as examples can be cross-checked", or "checks that call a function or read a document are not cross-examined yet": it cannot judge this kind of check.
- "you approved the checks now in force; only you replace them": the autopilot never replaces checks you approved yourself.
- "turned down 2 times already; these wait for you: …": it asked twice and the checks still failed a test; the findings follow. The findings you may read, in the autopilot's own words (the same ones are told to the next Checker when it turns checks down):
- "they already pass on the project as it is, so they may not test what the milestone adds", or "they could not run on the project as it is".
- "[check] runs the program on [file], which nothing creates": the check hands the program a file that no example makes, so it would fail a correct build.
- "[check] requires exact text its sentence does not say: …": a word or value the check needs but never tells you.
- "the checks leave out what the milestone's 'done when' names: …; check each of them": your Done when names an exact text (an attribute with its value, a call written with numbers, a phrase in quotes) that no check requires or forbids.
- "[command] writes [file], and its checks read what it prints; check the file instead": the command prints nothing, so a check on its printed output cannot pass.
- "[model] found a field written differently from the proven inputs and the milestone: …": the second model saw a value written in another place or under another name than the program reads it.
- "[check]: [question] The checks expect [value]; [model] worked out [other value].": the second model, shown the input but not the expected value, got a different one.
- "[model] says these contradict another milestone's checks: …": a claimed contradiction is always your call.
- "the cross-check got no answer (…)": the second model did not answer, so nothing more was asked. "…gave no clear judgement (…)": one more model was asked first, when there was one, and it was not clear either.
What to do: read the checks, and press Use these checks if they are right, or Discard (with a reason) to have new ones asked for. To read every proposal yourself from now on, untick the check autopilot under Build continuation.
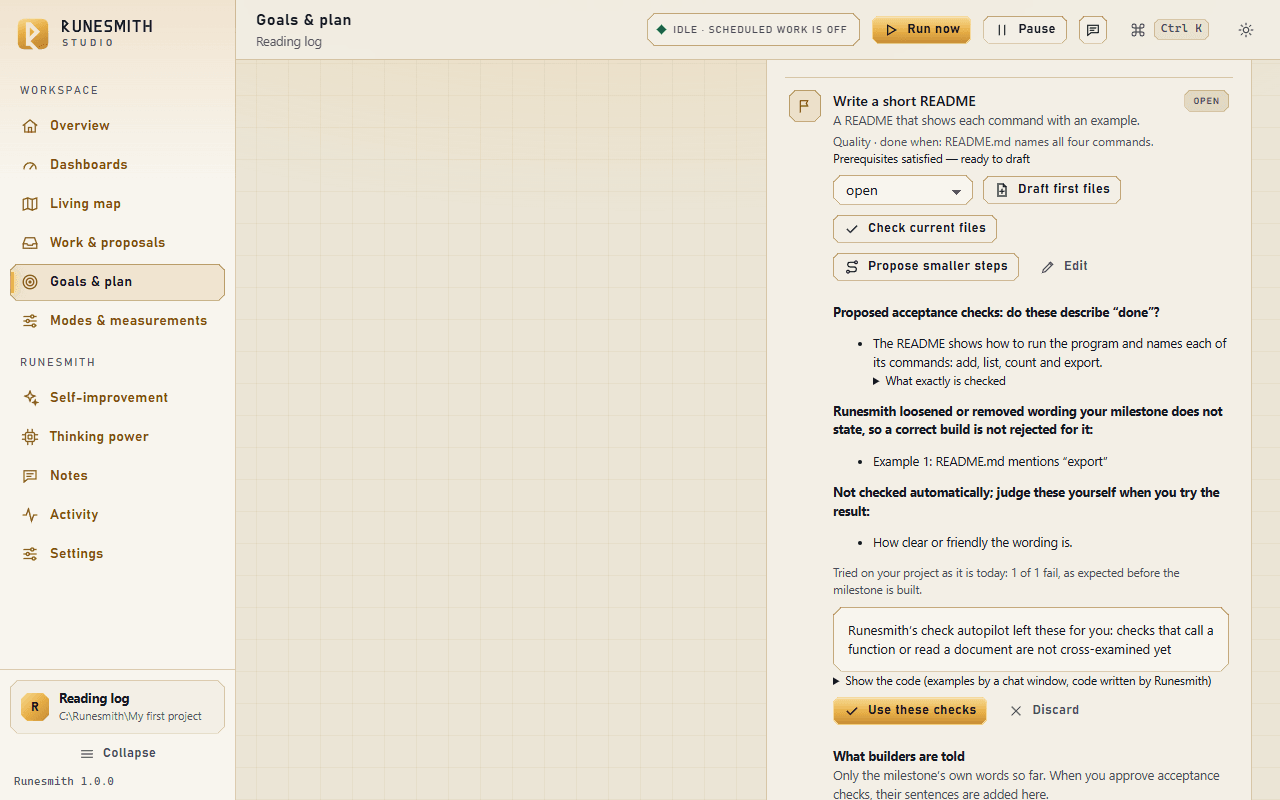
"Withdraw these checks?" and what follows #
Where: the box that opens when you press "Withdraw these checks" on a milestone with approved checks.
What it means: you are about to take approved checks back. They stop judging builds, their file is kept, builders stop seeing their sentences, and the next Checker is told your reason. Nothing is deleted.
What to do: type what is wrong with them in plain words and press Withdraw. If you press it with nothing typed, nothing is withdrawn: the box closes and a notice reads "Say what is wrong with the checks; it is kept with them." Press "Withdraw these checks" again. Afterwards the notice tells you what comes next: for an open milestone, "Checks withdrawn. Press “Propose acceptance checks” to have new ones written with your reason."; for a done or dropped milestone, "…set its status to open to have new checks written with your reason."
"Waiting for: [milestone] ([status]); …" and "Prerequisites satisfied — ready to draft" #
Where: on a milestone card under Goals & plan, under its title.
What it means: the first line names the milestones this one needs first (its "Needs first" list, or the smaller steps Runesmith proposed for it) that are not yet done or dropped. Until they are, its Draft first files button is greyed out and the schedule builds other milestones instead. The second line means nothing is left to wait for.
What to do: nothing, unless the wait is a mistake: press Edit on the milestone and change Needs first. If a prerequisite is not needed, drop it: a dropped prerequisite counts as settled, and the milestone's own checks still decide when it is done.
"Not saved: [reason]" (the milestone form) #
Where: a red notice after pressing Save in the form behind Milestone or Edit on Goals & plan. The form opens again with what you typed.
What it means: Runesmith refused the save and saved nothing. The reasons you may read:
- "[The title] has [n] characters; the most is 200. Shorten it: nothing was saved, and nothing is cut without telling you." The limits are 200 for the title, 1,500 for "What it should do" and 400 for "Done when"; the counters under the fields show them.
- "That would make “[milestone]” wait for itself through its prerequisites; nothing was saved." A loop in "Needs first" (A needs B and B needs A).
- "A milestone can need at most 12 others first."
What to do: shorten the text or change Needs first, and press Save again.
"Prioritized files that models cannot be shown: …" (in the Author context drawer) #
Where: a warning in the Author context drawer (Goals & plan → Plan card), naming each prioritized file and what to do.
What it means: you prioritized a file that models cannot be shown. The wordings, one per file:
- "[file] is gone or hidden: take it out of the list."
- "[file] is too large to draft, or has lines too long to show even in parts: split it, then take it out of the list." (A file over 400,000 bytes is too large to draft. A file over 40,000 bytes none of whose lines is short enough to quote, such as minified code, cannot be shown even in parts.)
- "[file] is not UTF-8 text: save it as UTF-8, or take it out of the list."
- "[file] does not fit the 48000-character budget with the other prioritized files: take one out."
What to do: do what the line says, then press Save future context again with a short reason. While a prioritized file is gone or hidden, no model is asked at all for builds, and no try is used up; the reason is named in every summary until you take the file out of the list. In those summaries in Activity it reads: "[file] is prioritized under Author context but is not a file models can be shown (gone, or hidden). Remove it from the prioritized files under Goals & plan, Author context. No model was asked, so this used up no try."
Proposed breakdown: "[milestone] · [model] · awaiting adoption" — the "Adopt prerequisites" button #
Where: near the bottom of Goals & plan, after Runesmith (on its own, or because you clicked "Propose smaller steps") suggests splitting a stuck milestone into smaller prerequisite steps.
What it means: the original milestone wasn't dropped — this is an offer to replace it with a short sequence of smaller steps that lead up to the same goal.
What to do: read the proposed steps. Click "Adopt prerequisites" to add them (your original goal is preserved), or click "Reconsider" to leave feedback on why it should be reconsidered, which the next attempt reads.
If you chose One more try, then break it down (Settings → Behaviour → "Running on its own"), Runesmith adopts a breakdown itself, once for each milestone, and you meet this card only when it could not adopt it ("…but could not adopt them (…); they wait for you") or when you asked for the breakdown yourself.
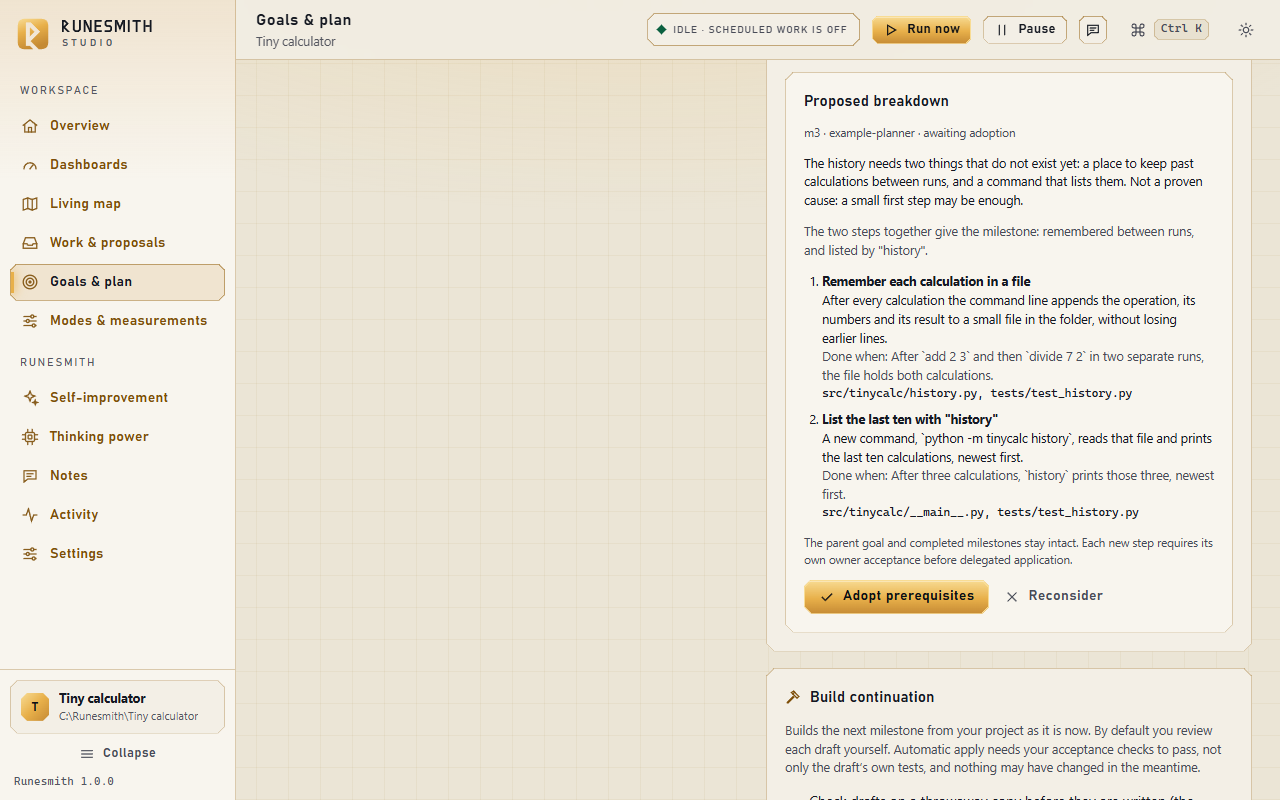
Thinking power #
These messages explain why a model didn't answer, wherever a model was asked something — proposing checks, drafting files, planning, correcting a draft. Wherever you meet one, the fix is on this page.
"…the model is busy or at its free limit right now: try again later, or put another model first under Thinking power" #
What it means: the model service turned the call away because it's over capacity or you've used up a free quota (daily or per-minute), not because anything is wrong with your project or your request.
What to do: wait and try again, or, on Thinking power → Who does what, add another model to the same role and use the up-arrow ("Move up") to try it first. If the role already lists more than one model, Runesmith normally moves on to the next one by itself on a plain refusal — see "Fall-through" in the glossary — so seeing this message with more than one model already listed usually means every one of them is out of capacity right now.
"…the model did not answer in time (a free service may be busy): try again later, or put another model first under Thinking power" #
What it means: the call was sent but nothing came back before Runesmith's own waiting limit. This is different from a clean refusal — Runesmith doesn't know whether the other side is still working on it, so it won't send the same request twice.
What to do: same as above — wait, or put a different model first. If it keeps happening for a saved answer that might still arrive, look for it under Work & proposals → Drafts (see "the answer has not arrived yet", below).
"…the model service refused the key or token: check it under Thinking power" / "The service refused the key ([401 or 403]). Check it, or paste it again, under Thinking power; a retry with the same key cannot help." #
What it means: the key or token you saved for this model was rejected outright. Runesmith won't keep retrying the same wrong key.
What to do: go to Thinking power, open that model's card, and paste the key again (check for stray spaces or an expired key), then "Save and test".
"Ollama is not running on this computer (nothing answers at [address]): open the Ollama app (it sits in the system tray) or run 'ollama serve', then try again." / "Nothing answers at [address]: the model server on this computer is not running. Start it (LM Studio: Developer, Start Server; llama.cpp: llama-server), then try again." #
What it means: you've told Runesmith to use a model on your own computer, but nothing is listening at the address it tried. Ollama gets its own wording, naming the Ollama app and the ollama serve command; any other local server (LM Studio, llama.cpp, or another OpenAI-compatible server on your machine) gets the second wording instead, which names how to start LM Studio or llama.cpp specifically.
What to do: start the local server the message names, then try again — no need to re-save anything.
"The model '[name]' is not downloaded yet: run '[pull command]' (or choose one that is), then try again." #
What it means: your local server is running, but it doesn't have that particular model.
What to do: run the download command the message gives you (for Ollama, ollama pull [name]), or pick a model your server already has from "List models".
"The provider refused the key." / "Could not list models (the provider may not support it, or it is not running)." #
Where: a toast after clicking "List models" on a model's setup card.
What it means: the first is a bad key, exactly as above. The second is more general — either the address is wrong, the server isn't running, or that provider simply doesn't offer a list of models to browse.
What to do: for a refused key, fix it as above. Otherwise, check the address is right and the server (local or remote) is reachable; you can still type a model's exact name by hand instead of picking from a list.
"The late answer has not arrived yet; Runesmith waits for it and does not ask twice." / "A late answer is still expected, so building waits for it and asks no model meanwhile." #
Where: the live log. The first wording appears when a scheduled round actively checks on a specific outstanding call and finds it is still being worked on remotely. The second appears when a round finds a call left outstanding by an earlier round but isn't yet at the point of re-checking that one — either way, it starts nothing new, and asks no model, until the wait is resolved one way or the other.
What it means: exactly what it says — this is not a failure, just a status. Runesmith deliberately avoids sending, and potentially paying for, the same request twice while it waits.
What to do: nothing, unless you'd rather stop waiting — see "An answer for … could not be used", under Work & proposals, if the same call later comes back refused.
"The late answer never came: the model’s job failed, so this try ended without an answer." #
Where: the live log, after a scheduled round checks on an outstanding call and finds that the remote job itself failed, rather than still being in progress.
What it means: the wait wasn't for nothing — Runesmith checked, and found the remote side had failed the job. This try is over and is recorded as a normal failed try; the next round tries again under the usual limits (see "Three tries", above).
What to do: nothing forced. If a model keeps failing this way, treat it like any other refusal — see the "Thinking power" messages above for what the underlying reason means.
"A request is waiting for your chat window: copy it into the chat you use, then paste the reply back here. Runesmith cannot send it on its own, even on a schedule." #
Where: the Overview hero, whenever a chat-window model is one of your roles and has a request ready to relay, with the button "Open the chat relay".
What it means: a chat-window "model" needs a person to carry each message by hand — this is expected, not a fault, and it's why the schedule can't finish this particular step by itself.
What to do: click "Open the chat relay" (or the "Needs you" pill in the top bar, from any page), copy the request, paste it into your chat window, then paste the reply back and click "Send the answer". Chapter 1 walks through this in full.
Activity #
Restart recovery #
Where: a card headed "Restart recovery" with the badge "Held · nothing replayed", shown on Activity whenever the Overview points you here after a restart.
What it means: this panel is a review step, not a repair step. Nothing is fixed or discarded by opening it — the queue stays paused until you say so, on purpose, so a request that was waiting for your chat window or a candidate that was mid-check isn't silently retried or silently dropped.
What to do:
- Read the plain summary at the top (for example, "Runesmith was restarted while drafting files, waiting for your chat window. Nothing was repeated or sent twice.").
- If you want more detail, the smaller print below names each waiting job.
- Tick "I have reviewed the saved outcomes and the waiting intentions."
- Choose "Keep waiting jobs · stay paused" to keep them for later, or "Set aside waiting jobs · stay paused" to drop them (a receipt is kept either way). The queue stays paused after either choice.
- Click "Resume queue" (the same pause/resume button used elsewhere on Activity) when you're ready to let work continue.
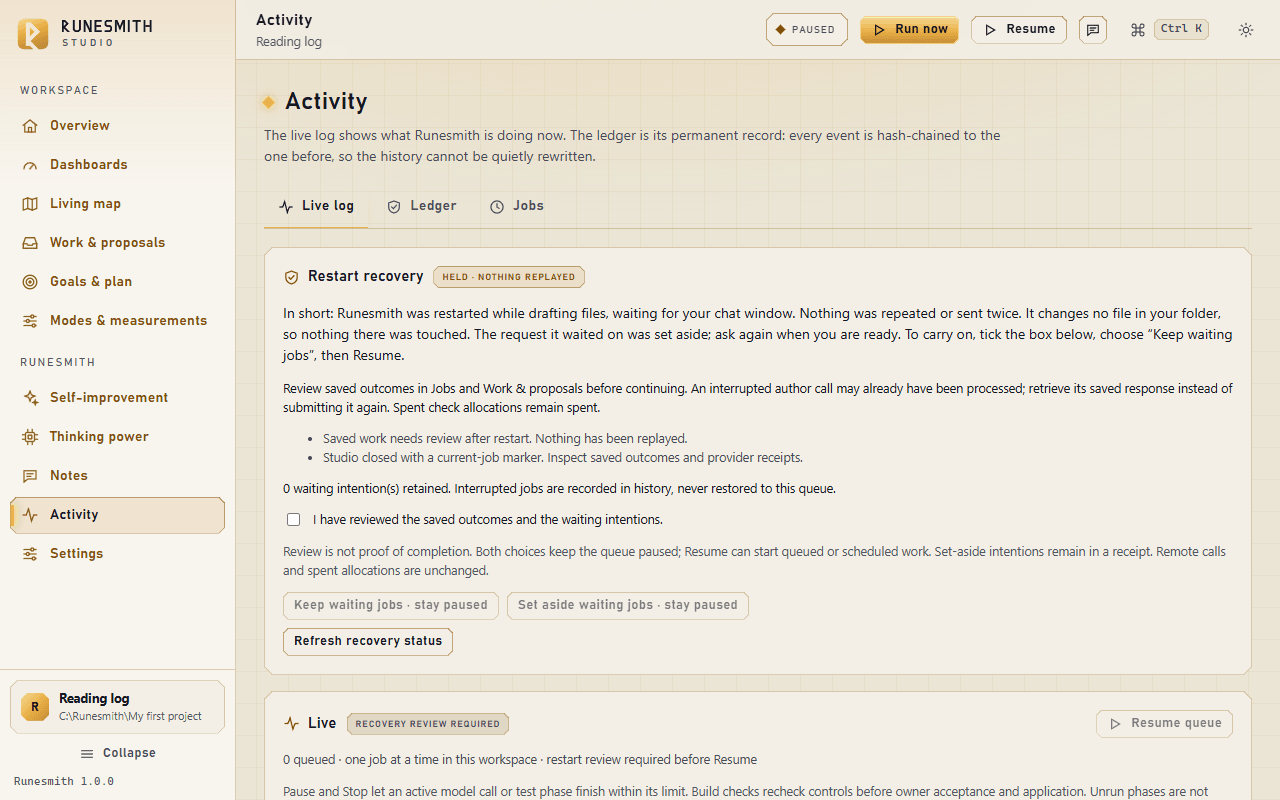
"Paused; queued work is held until Resume." / "Pause queue" and "Resume queue" #
Where: the top of Activity's job list, and a status line.
What it means: this is the same pause the "Work on a schedule" switch and every manual "Run now" respects. While paused, nothing new starts — the current step, if one was already running, finishes on its own.
What to do: click "Resume queue" to let queued and scheduled work continue. If a restart recovery is still open, resuming is blocked until you've completed that review (above).
Self-improvement #
These are not error messages — Self-improvement changes nothing about your own project, and nothing here can go wrong for your files. They're included because they can look alarming the first time you see them.
"Runesmith was updated, so the active organs were re-checked and re-qualified under the new kernel (same bytes): [old id] → [new id]." #
What it means: after an update to Runesmith itself, it re-verifies that the repair organ you had active still behaves the same way under the new version, and records that as a fresh, re-qualified entry — the underlying code (the "bytes") hasn't changed.
What to do: nothing. This is informational.
"Stop this trial?" #
Where: the confirmation after clicking "Stop this trial" on an open online trial.
What it means: an online trial compares a candidate generation against the one currently active ("incumbent") on your real repair work. Stopping it keeps the incumbent active, drops the candidate, and records the trial as closed by your choice — the counts collected so far are kept for the record, not discarded.
What to do: click "Stop the trial" to confirm, or Cancel to let the trial keep running.
"Make [generation] active?" #
Where: the confirmation after clicking "Make active" next to any generation that isn't currently active.
What it means: this is your own explicit choice to switch which version of the repair organ is active, skipping the usual online trial. It's how you roll back to an earlier generation. If a trial is open, it's closed by this action.
What to do: click "Make active" to confirm. This is recorded in the ledger as your own choice.
"No campaign yet. One starts when Runesmith has at least [N] eligible stored attempts and enough new ones since the last campaign, and only while no trial is open." #
Where: the "Kaizen campaigns" card, whenever no campaign has run yet — shown whether self-improvement is currently on or off (a small "on"/"off" badge next to the card's own Settings button shows which).
What it means: Kaizen only rewrites Runesmith's own repair organ once it has enough real, stored evidence to learn from — and never while an online trial is already comparing two generations.
What to do: nothing forced. Keep using Runesmith normally (with "Let Runesmith improve itself" on, under Settings); a campaign starts on its own once there's enough experience.
Glossary #
Milestone. One step of your plan, with its own "done" description. Goals & plan breaks your whole plan into milestones you build one at a time.
Plan. The full list of milestones for what you're building, shown on Goals & plan. A plan can be redrafted; finished milestones are always kept.
Draft. Files a model has written for a milestone. A draft lives under Work & proposals → Drafts until you write it into your real folder; it is not written, and not necessarily checked, just because it exists.
Acceptance checks. The plain sentences (and the check code behind them) that decide when a milestone is really done. You read and approve them yourself (or, if you switch on the check autopilot, Runesmith approves them for you); whoever builds the milestone is told their sentences and what exactly each one checks, never the code.
Check autopilot. An owner setting, off by default (Goals & plan → Build continuation), with which Runesmith approves a milestone's proposed acceptance checks itself so that a project running without you does not wait. It approves them only when they pass every test: tried on a copy of your project, nothing wrong in Runesmith's own reading, and a second, different model works out the same expected values. Otherwise it turns them down with the reason, asks again (twice at most), then leaves them for you. Its approvals read "approved by Runesmith's check autopilot", never "approved by you". It is a convenience, not a guarantee.
Withdraw (checks). Taking a milestone's approved checks back, with a reason you type. They stop judging builds, their file is kept, builders stop seeing their sentences, and the next Checker reads your reason.
Needs first (prerequisite). The other milestones a milestone waits for. Set in the Milestone form; the card reads "Waiting for: …" until each is done or dropped. It changes the order only.
Author context. The drawer on the Plan card that shows which of your files models are shown when they build, and lets you prioritize up to 12 of them.
Prioritized file. A file you listed under Author context so that models are shown it first. A prioritized file may be shown whole up to 40,000 bytes.
Shown in parts. How a file too large to show whole is given to a model: an outline of its declarations, then the exact lines the step is about. A model may change such a file only with exact edits that quote lines it was shown.
Running on its own. The Settings card with three choices (after an interrupted job, when a milestone's tries are used up, when a draft's checks did not finish) that let Runesmith decide, in your place, what you would otherwise decide. All three start on "Wait for me".
Decided by your settings. The Overview card that lists what Runesmith decided because a "Running on its own" choice allowed it, each marked "Runesmith (your setting)". The same words are kept in the ledger under Activity.
Full speed. The Settings switch (Rhythm card, off by default) that starts the next scheduled step as soon as one ends while models answer, instead of waiting out "How often". When no model answers it waits 1, 2, 4 … minutes, never longer than "How often".
Grant (allowed files). The folders named under "Allowed files or folders, comma separated" on Goals & plan → Build continuation. Automatic apply can only write inside a grant — type a folder name, several separated by commas, or "." for the whole project; with nothing named, nothing can be written automatically.
Round. One pass of "map, find work, work, report" — Runesmith maps your folder, looks for something to do, does it, and reports the outcome. You start one yourself with "Find work now" (Work & proposals); "Work on a schedule" starts one automatically, on the interval you choose. (Modes & measurements has its own "Run now" button per mode, but that runs just the one mode, not a full round.)
Schedule. The "Work on a schedule" switch (Settings, or the Overview's "How Runesmith may work here" card). With it on, Runesmith runs a round by itself every so often while the Studio window is open (sooner, step after step, with "Full speed" on); with it off, nothing starts without your click.
Trial. On Self-improvement, an online comparison between a newly frozen candidate generation and the one currently active ("incumbent"), run on your own real repair work as it happens. The candidate only ever becomes active by clearly winning the trial, or by your own separate "Make active" choice.
Generation. One version of Runesmith's own repair organ — the part of Runesmith that repairs failing code. Self-improvement lists every generation it knows about, which one is active, and lets you roll back to an earlier one with "Make active".
Kaizen / self-improvement. The process, governed by the "Let Runesmith improve itself" switch, by which Runesmith proposes a new generation of its own repair organ from its own stored experience of past repairs — then always puts that candidate on trial before it can ever become active.
Planner. The model role that drafts your plan and each milestone's first files.
Checker. The model role that proposes a milestone's acceptance checks — the sentences describing "done".
Worker. The model role that repairs failing code, and does the code-level work inside a Build.
Improver. The model role used for Kaizen self-improvement campaigns, proposing changes to Runesmith's own repair organ.
Fall-through. What happens when a model refuses a call, or answers busy or refused before generating anything: Runesmith automatically tries the next model listed for that role, in the order shown on Thinking power ("first = preferred, then fallbacks"). A call that has already been accepted and is running is never retried elsewhere, so a slow or lost answer is never asked for, or paid for, twice.
The chat relay. The way Runesmith works with a model that has no key and no server of its own — a chat window you already use (ChatGPT, Claude, Gemini, or similar). Runesmith prepares each request; you copy it into your chat window by hand and paste the reply back. Nothing is ever sent on your behalf.